The FlipDotCommunicator is a device for social distancingdistant socializing.
In these times of high paced, direct digital communication, it is a reminder of the physical and the momentariness. It is a tool to embrace non-explicit communication.
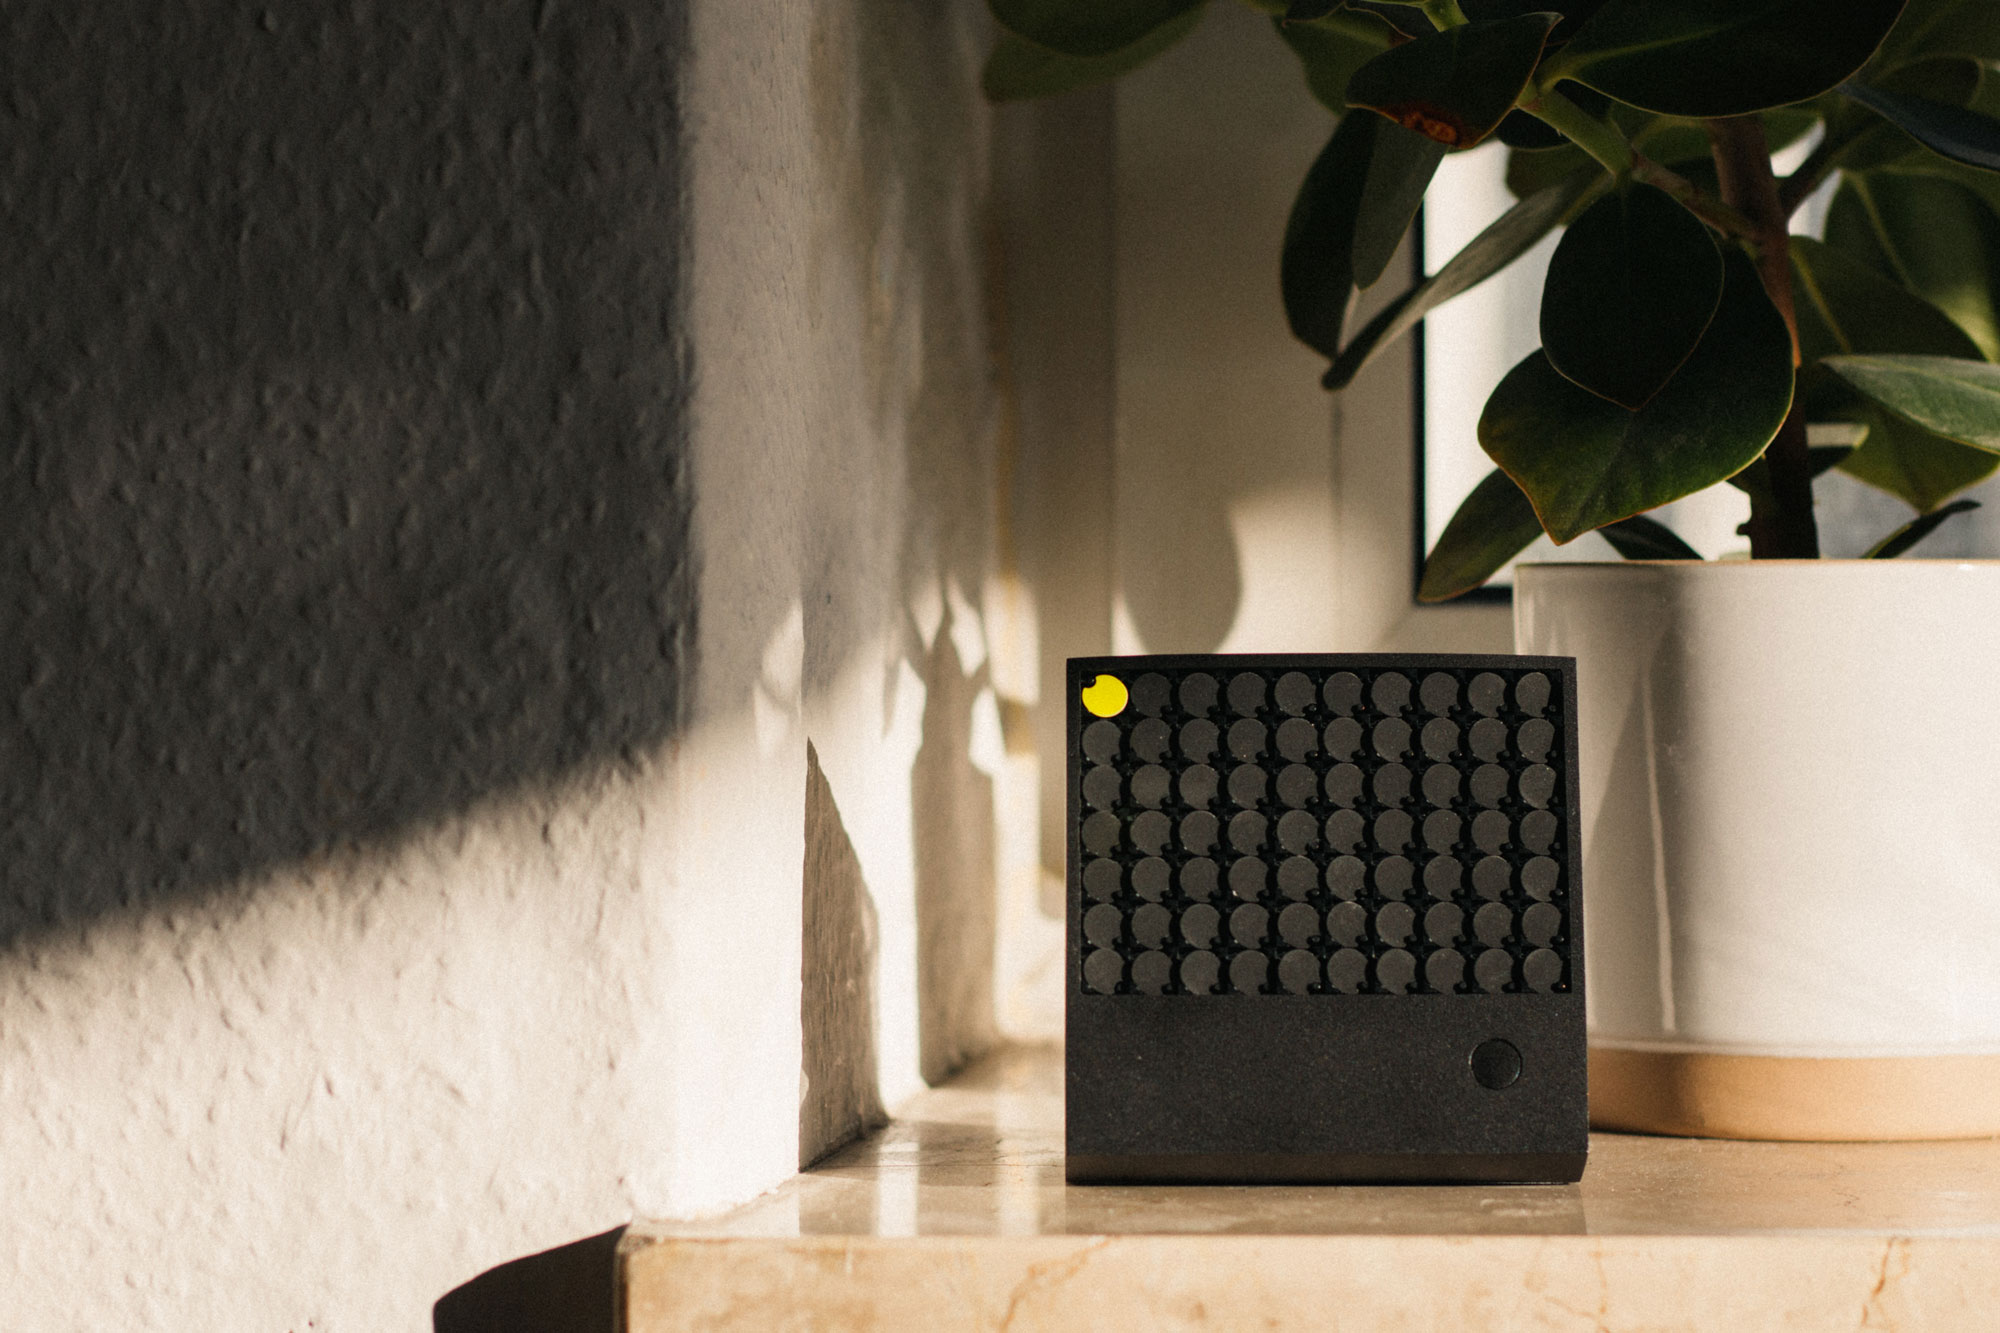
With its soft and erratic flipping sounds, it should bring a little bit of humanness back to our living space. Every message that is received is deleted immediately from the server. When pressing the button, the content is displayed. Once the button is pressed again, the transmission is gone forever. It can stay forever, but thereby it hinders new messages from being received.
It exists in this moment and this moment only—one message at a time. It forces the user to acknowledge the evanescence of a moment, pushing to cherish them more again.
Website
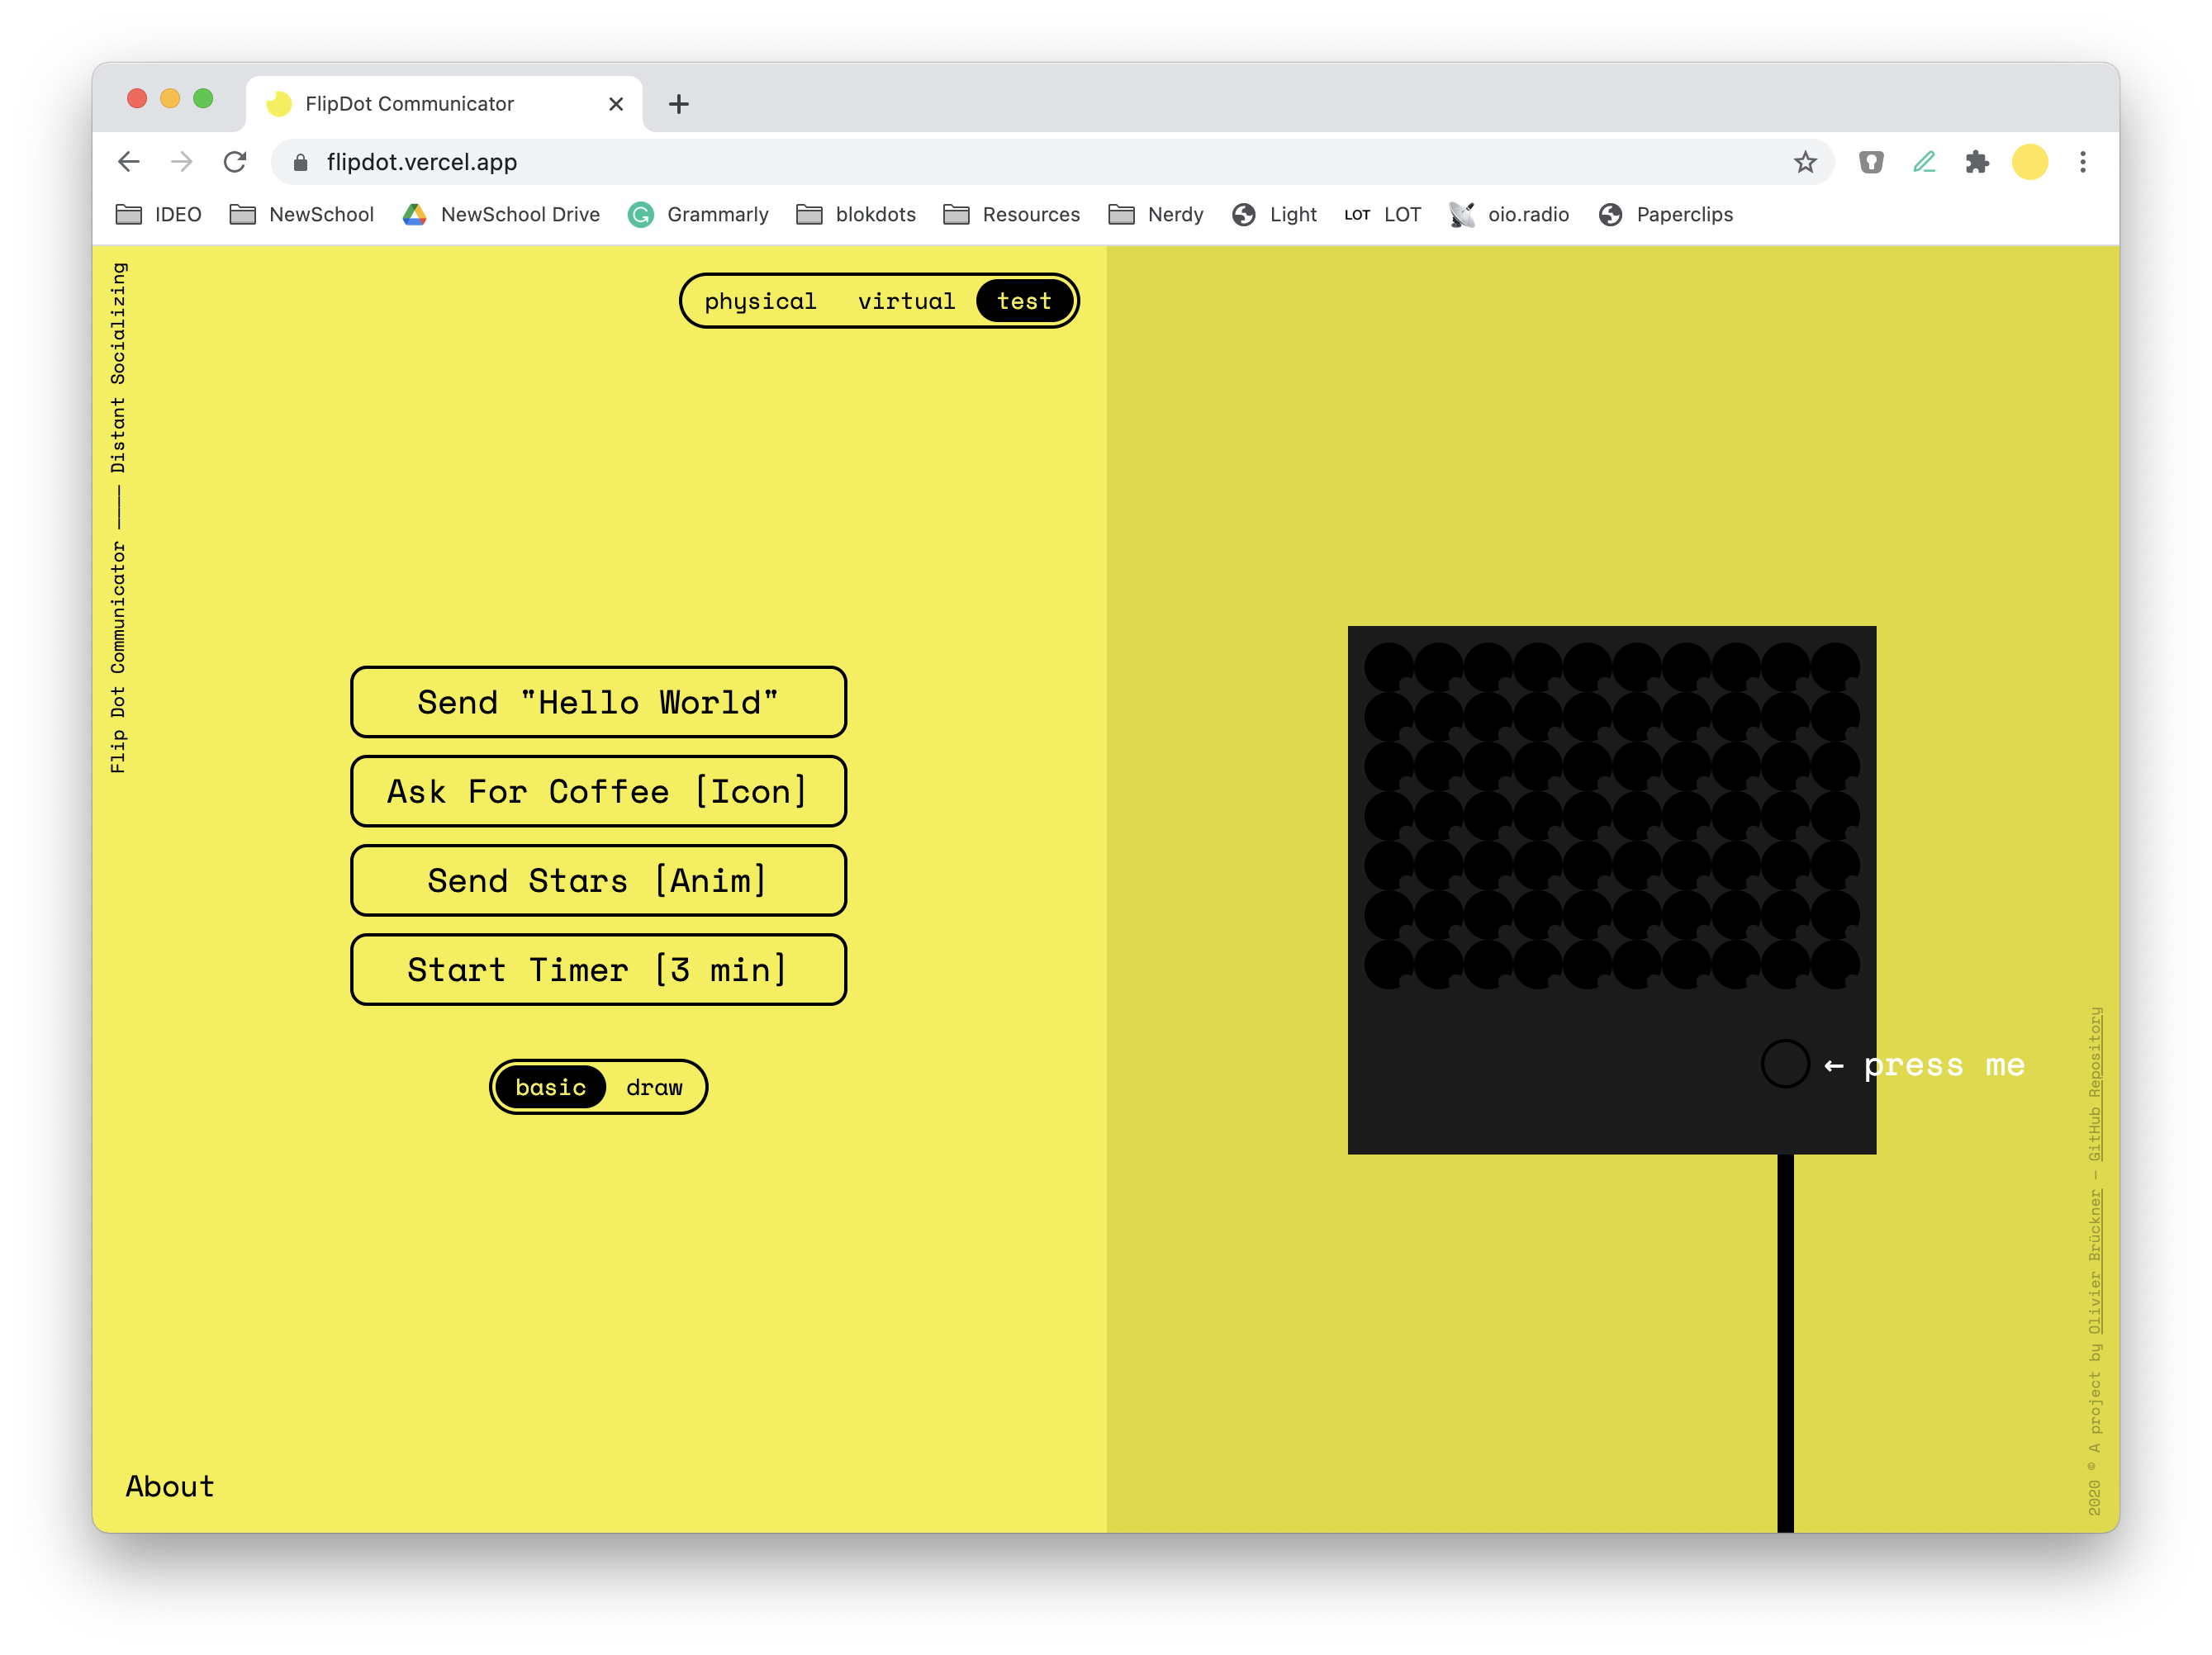
The final interactive piece is the Website. It acts as the virtual prototype of the device, but more importantly, as the interface for it as well.
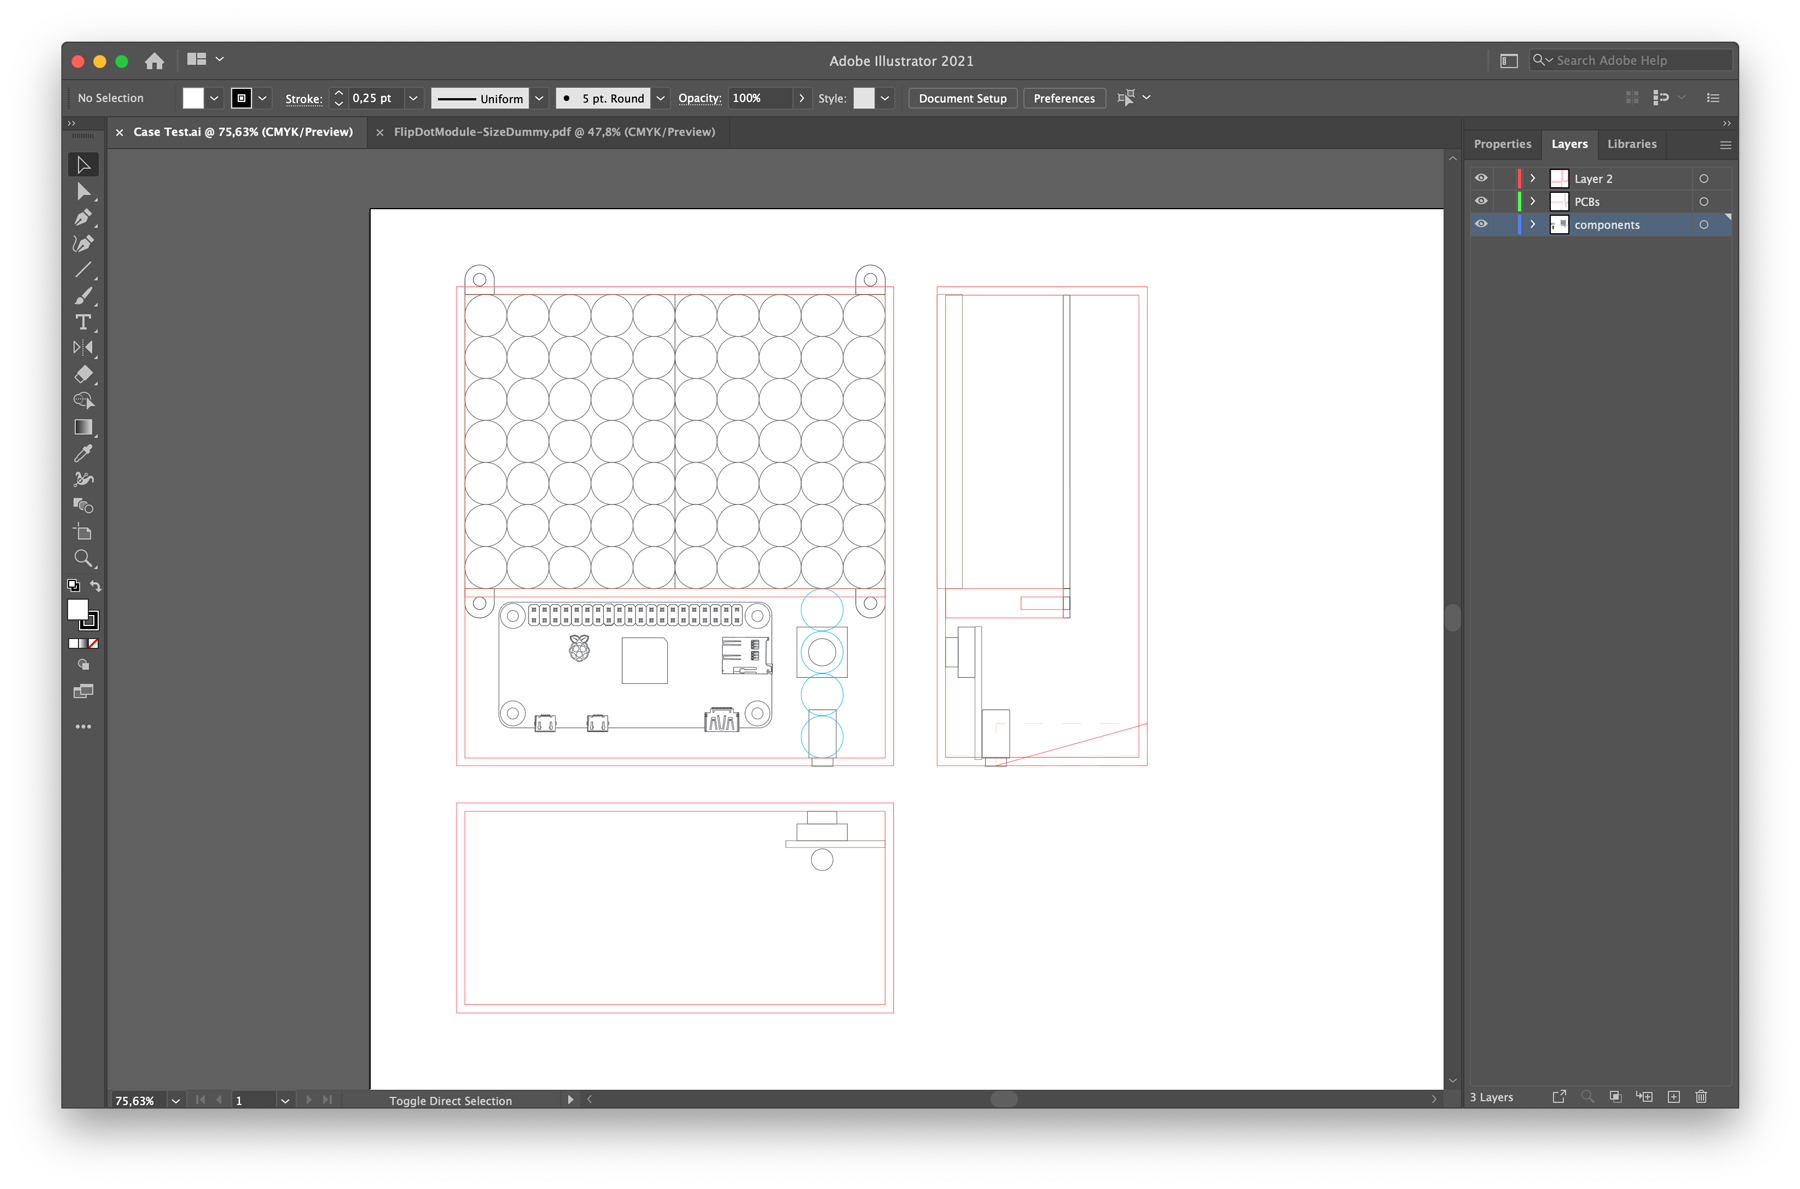
Being an industrial designer, I wanted to create some technical drawings to give better understanding to the physical form. It is not a full fletched out drawing, thus I see this more as an artistic visualization instead of a building plan.
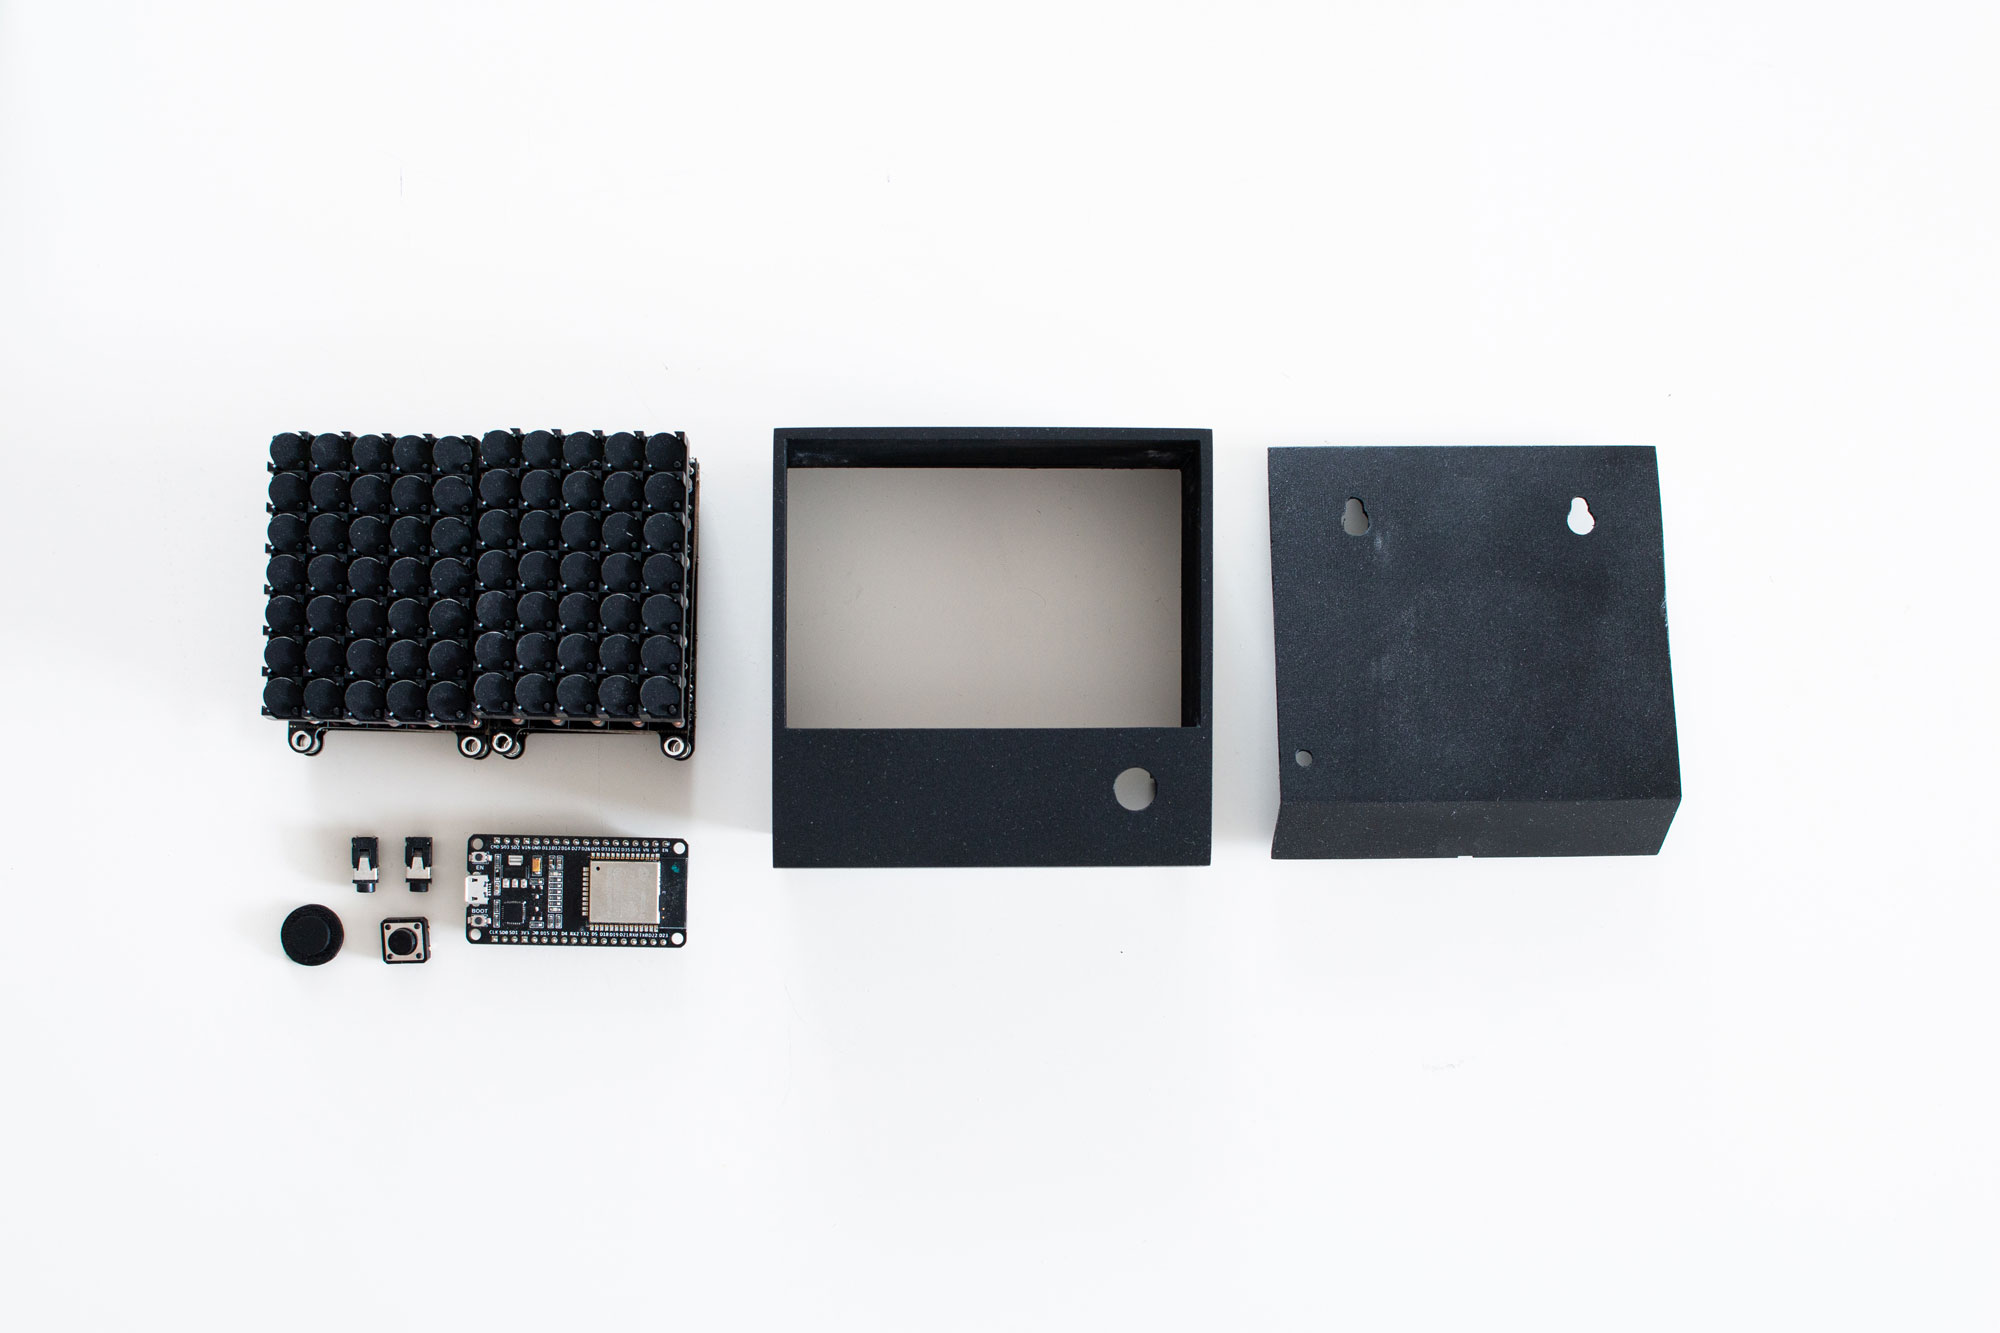
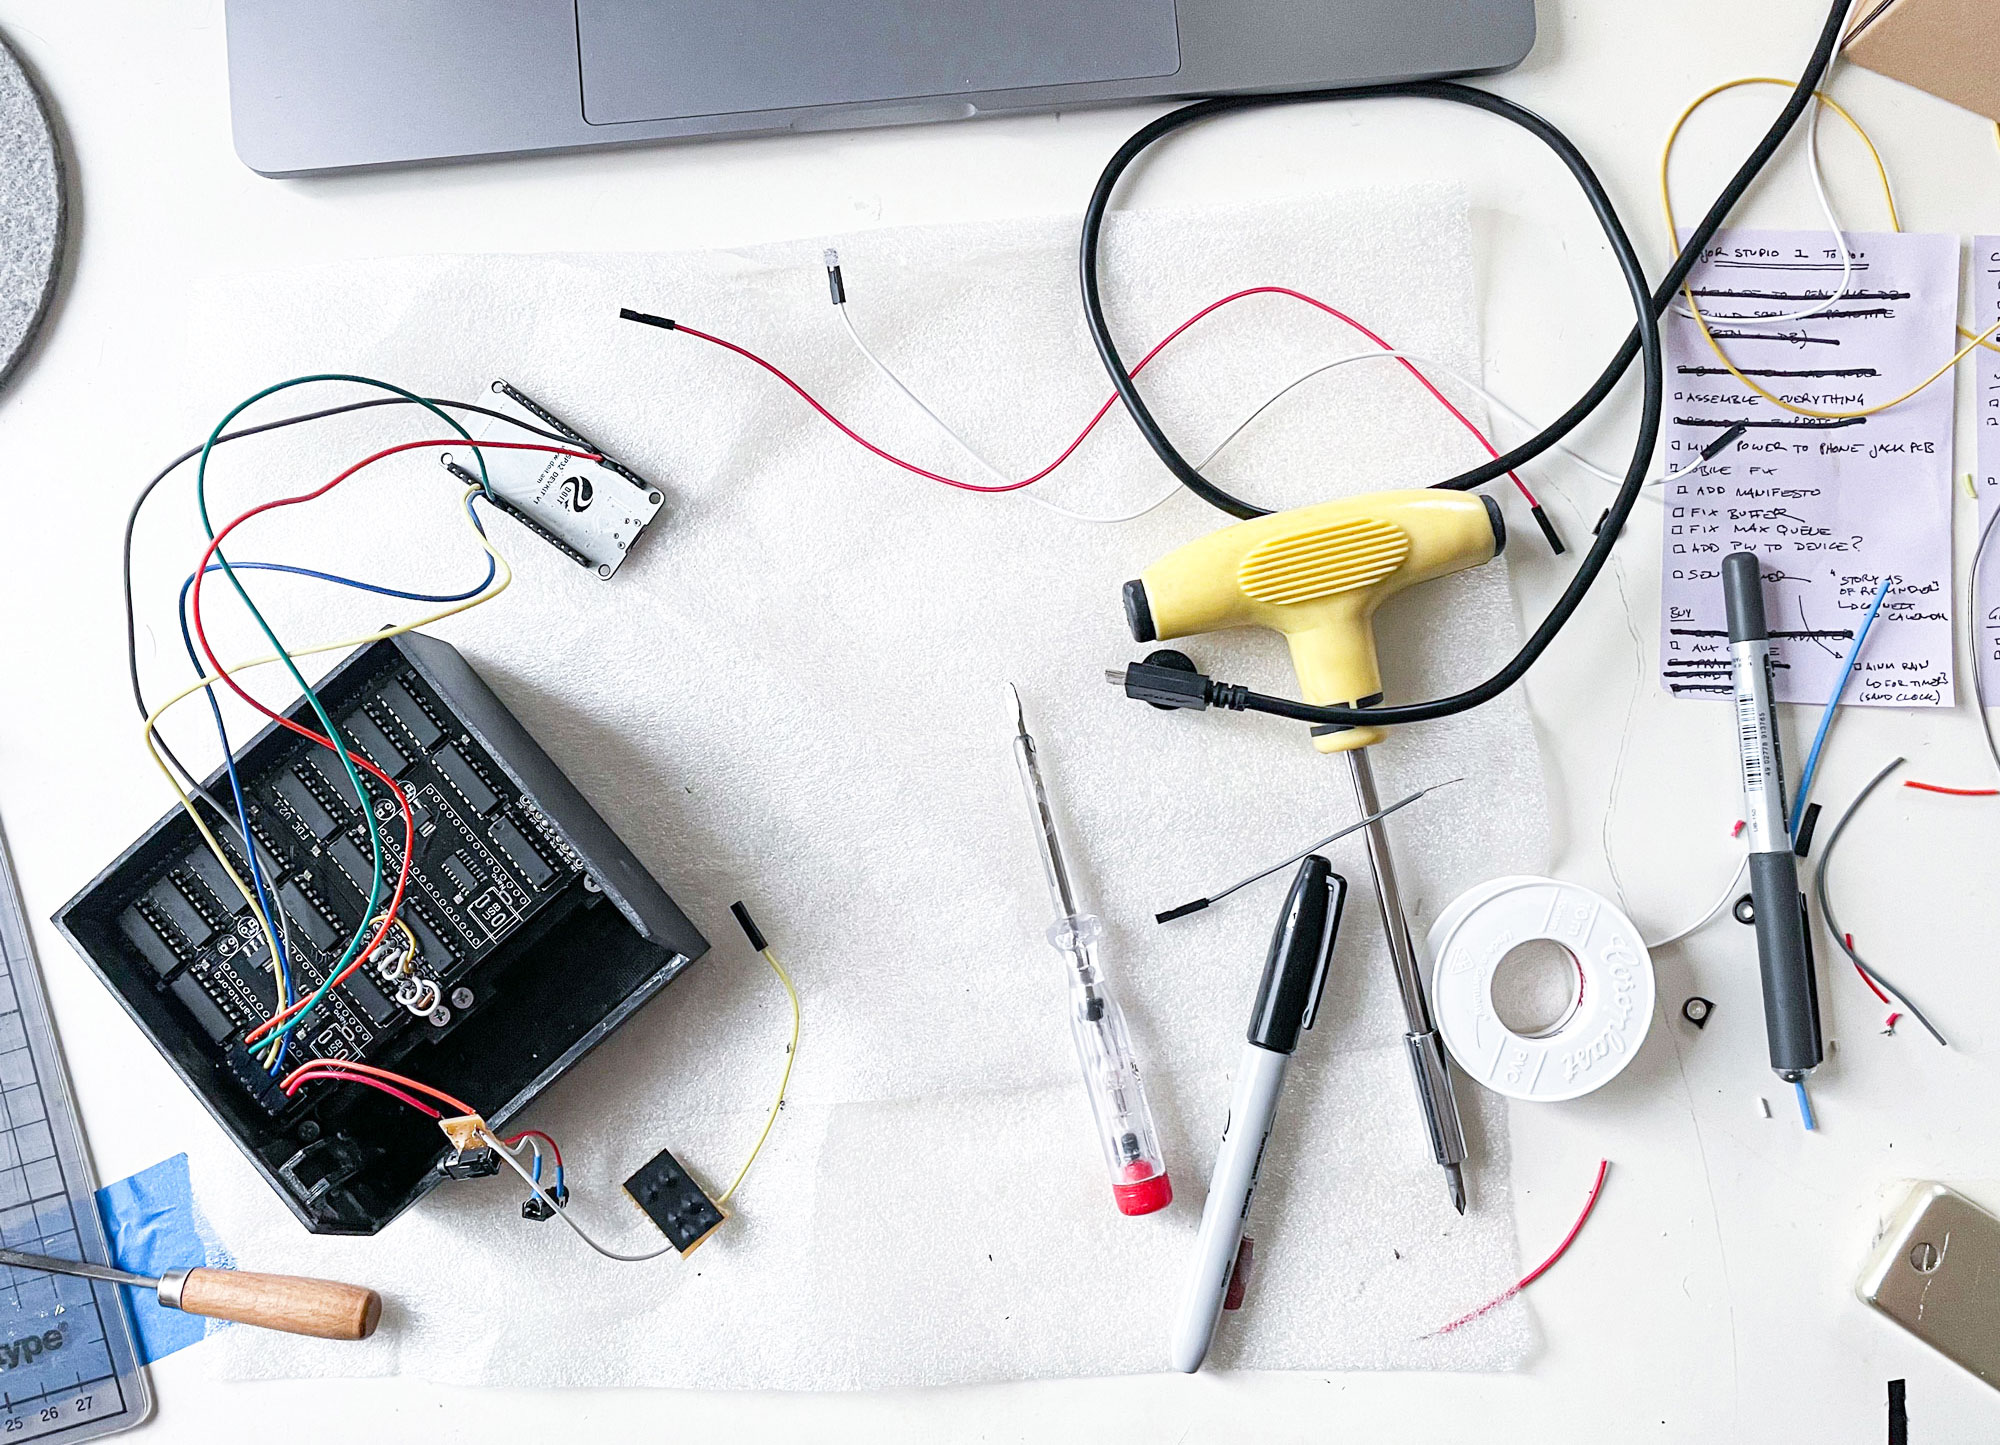
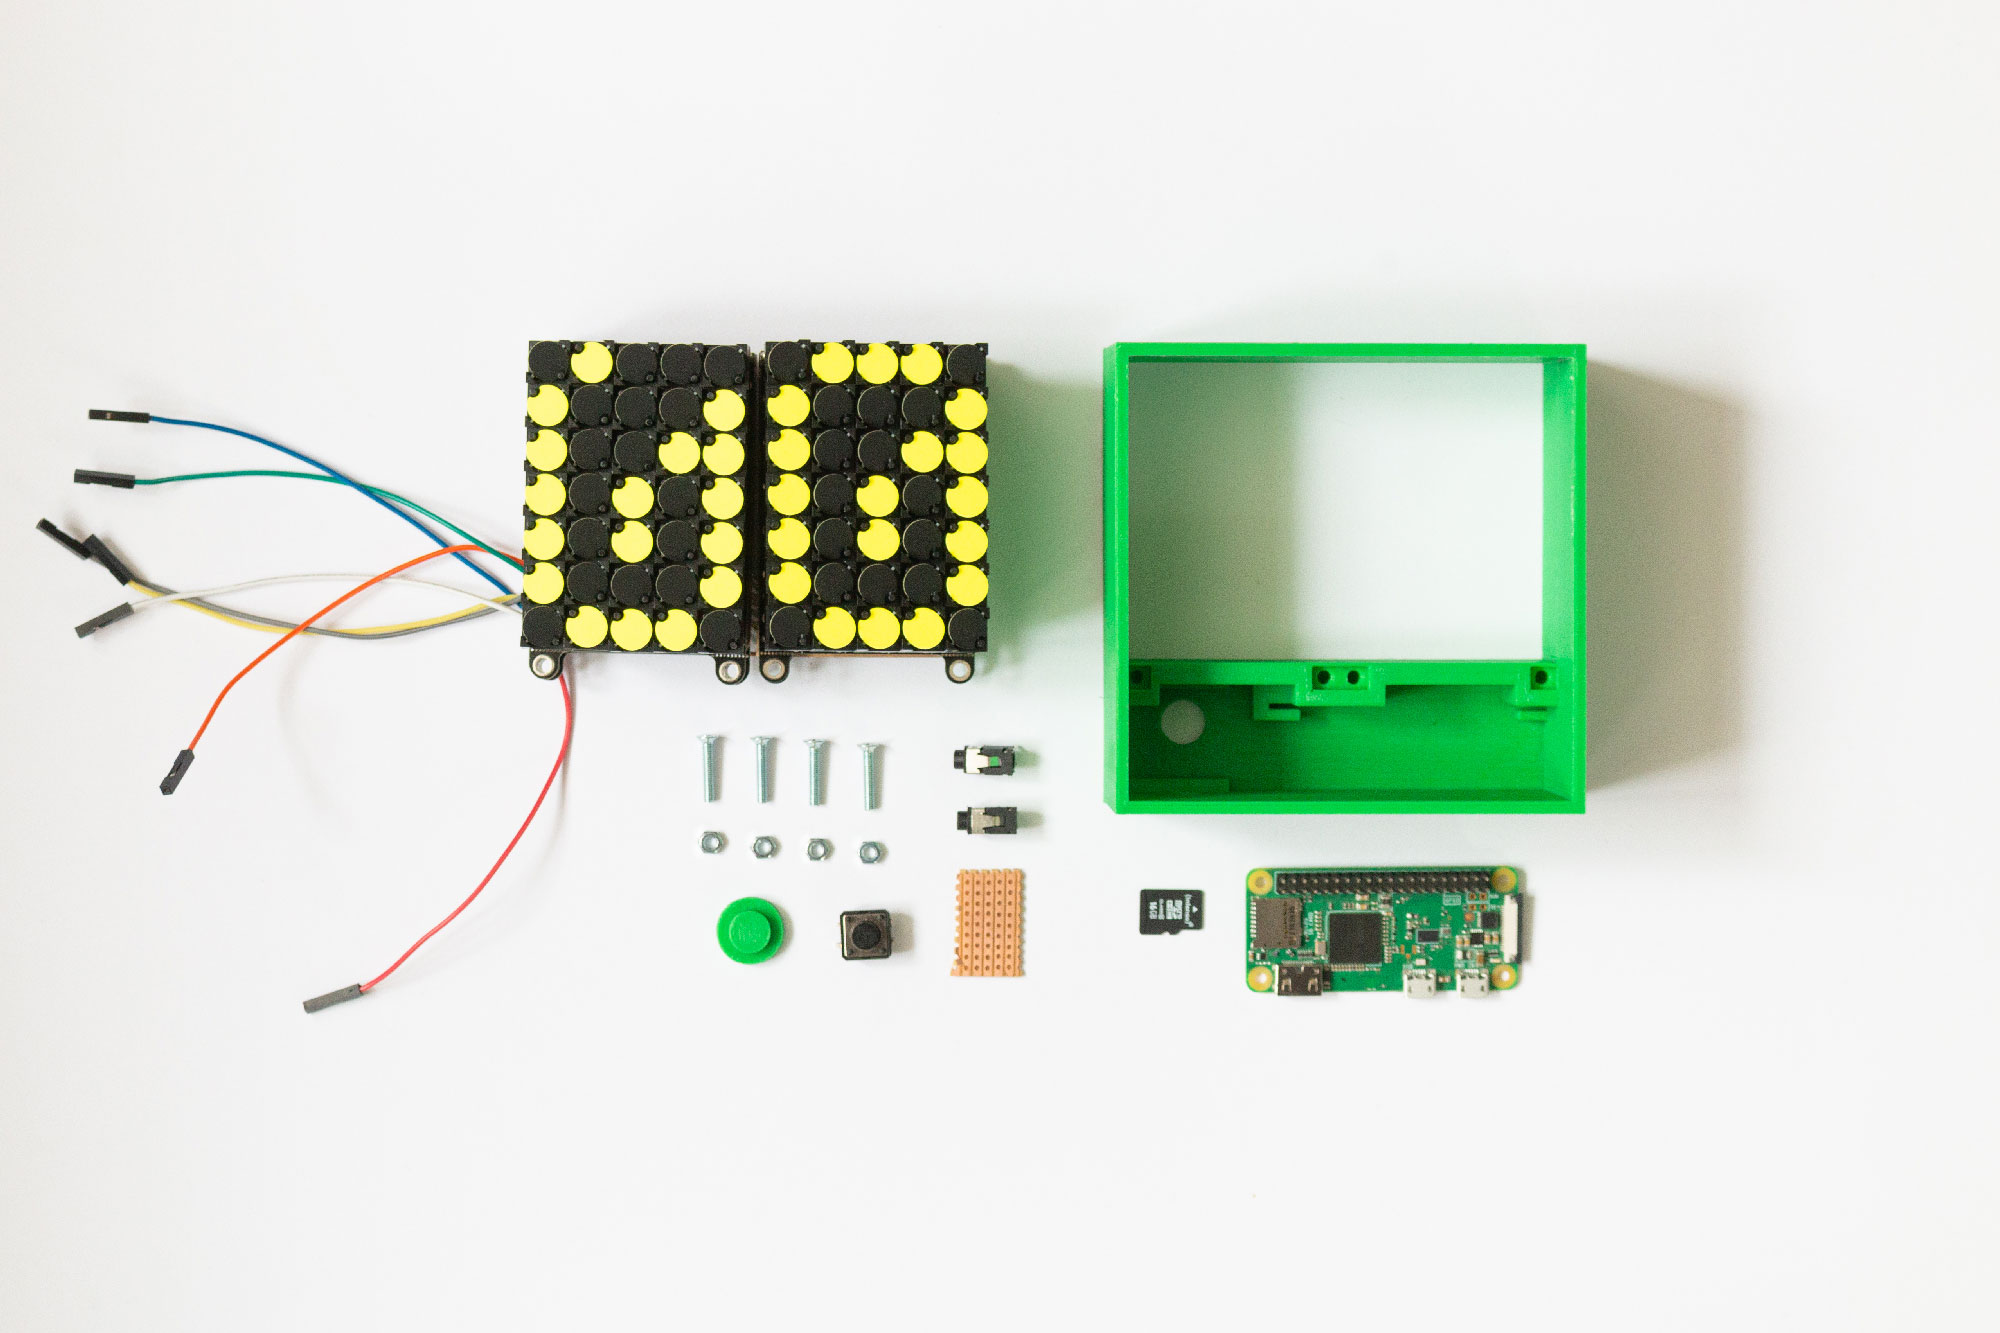
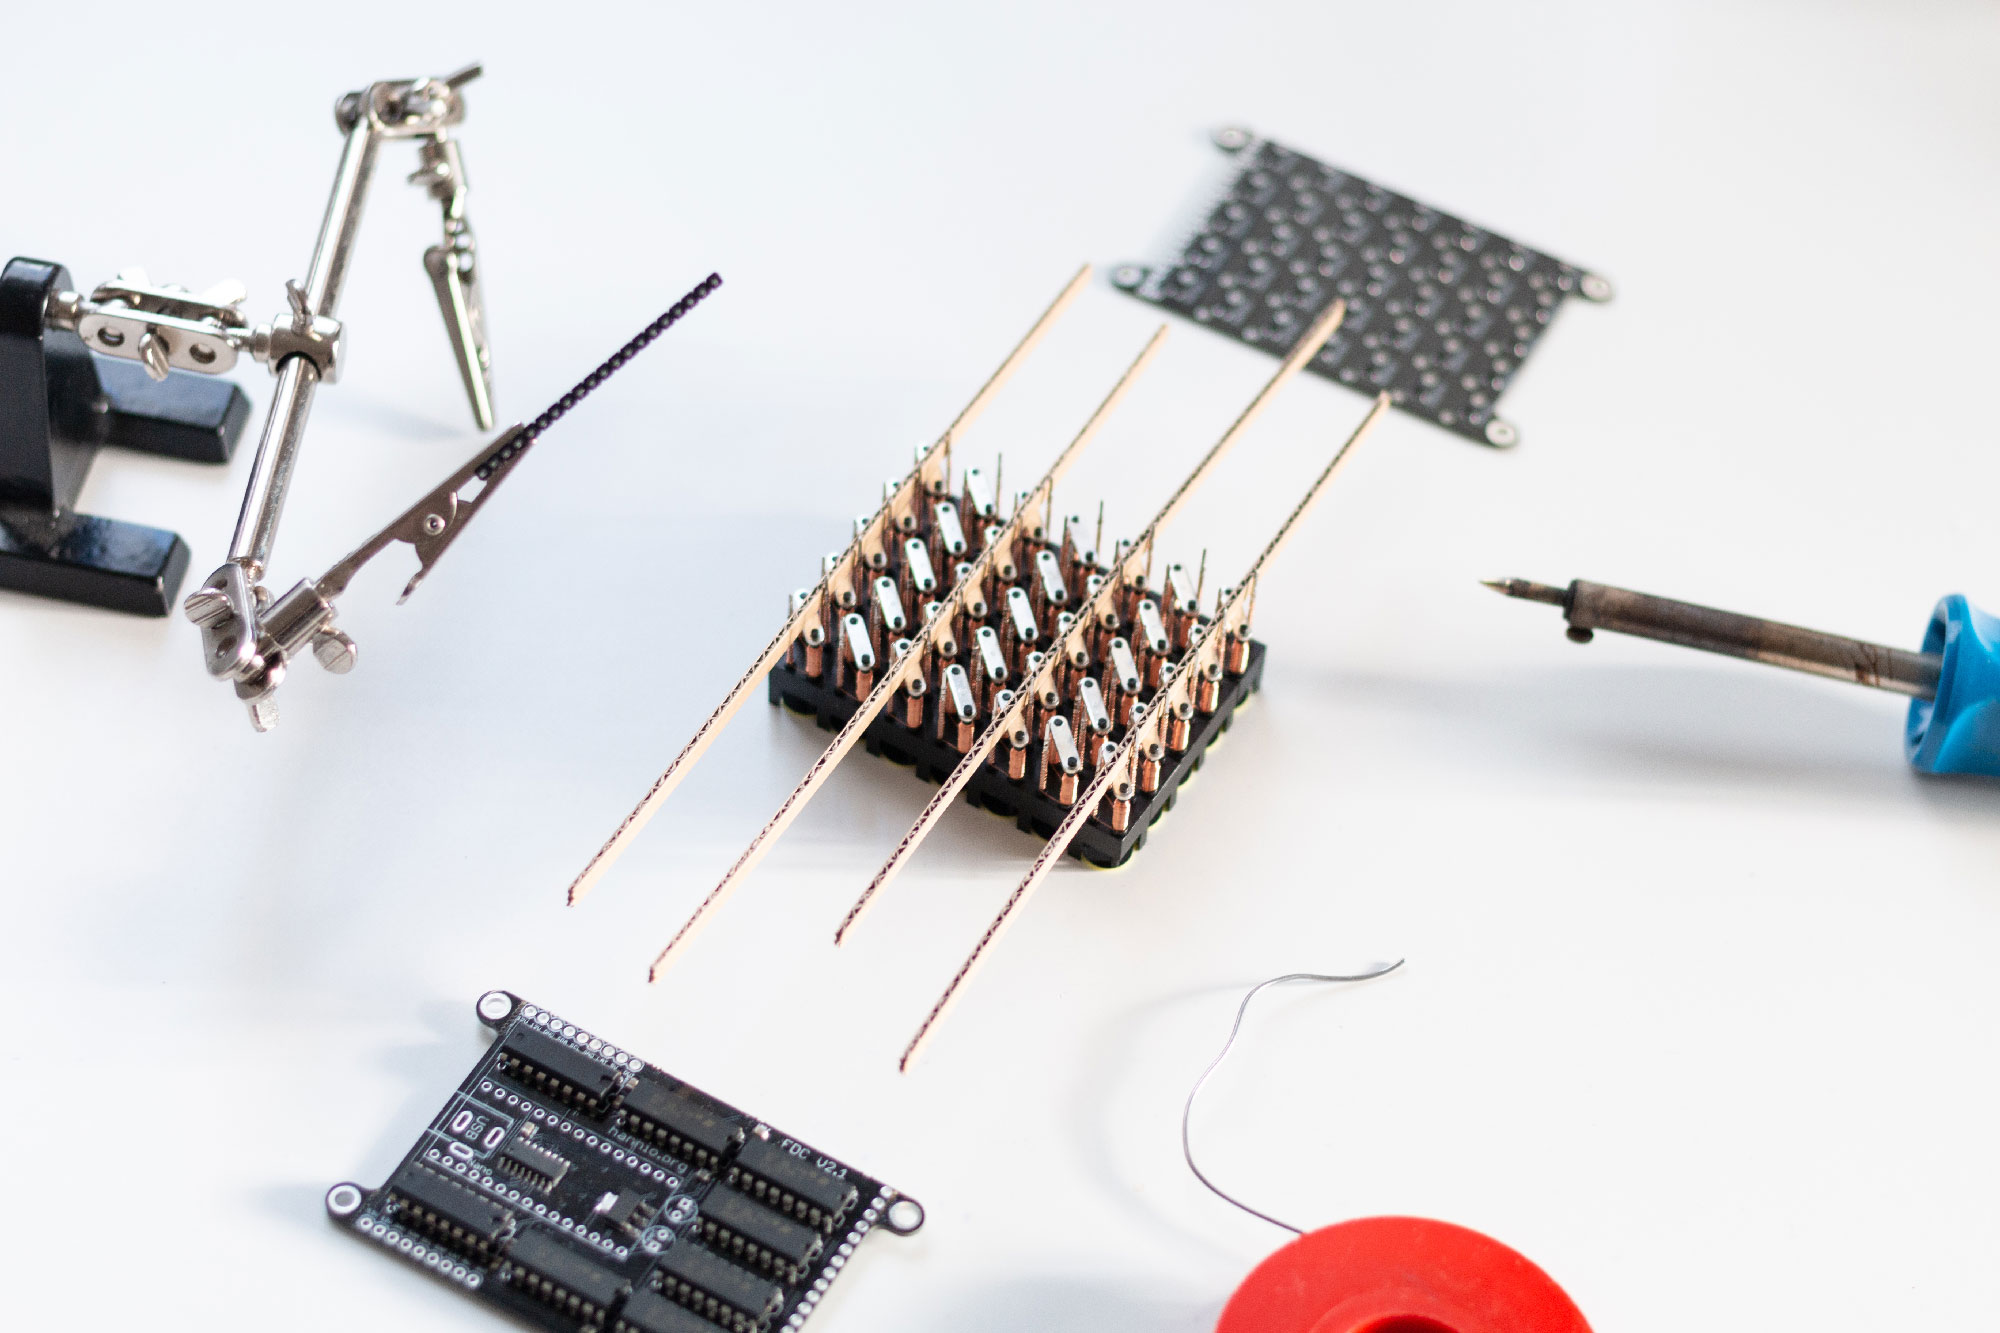
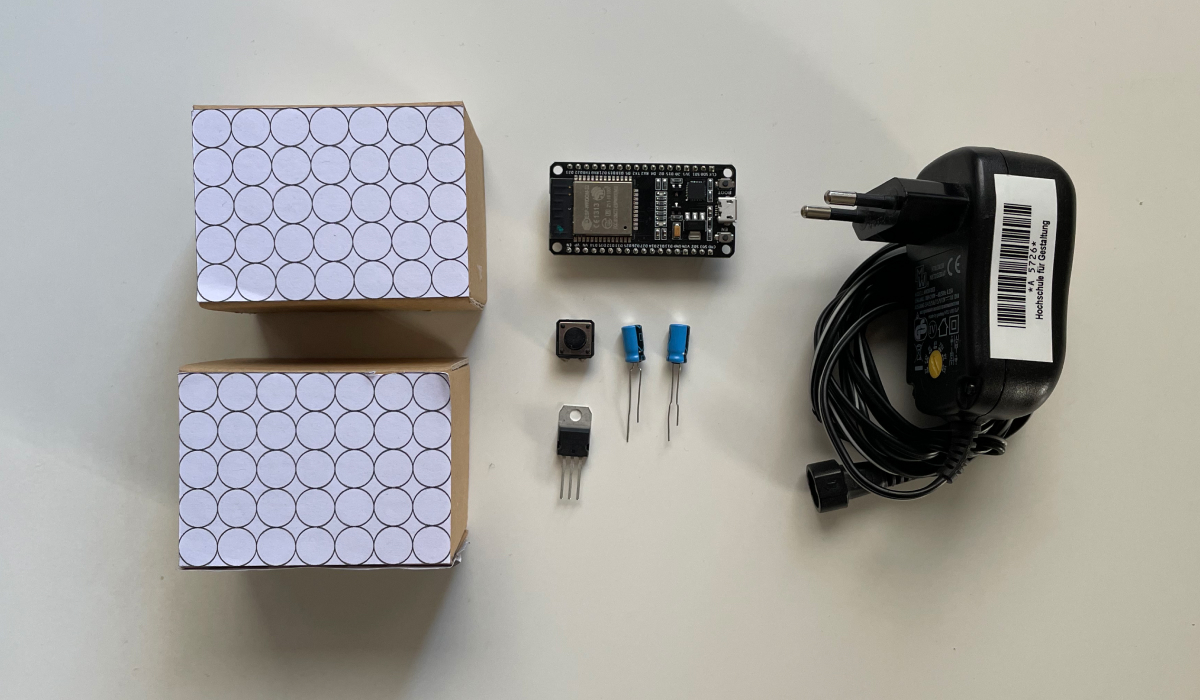
After the paint had dried, I was today able to continue assembling the device. These are all the parts (apart from the wires) that would need to get assembled:
Then I assembled all the components. I needed to solder some smaller elements, e.g., the phone jacks and the little button PCB. Gladly, everything fits where it should, having made the assembly relatively straight forward.
I had the only issue due to the slightly tighter “window” resulting from the filling and spray paint. Two flip dots in the corners were not flipping correctly, as the additional tension was holding them put. A little bit of filing seemed to do the trick.
Now, as the device is put together, I can refine the website’s interaction and finalize the messages themselves.
Now, as the base structure and hardware are set up, I can go deeper into designing the interactions. Here is a list of guiding questions I have:
How are messages sent? Is it a website? Can people do it from the device? What are the limitations/possibilities?
How would the sender send an animation that is not predetermined? Does this need a particular interface?
How can the sender select to whom to send? Especially if multiple? Is this predefined as a sort of tiny social network?12
Should the recipient see who sent the message?
Decisions
Hardware Interface
I decided on the Hardware interface to be as little as possible. No LED to indicate, no dial to select, just a button. It should remain the small analog piece of embracing the moment. Thus it does not fulfill the requirements necessary for complex interactions to send messages to different people and is only a receiving device.
For sending, it, therefore, needs another additional interface. As for the prototype, a website seems to be the easiest way to enable complex interactions and selections to send messages. It is usable on any device (with a web browser), making it simple to develop and accessible for a broad audience.
My current website seems to be sufficient for the prototype, but it would need to incorporate selections to whom to send and some authentification if being a product.
Sending Interface
I currently have three different sending types that are supported:
“Hello” — sends a tiny animation.
“Array” — sends a specific matrix (image) to the hardware, which is then displayed.
“Animation” — sends a small sequence of arrays to display, thus creating a tiny animation (currently, only “stars” is supported).
Especially when considering the animation one, a specific interface is needed. Also, I want to add a small timer feature to create the anticipation moment for a call or meet-up, as mentioned in the initial story.
The animation would need to have either predefined animations to send, similar to the emoji keyboard, or would need to enable to create own sequences. The sender could make animations frame by frame using the matrix draw tool.
Interaction Diagram
You can see how the interaction pattern works on the chart below, keeping in mind the schematics mentioned above.
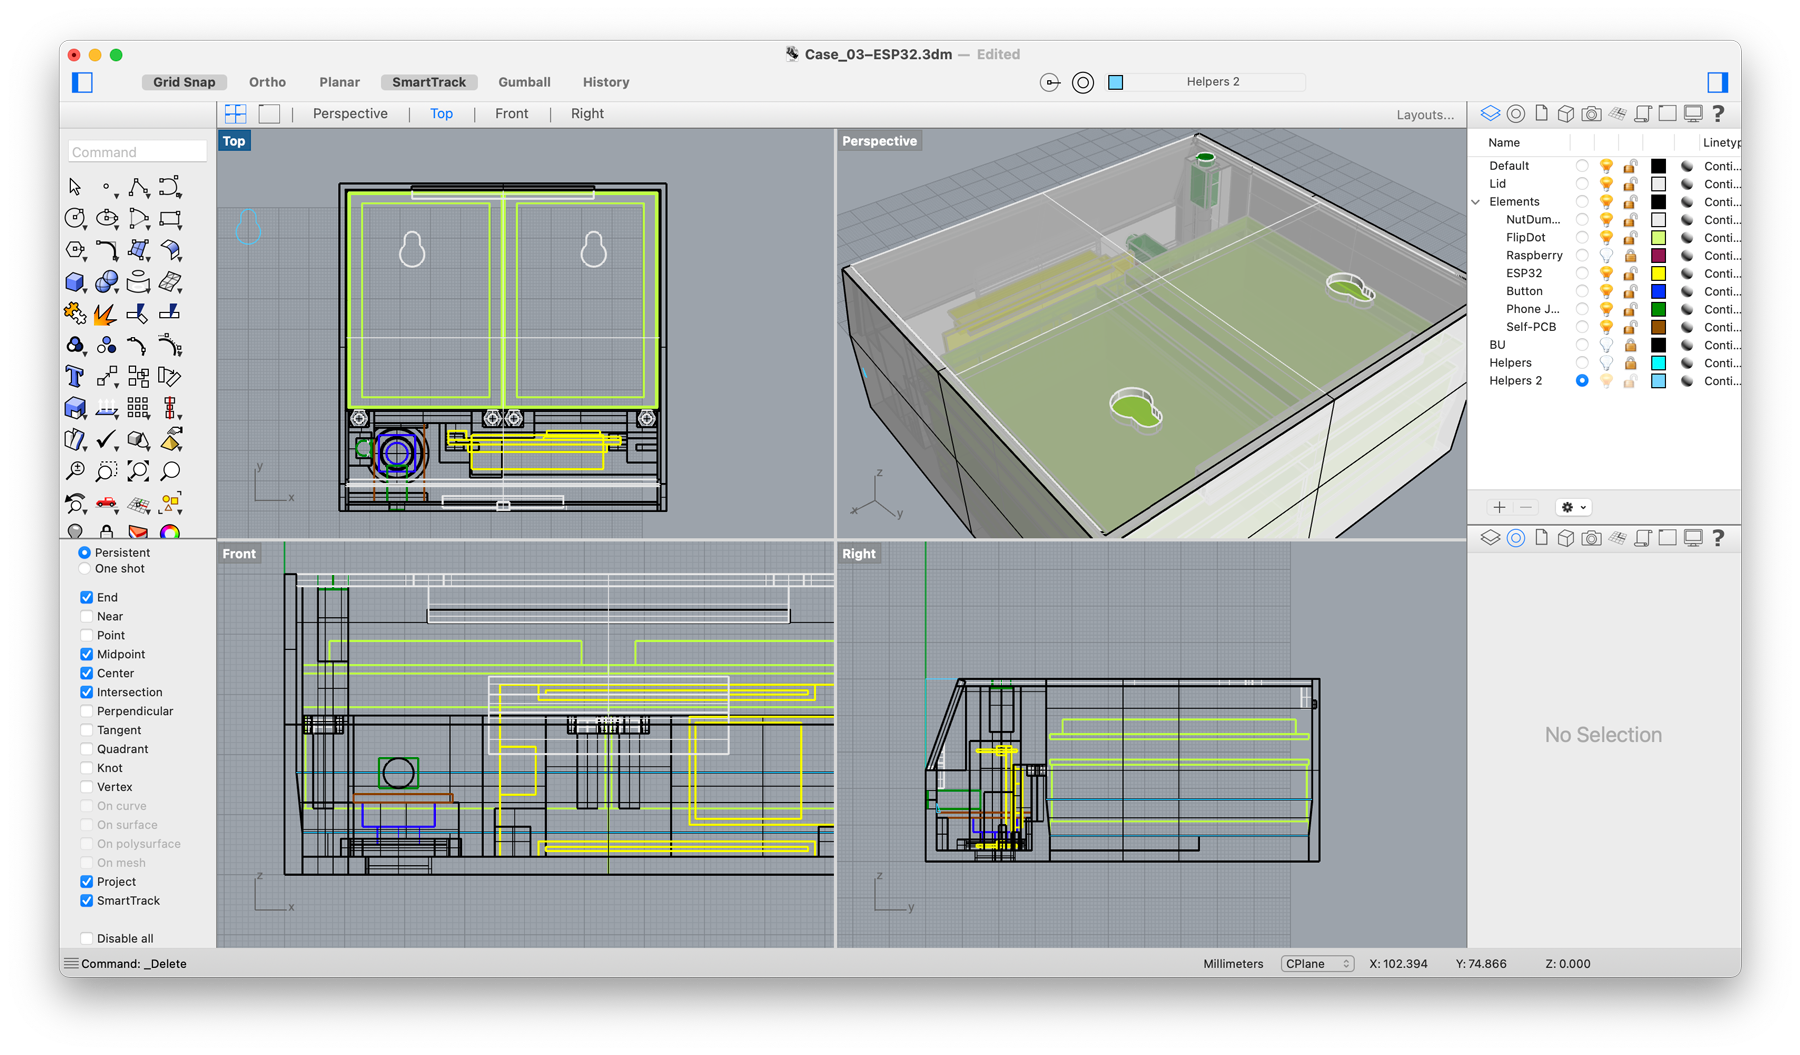
As now the hardware components are fixed and the final presentation is coming closer, I need to create the product I envision. I took this Friday to focus on model making.
The Case
Andreas was so kind to print the second iteration for me again. I needed to make some adjustments, including the new ESP32 board and fixing some issues I had with the first prototype. Also I added a lid to it and a small angle position at the bottom to be able to tilt the whole device.
Here you can see the 3D file that I used for the print:
(Note: this implementation is a refactor of my second 7-in-7 project.)
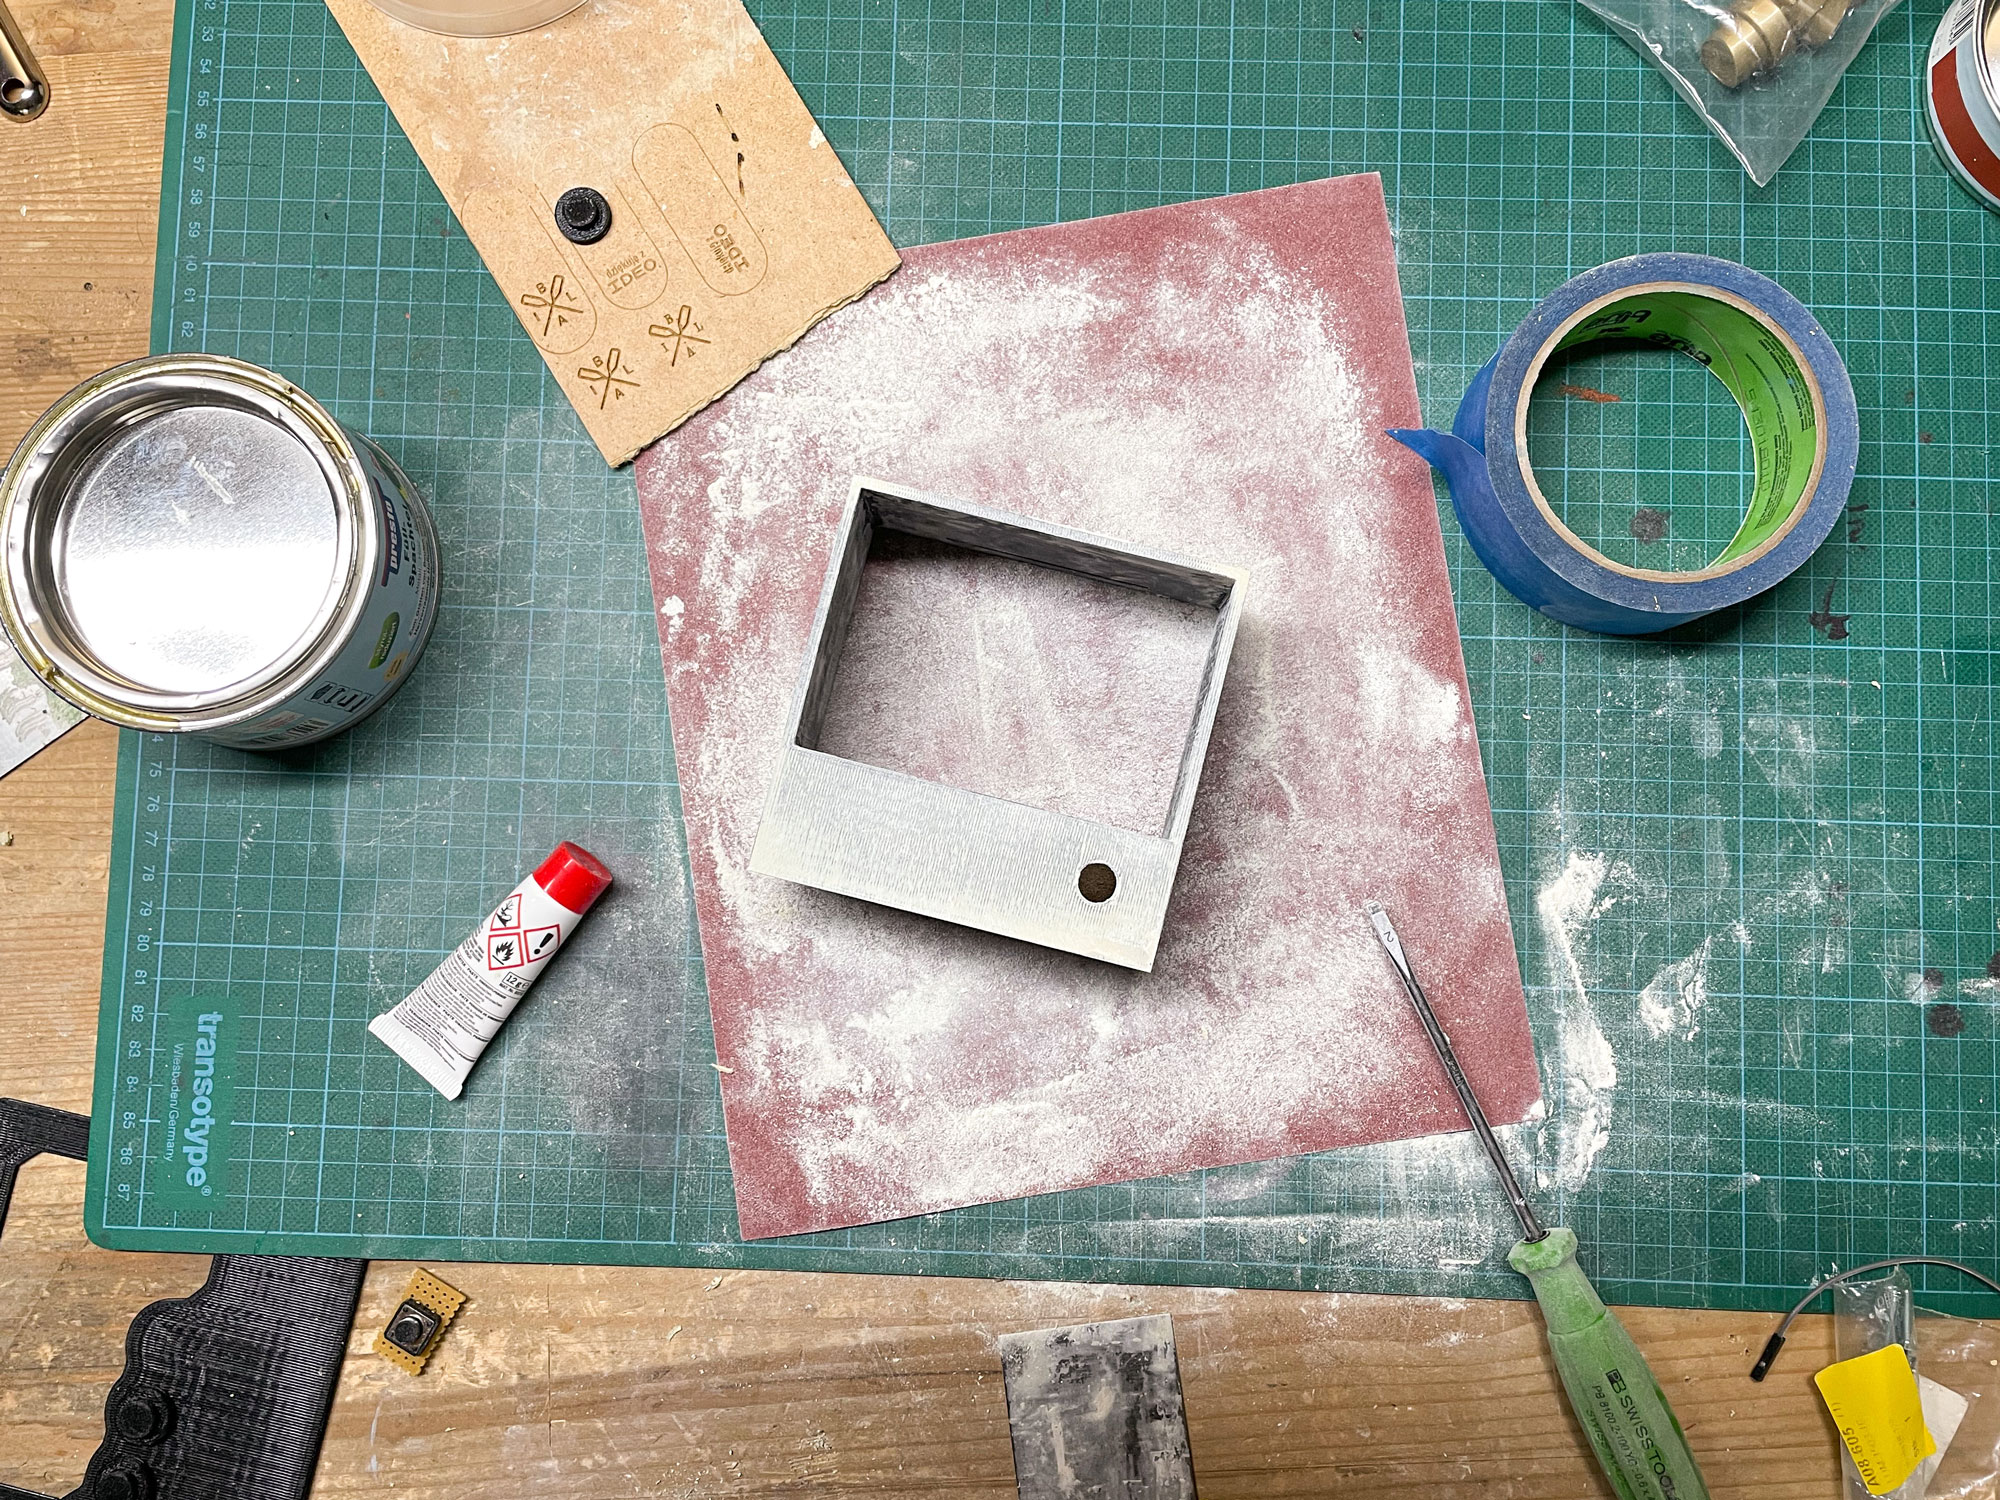
After printing, I followed the classic model-making process of filling, sanding, and spray painting. A nice throwback into my undergraduate studies. Luckily, I was allowed to use the workshop of my former office. Thank you all!
Now, the paint is drying, hence I need to wait until I can continue assembling the prototype.
As mentioned I refactored the website from the firestore to the realtime database. It was way faster than I anticipated.
Also, I was able to combine the libraries and got the ESP32 running with the realtime database from Firebase.
When running the program, I realized that the flip dots get extremely hot when triggered too often, especially as I had the matrix displayed every run of the loop(), which is multiple times per second, the example only did an update every 400ms. Hence I needed to refactor the code that the screen would only update when necessary (especially, as it otherwise is not even useful, switching from black to black). This brought also the benefit of getting rid of a small ticking sound, like a clock, as the magnets were fired constantly.
I then started to refactor the database. It now is able to send arrays as well, allowing to process the content entirely on the website. The new MatrixDraw component enables visitors to send draw and send own images in this very limited resolution.
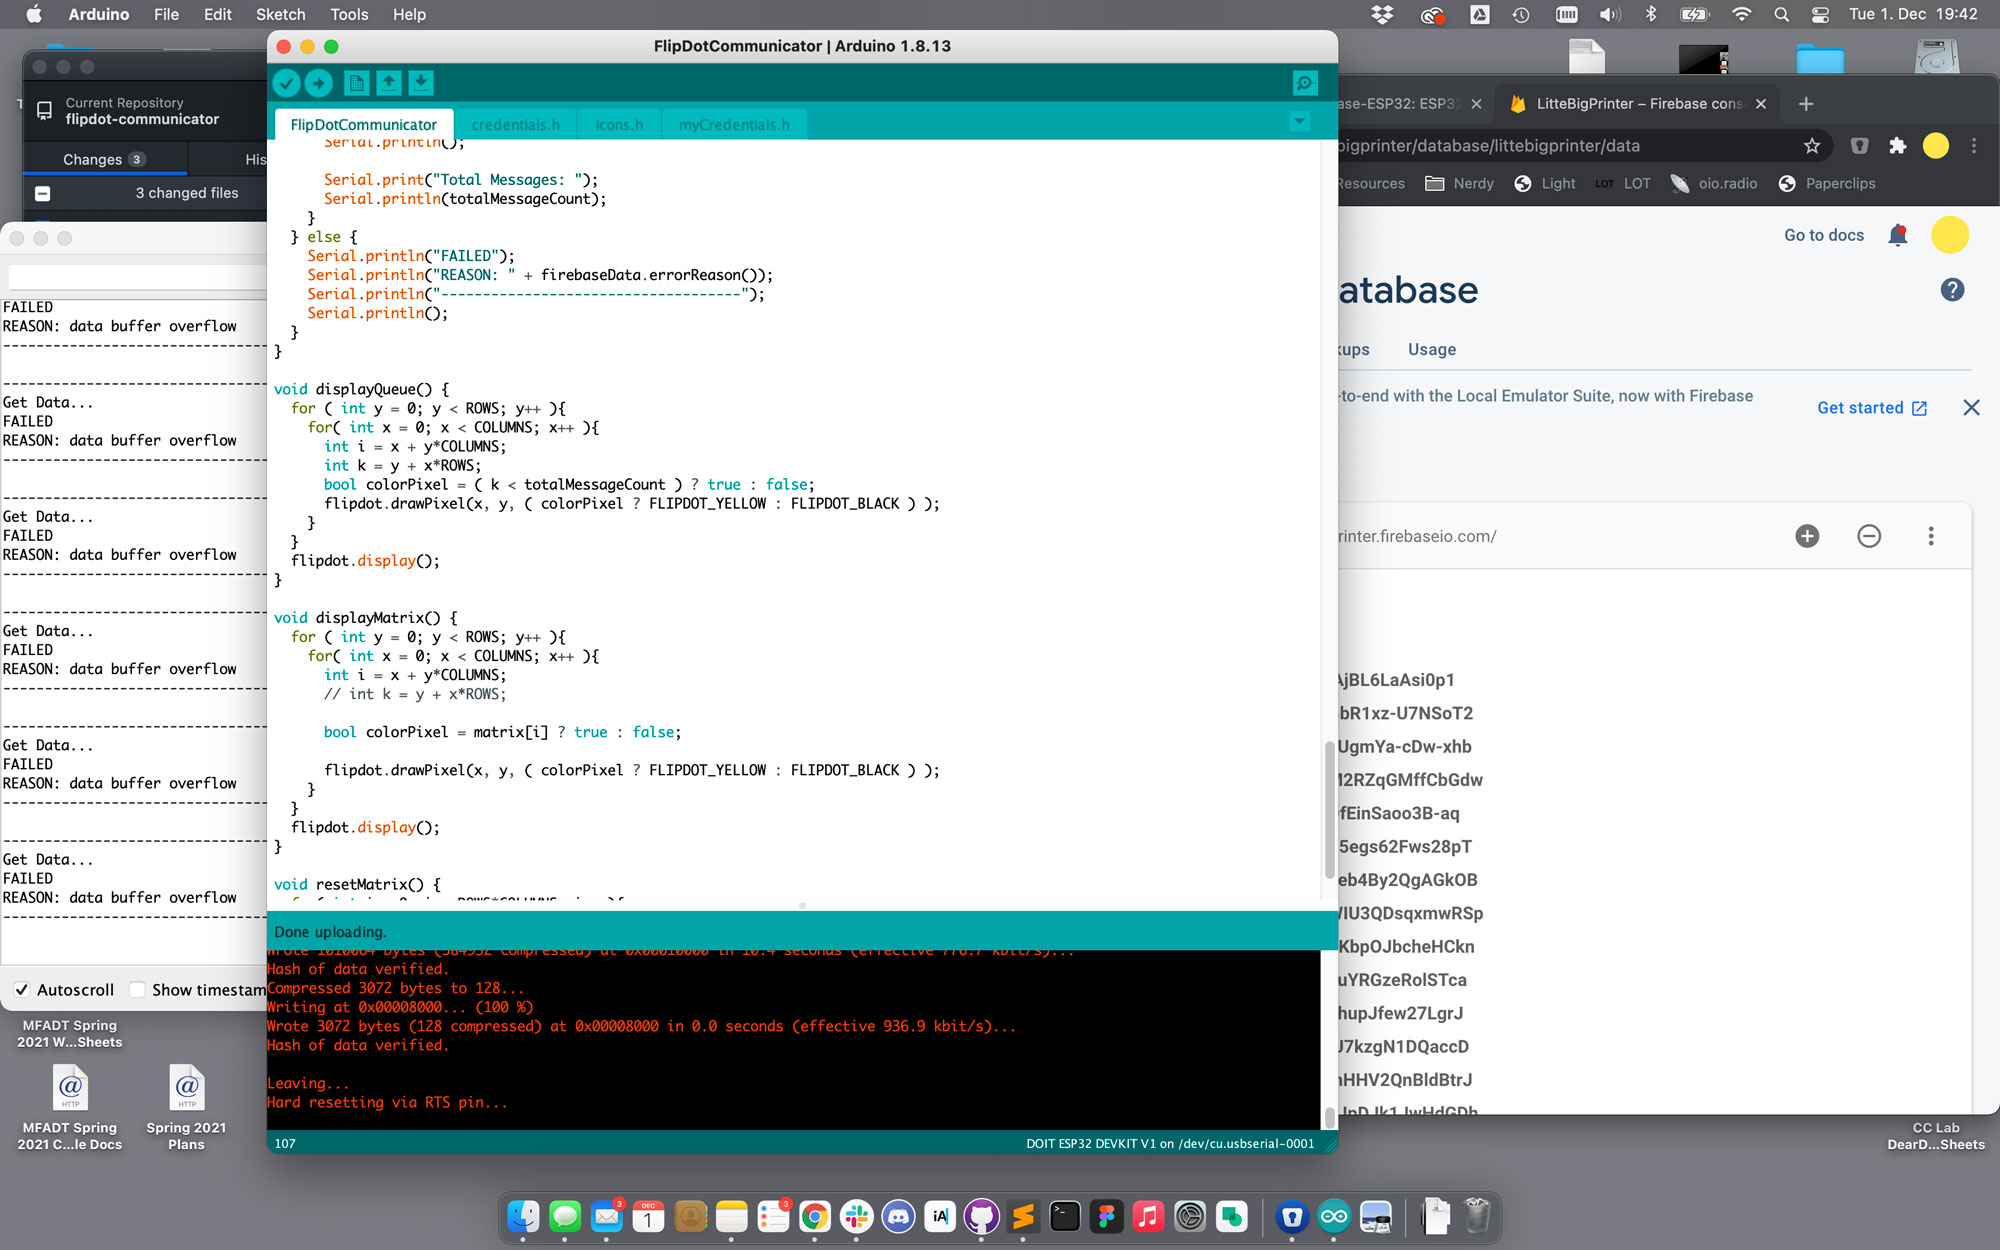
The next big issue seems to be the buffer. I can only read so many data entries per call, which will eventually be an issue when getting to sending more complex matrixes.
Especially, when sending animations this will be a problem. I don’t know if I am able to figure this out in the time given by the deadline.
Additional
I stumbled upon this repository by Julian Hespenheide, which is explaining flip dots quite thoroughly, in case you want to know more! (I found it too late, unfortunately…)
Currently the studio Julian Hespenheide works at, is having an exhibition displaying a flip dot display. Read more about it at the studio’s website: Studio TheGreenEyl.
After a brief chat with Marcus, I shifted away from the Raspberry Pi again. As already mentioned a couple of days ago, it seems overpowered. Also the flip dot library seems to work fine on an Arduino like chip so I would not need to rewrite it for the Raspberry. An Arduino like architecture also seems to be more stable than a full fletched system running node.
me-no-dev could help me solve the issue I had with flashing the ESP32 with the new macOS Big Sur.
For the ESP32 and the flip dots, I am currently considering these two libraries to get everything connected and running:
The new board also requires a new hardware setup for the case, which needs to be implemented, as well as a restructure of the Firebase code I currently have on the website. Instead of using the Firestore database I need to shift the messaging system to the Realtime Database so that the ESP32 library is able to work properly.
To test if everything would work as expected, I adapted the code of the basic example file so that it fits the pin layout of the ESP32. I faced an issue with the required analog pins, but by changing a couple of lines in the flip dot library file to these ones, I could fix that:
Here you can see a short snippet of the display running with an ESP32. Also I replaced the previous 12V 1A power adapter to a 12V 5A one, which seemed to increase the performance of the flip dots a lot. (Tipp: right click and select “show controls” to enable sound of the video, then you will be able to hear the actual flipping sound.)
To get the case done, I started to design the base components in Illustrator. Here I got the first ideas for positions and sizes.
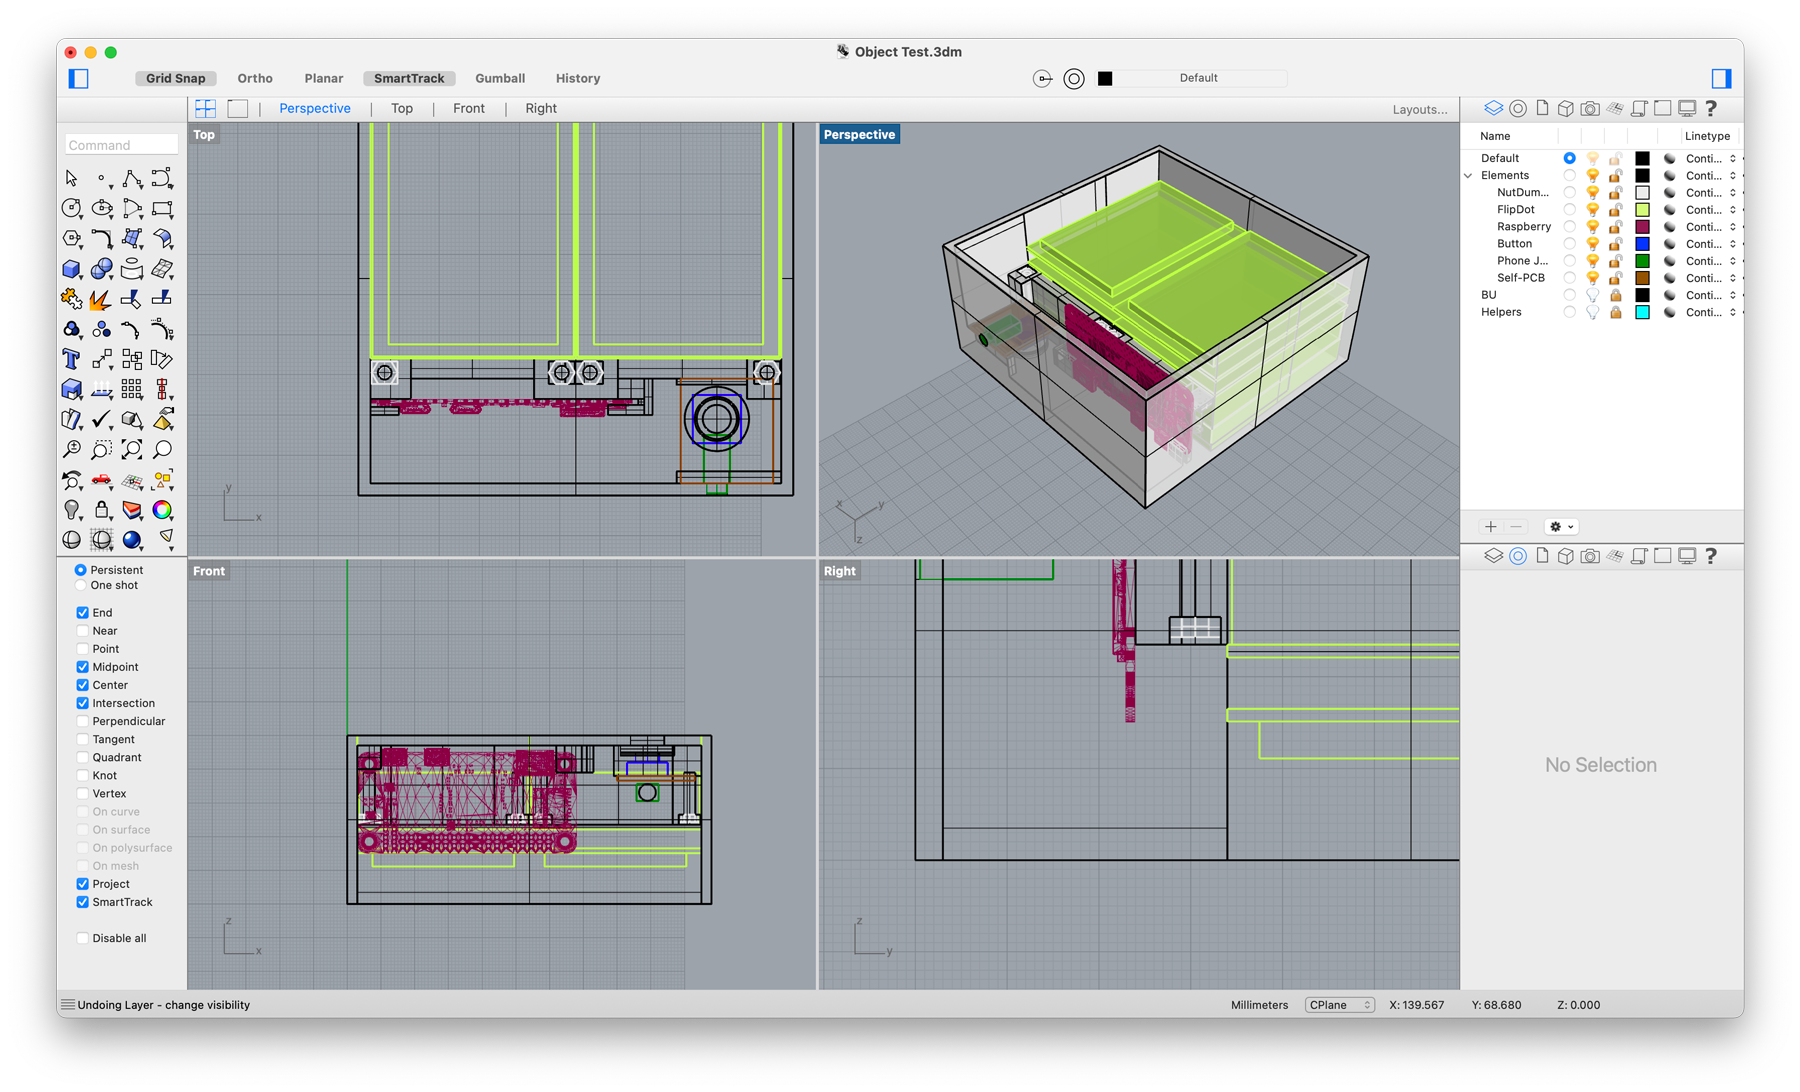
After realizing that I cannot place the components good in a 3D environment, I switched to Rhinoceros 3D to create the first model of the case.
This one then got printed at my old office (thank you Andreas!).
Trying to assemble the components I could already see which elements work and which do not. E.g. the flip dots need a tiny bit more tolerance to get into their “window”. Also the PCB for the button fits quite well but does not leave connection room for the phone jack, hence I need to add multiple strip boards at this location to not let them interfere with each other.
Other parts worked surprisingly well! The Raspberry Pi Zero fits perfectly into its compartment, which I did not expect to fit from the first try on. Also the button is satisfyingly press-able with the position of the strip board.
With these new insights, I want to refine the CAD model to print a version in which all the components fit as imagined
Unfortunately, the assembly of the flip dots is not documented on the website, but as I have not been the first person facing this issue, I found this video explaining some crucial elements. It is German though. I took the advice from the video and added placeholders in between to get the height right.
After having them assembled, I was able to run the example script. To see how the dots are actually flipping, I wanted to record them in slow-motion. I have been mesmerized! The beauty of the flip dots first appeared completely in this video. Each dot flips mechanically (duhh) but they also flip slightly off-timed, bringing exactly this kind of unpredictable humanness into this digital communication realm that I aimed for. But see it yourself:
I started to build the website. It should contain multiple aspects of the prototype:
The interface to send out messages
A virtual dummy interface for me to test communication patterns
A virtual dummy interface to be able to share the patterns with others, letting them test the interaction with the prototype even though they do not have access to the physical one
Software Architecture
As mentioned earlier, I needed a software architecture. Here ↑ you can find a more visual representation of what I intend to build.
Website
I want to build a fairly simple website, focussing on the sending part as well with the simplified hardware element. I decided for the font Space Mono as I simply like the technical appearance of it. In regards of color, I wanted to emphasize the unique color of the flip dots, that’s why I chose these two colors:
FlipDot-Light: #F2F03F
FlipDot-Dark: #DDDB1F
A toggle allows for three options:
physical – Sends your message to all website instances and the hardware prototype
virtual — Sends your message to all website instances
test — Sends your message just to your website instance
I am currently working myself from the bottom up, first enabling the test prototype to quickly test different animations and displays. The next one will be the virtual one (on which I am currently working) to send messages to other to test the communication with users. Finally, I want to build into the physical prototype.
From a technical perspective I can build up on each step, making it non-redundant to actually build these steps. With each of them, I can increase the fidelity a little bit while not refactoring the database too much. Meaning, the tests I make with the test prototype are almost completely usable for the final physical prototype.
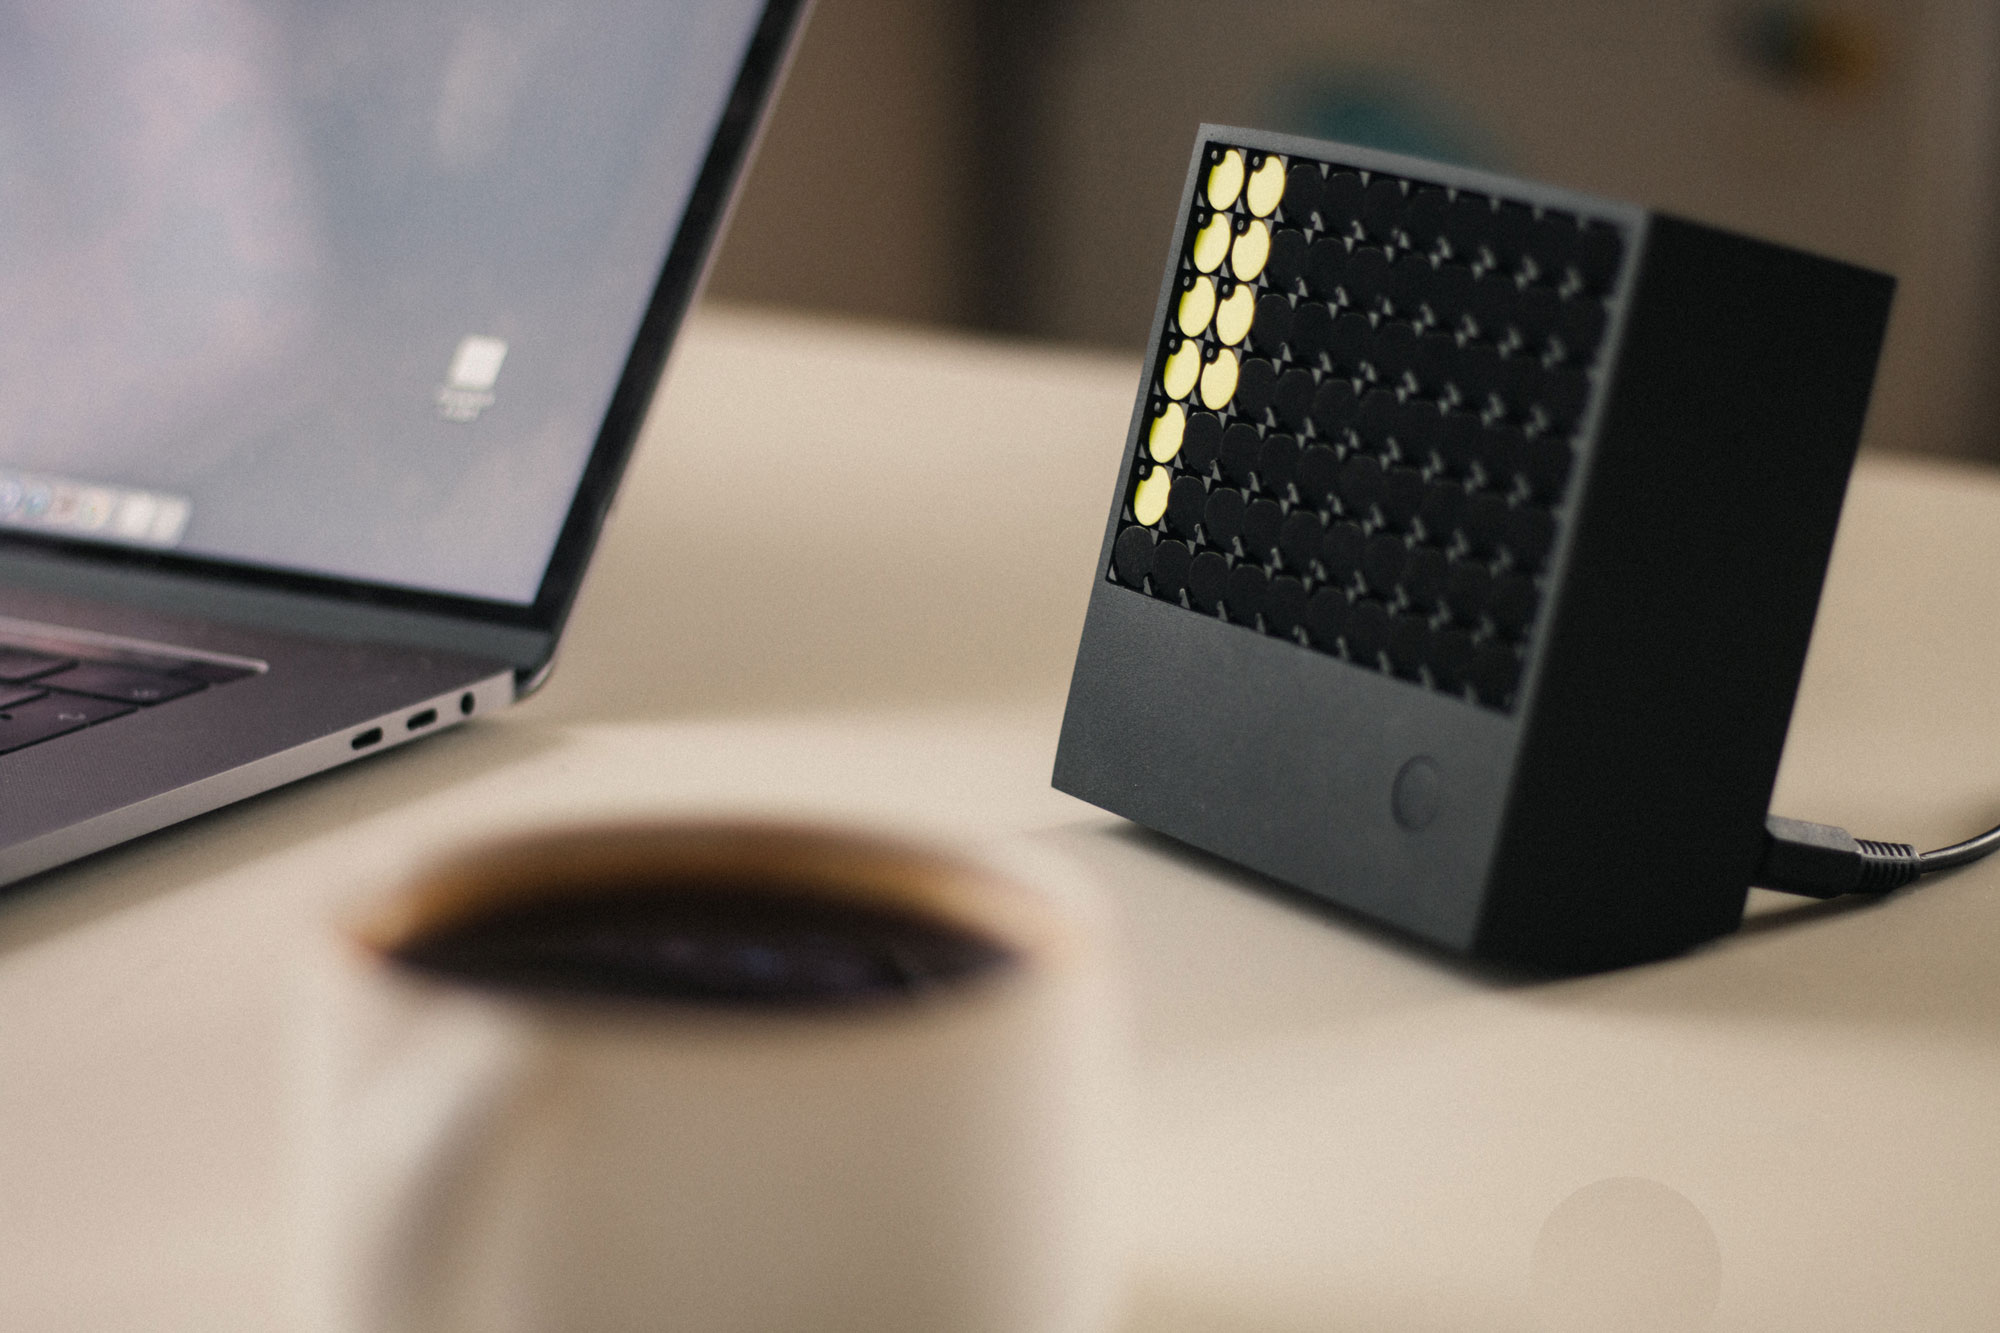
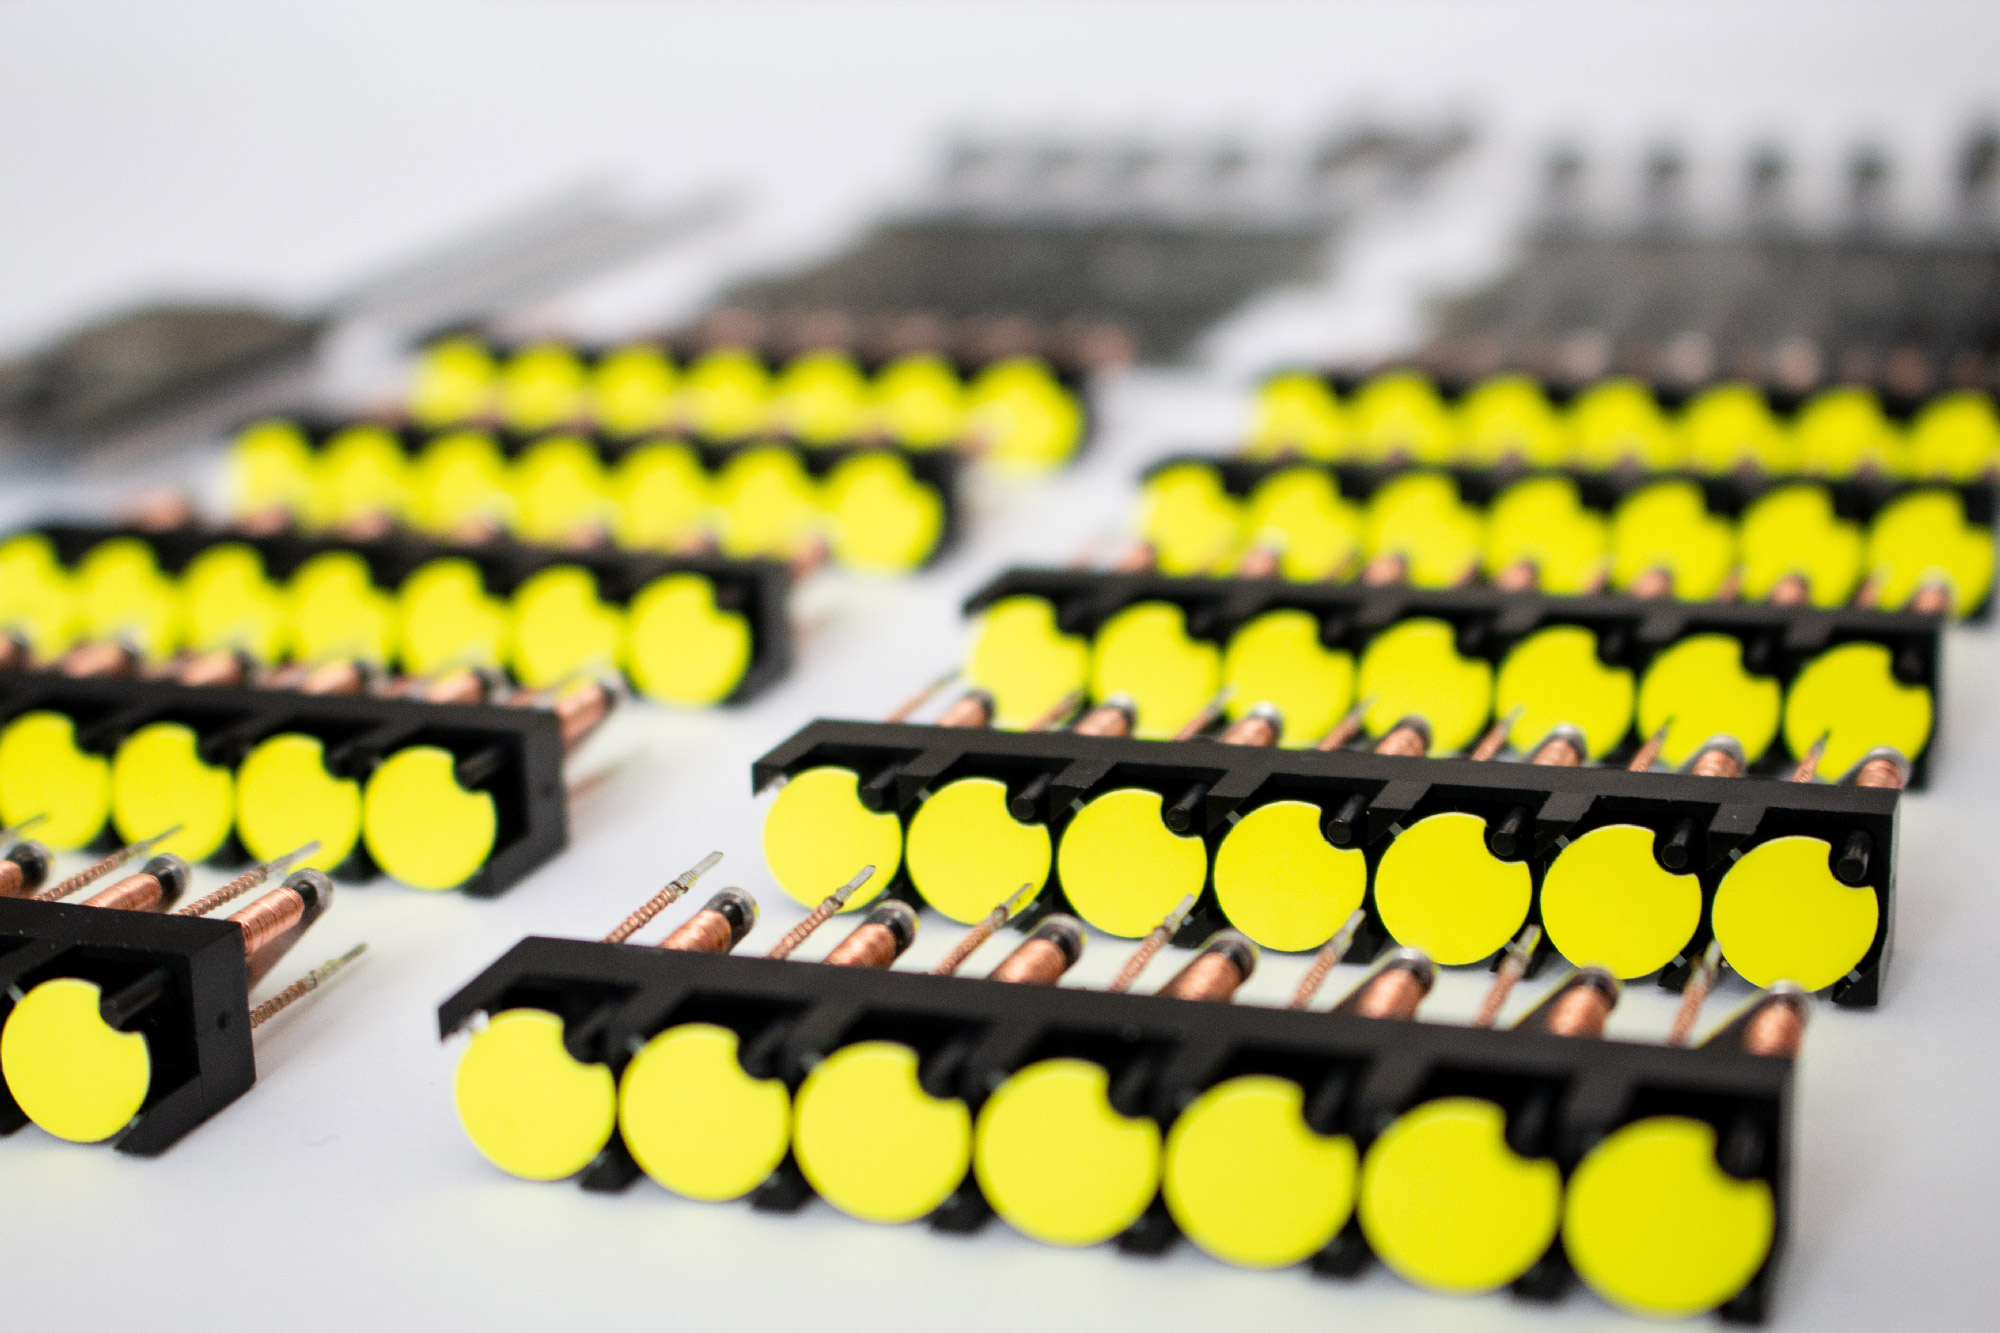
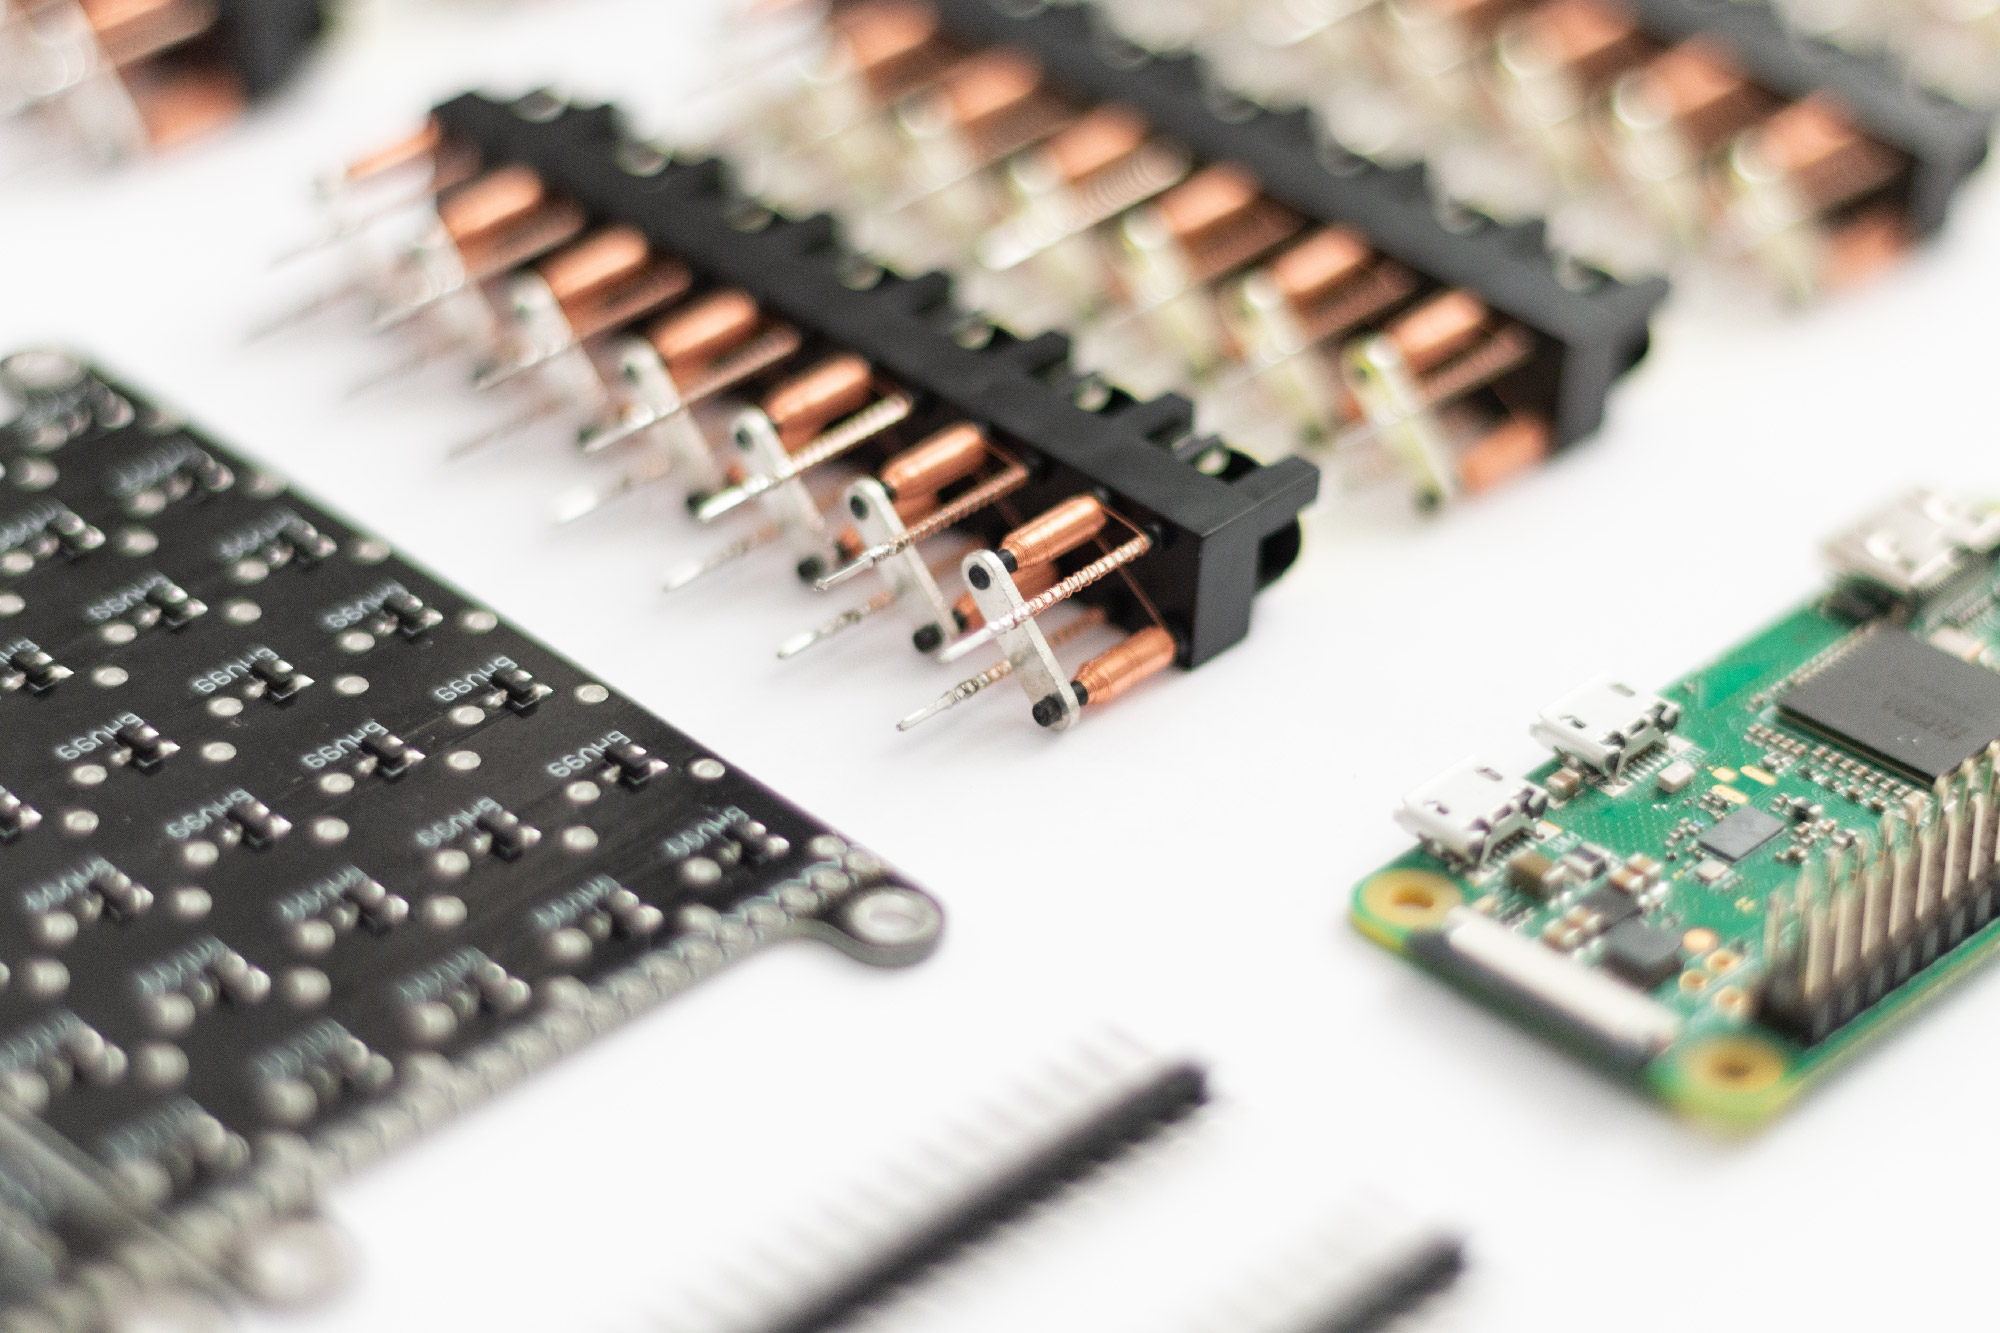
Today, the ordered flip dots arrived. Before assembling them I wanted to share the separate components as I think they are simply fascinating and beautiful.
The bright neon yellow on the dots is more mesmerizing than I had anticipated and it will definitely influence the further design of my project.
Now I need to assemble the elements to (1) be able to get the right measurements to continue developing the case and (2) to see how I can control them to see which parts I still might need to get.
In parallel, I have started to set up a GitHub repository in which I intend to create the communication and testing website and to upload building instructions for the hardware object.
Next to the size, of course the dots of the matrix is a limitation. Not necessarily what I can display, rather how I have to display it. For the modules I found, this would mean a matrix of two times 5 ✕ 7, consequently a final matrix of 10 ✕ 7. I created a quick prototype in a P5 sketch to be able to test out different variations quickly. I did not want to focus on this now, so at the moment it only creates random patterns when clicking on it:
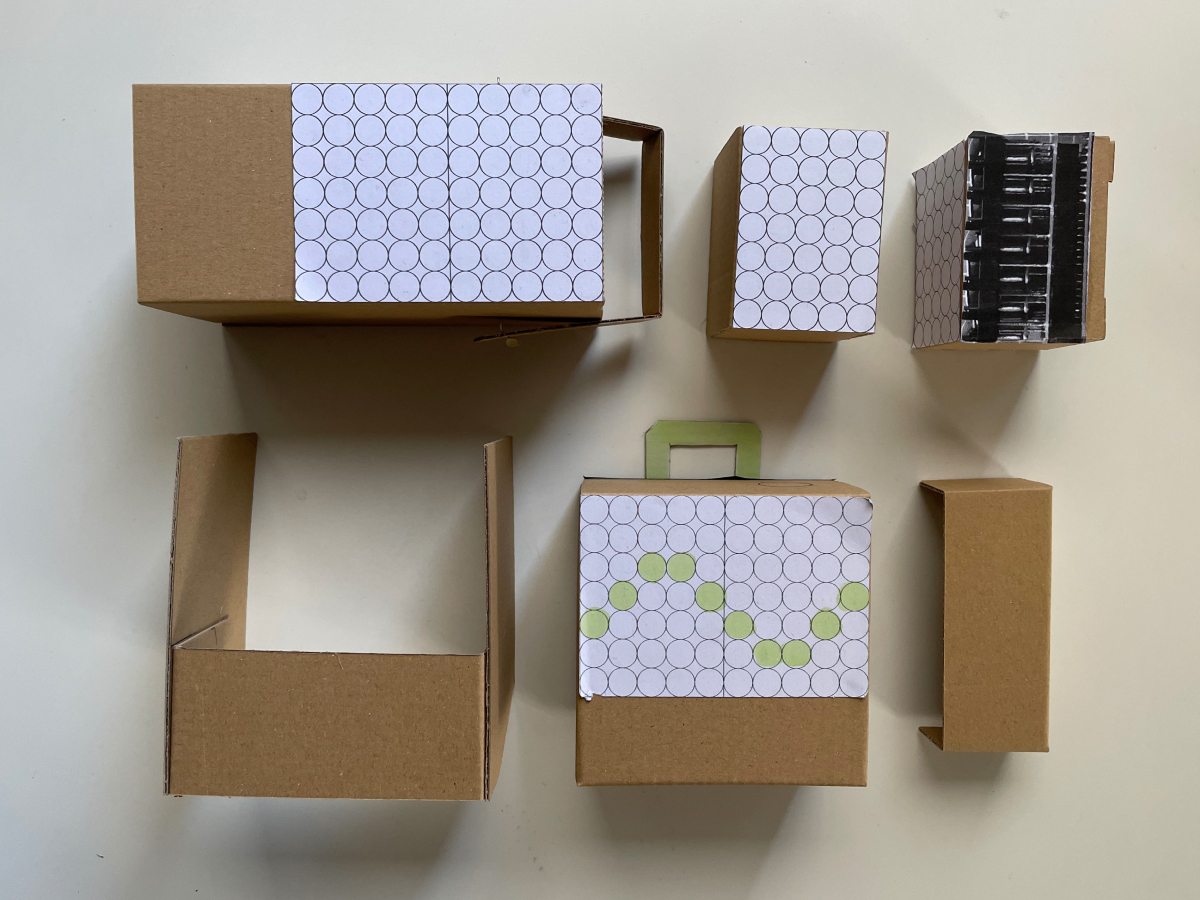
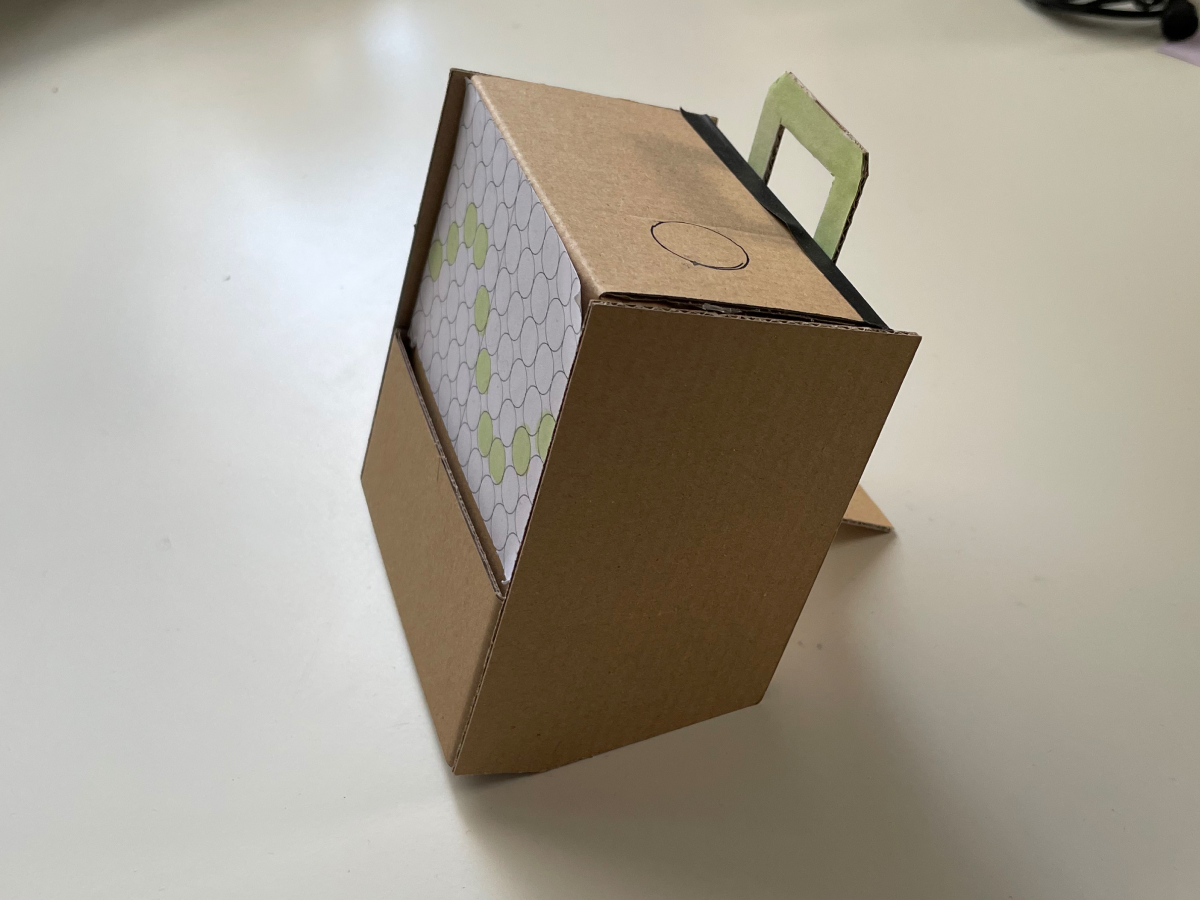
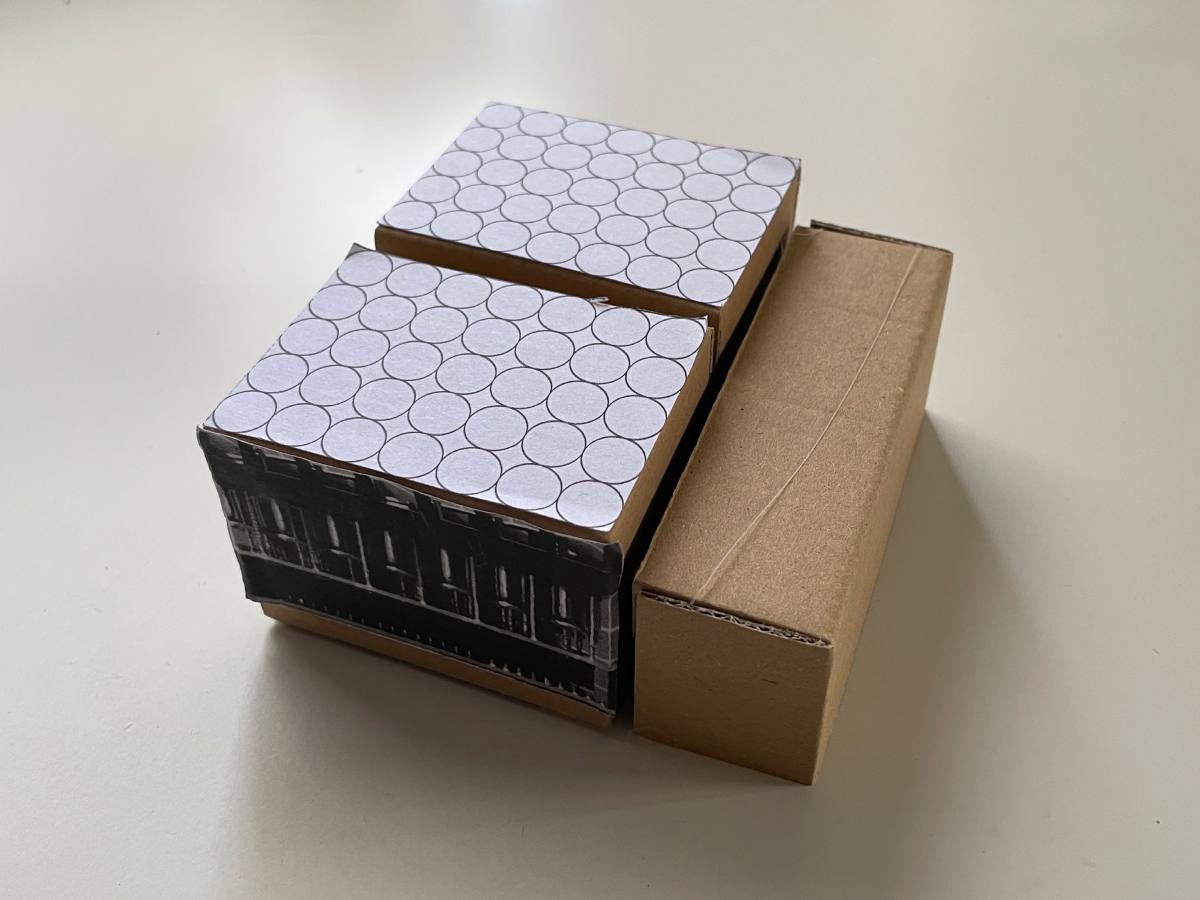
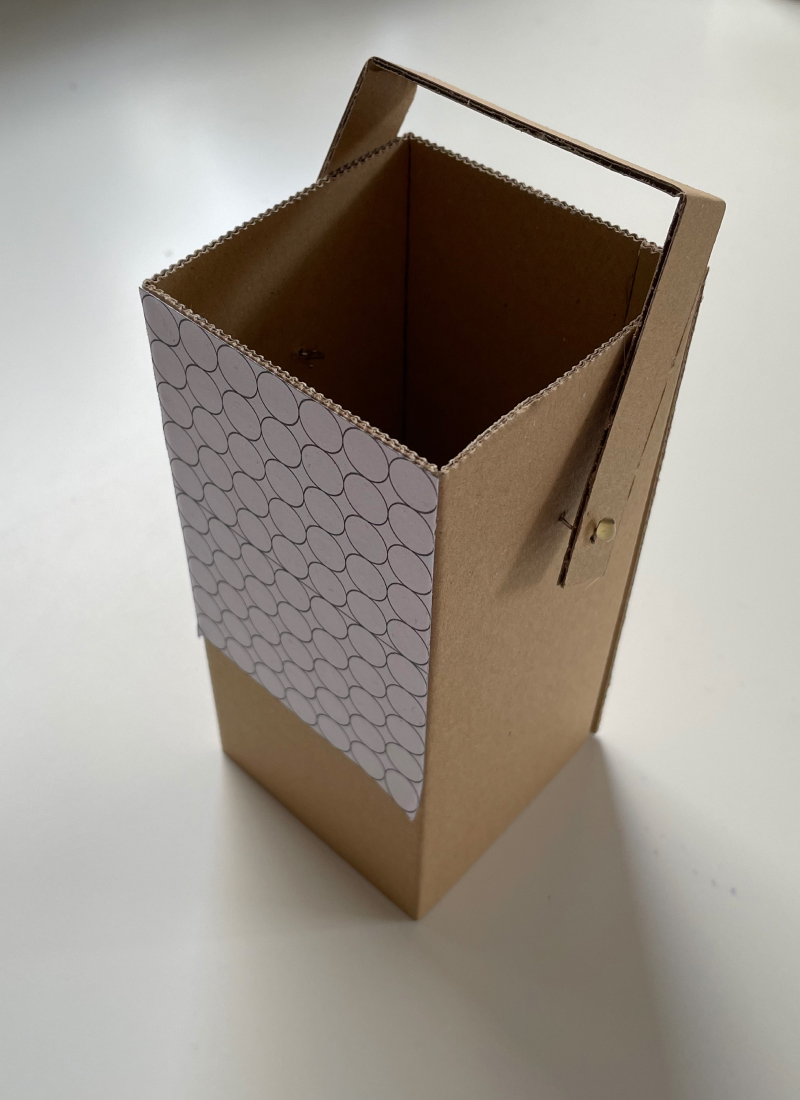
Cardboard Mockups
I wanted to understand the different shapes and sizes of the object. I first built volume models of the flip dot components with the sizes mentioned before. I wanted to get a feeling about the arrangement and size I would need in general.
I wanted to understand what would be the best shape to allow me putting it on my desk and reading it, but also to hang it on the wall, as described in my text. Yet each module has a matrix of 5 ✕ 7 flip dots, but how I arrange them is still open. Thinking about the other components I would need to include in the prototype, I intended some space to include in it as well.
My general intention is to emphasize on the flip dots, the central element of the communication piece. I like the general open aesthetic of the dots, the mechanical elements making the flip visible. Hence, they should not be covered by a glass. This fascination about the dots also got me thinking if the case therefore should also not flush with the top edge of the flip dots but rather with the edge of the PCB of the components.
As the matrixes are fairly big in general, I also thought about all the other components that I would need for the object to be working (see below ↓) to understand how much space I need to consider. This has been the foundation of my further experiments. Also thinking about how to make it less generic and including smaller features to make it more useful.
Interface Mockups
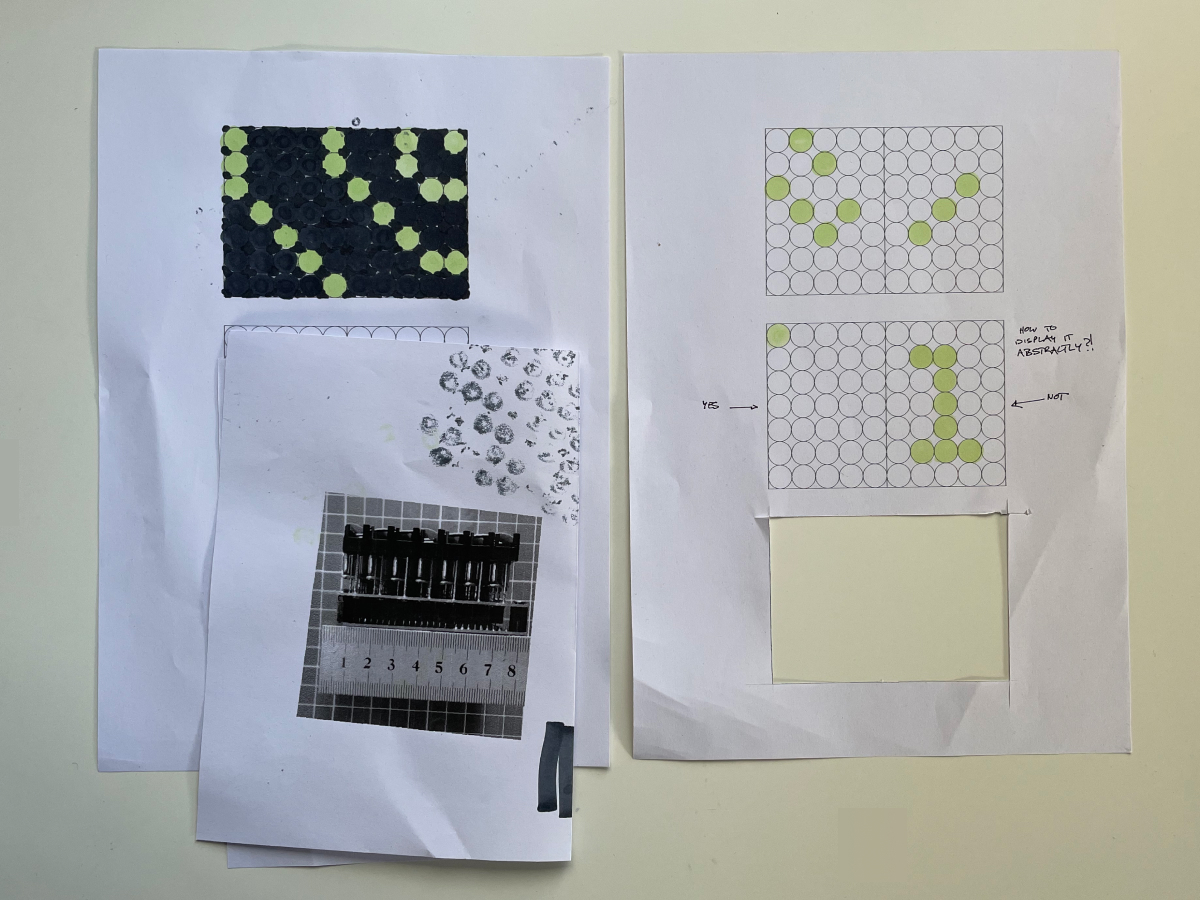
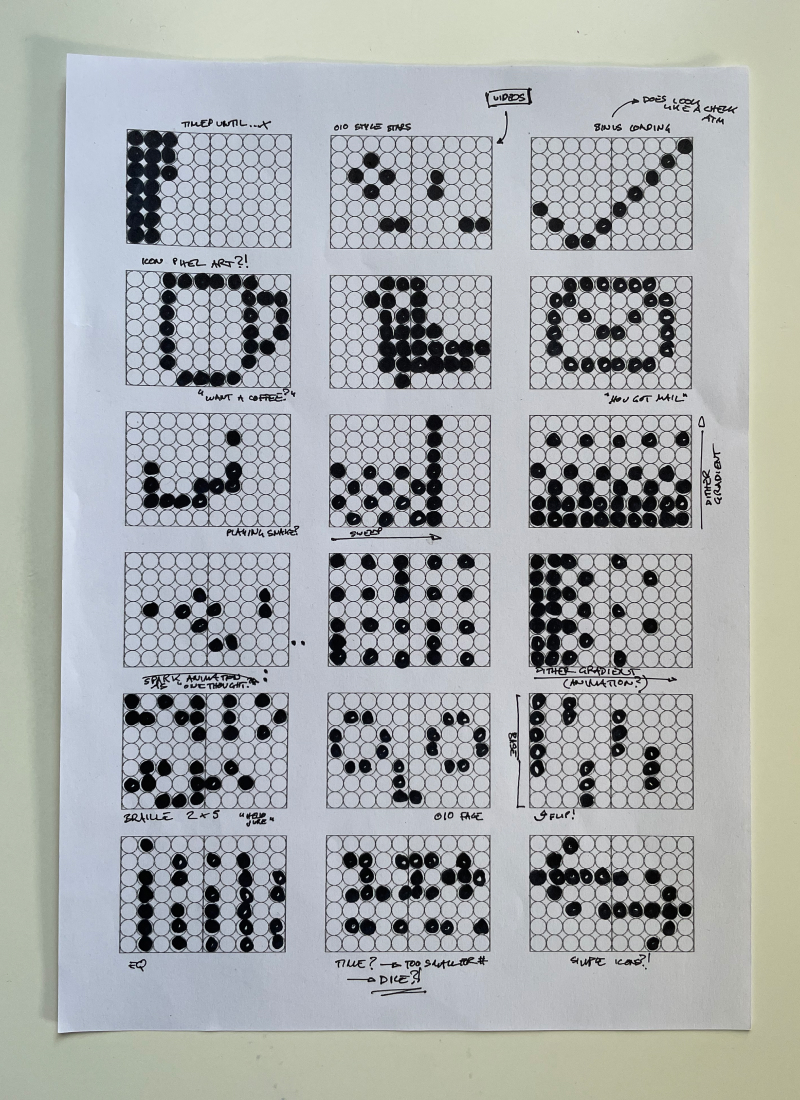
As the matrix is the most relevant piece of the whole object, I thought about how to represent messages on it. I printed a sheet with empty matrixes to test out quickly different interface ideas, some more abstract, some more specific.
Generally I like the ‘more abstract’ approach better as it inherits more space for interpretation, thus giving a more human connotation to the message. But I also had a look at 1 bit pixel icons as the have the same issue when it comes to resolution. I could imagine that this would also inherit a nice way of displaying a message, depending on the message of course.
Also inspired by this animation ↑ (seen on oio.studio), I could imagine that instead of just images small animations could display messages quite well. Especially considering the ‘click’ sound the flip dots make when changing color, the sound of the matrix together with the animations could play together nicely.
Software Architecture
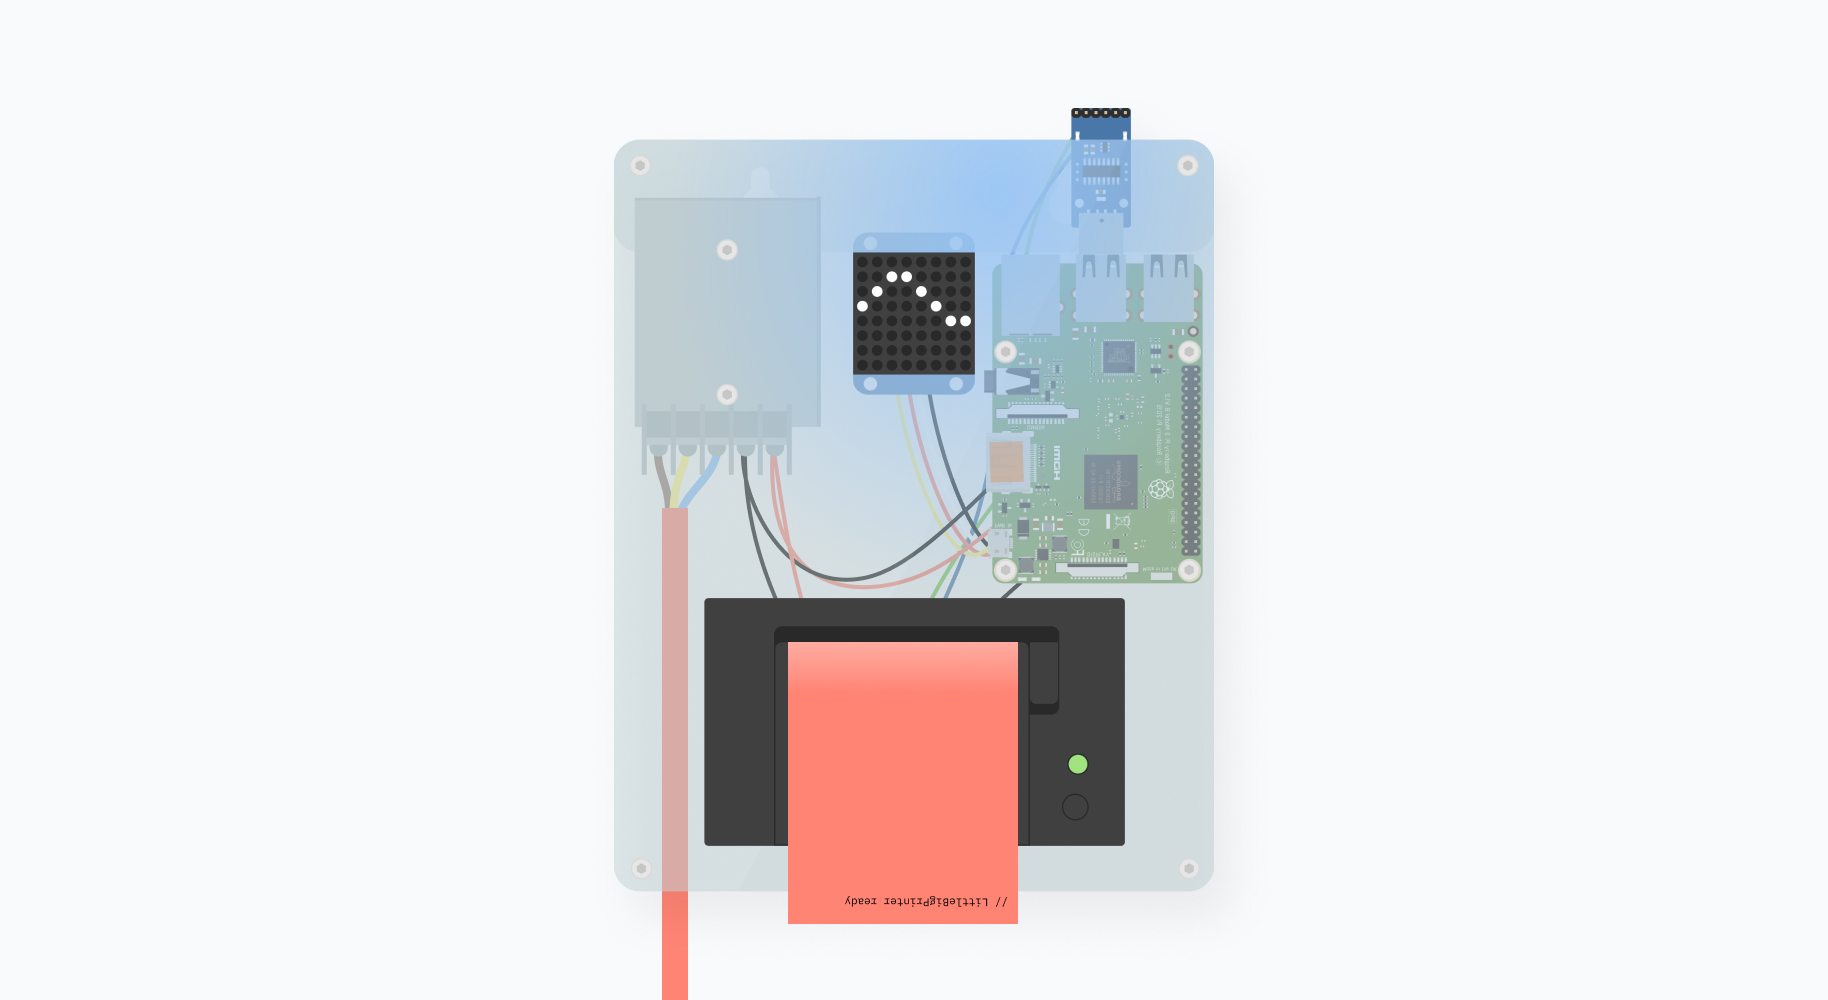
For the prototype, I want to build up on the LittleBigPrinter architecture that I have created already, to make this part easier and be able to focus on the interaction rather than the technicalities. Hence I have a setup as shown below ↓
Website — A website to send out messages and create a virtual prototype to understand the connection. I want to use Next.js, as I am more familiar with the framework and it enables me to easily build the communication.
Database — I need some sort of connection point between the elements, so I am thinking of a Firebase database, as it would enable me to do realtime communication between the components.
Hardware Object — The actual object. It needs to have a microcontroller that is able to connect to the internet to fetch updates of the database, something like a Raspberry Pi or an Arduino with an esp8266. This is the actual object containing the flip dot elements.
Elements
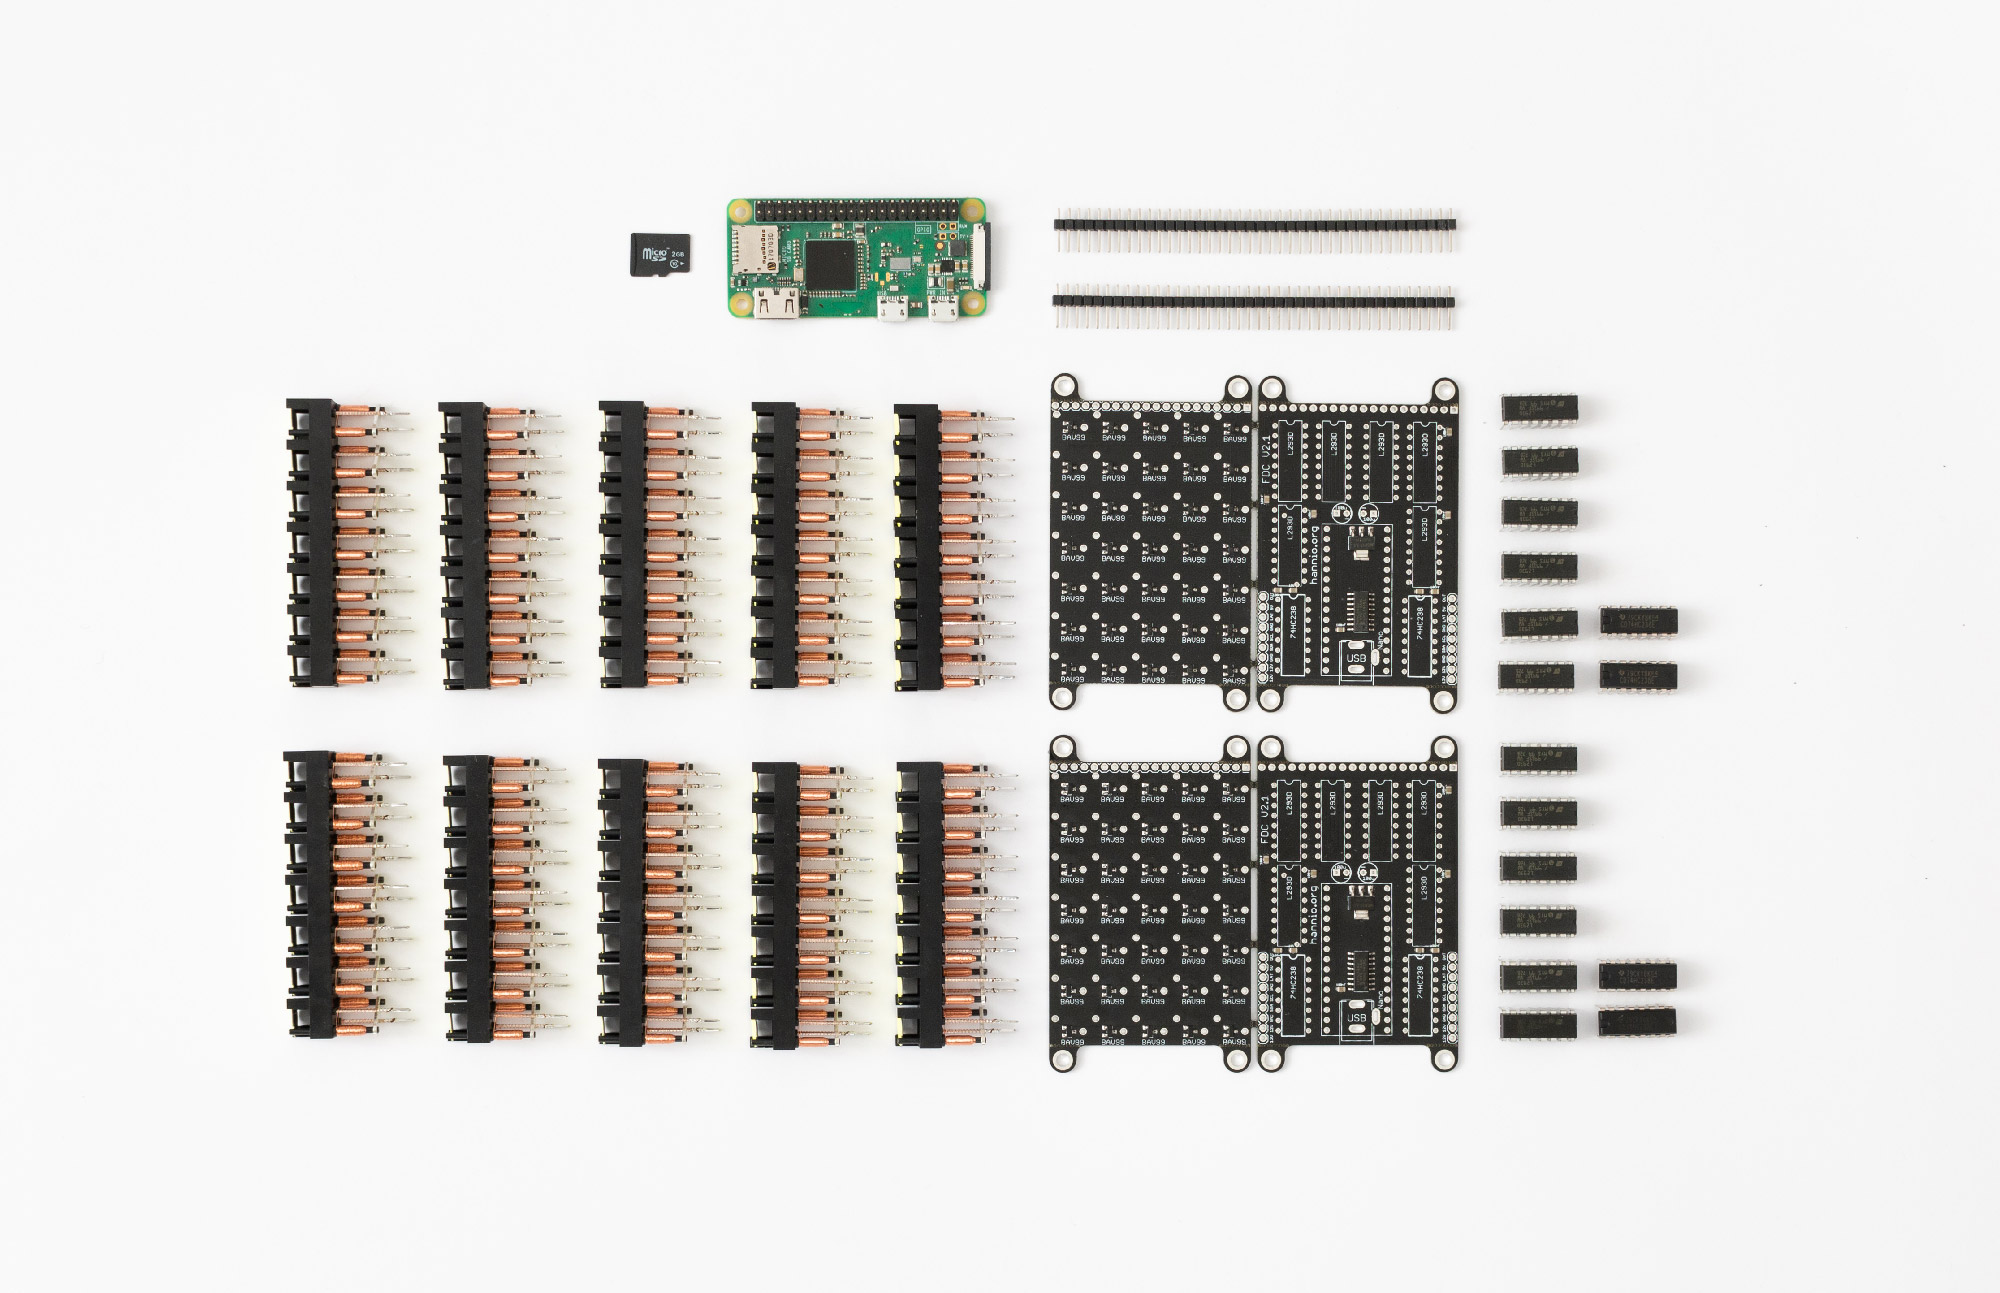
I also checked which components I would probably need to create a functional prototype. I generally need a brain of some sort to control the hardware. Initially, I was thinking about using an Raspberry Pi, but it probably is a little overpowered. I also found a library to connect an ESP32 with Firebase, which seems like a more lightweight and smarter solution, so I am currently planning with a setup similar as the following:
ESP32 — the microcontroller that is able to connect to the WiFi and otherwise behaves like an Arduino
voltage regulator — transforming the required 12V for the flip dot matrix to 5V that the ESP32 needs to run
2 ✕ 10µF Capacitors — to ensure the security of the converted voltage
button — to trigger actions as described in the concept
10kΩ resistor — for the button to work properly
12V power adapter — to give the box power
I am facing some issues when trying to program the ESP due to the new macOS Big Sur update. Currently, I am following this issue to solve the issue.
How to continue
For the next steps I want to (1) build the object to have the platform running, (2) create a base website layer to easily test out the communication methods, and (3) create assets, symbols, and animations to test different ways of displaying messages. I want to build upon the P5 sketch as seen above as I think this might be the best way to easily display the multiple variations of the matrix display.
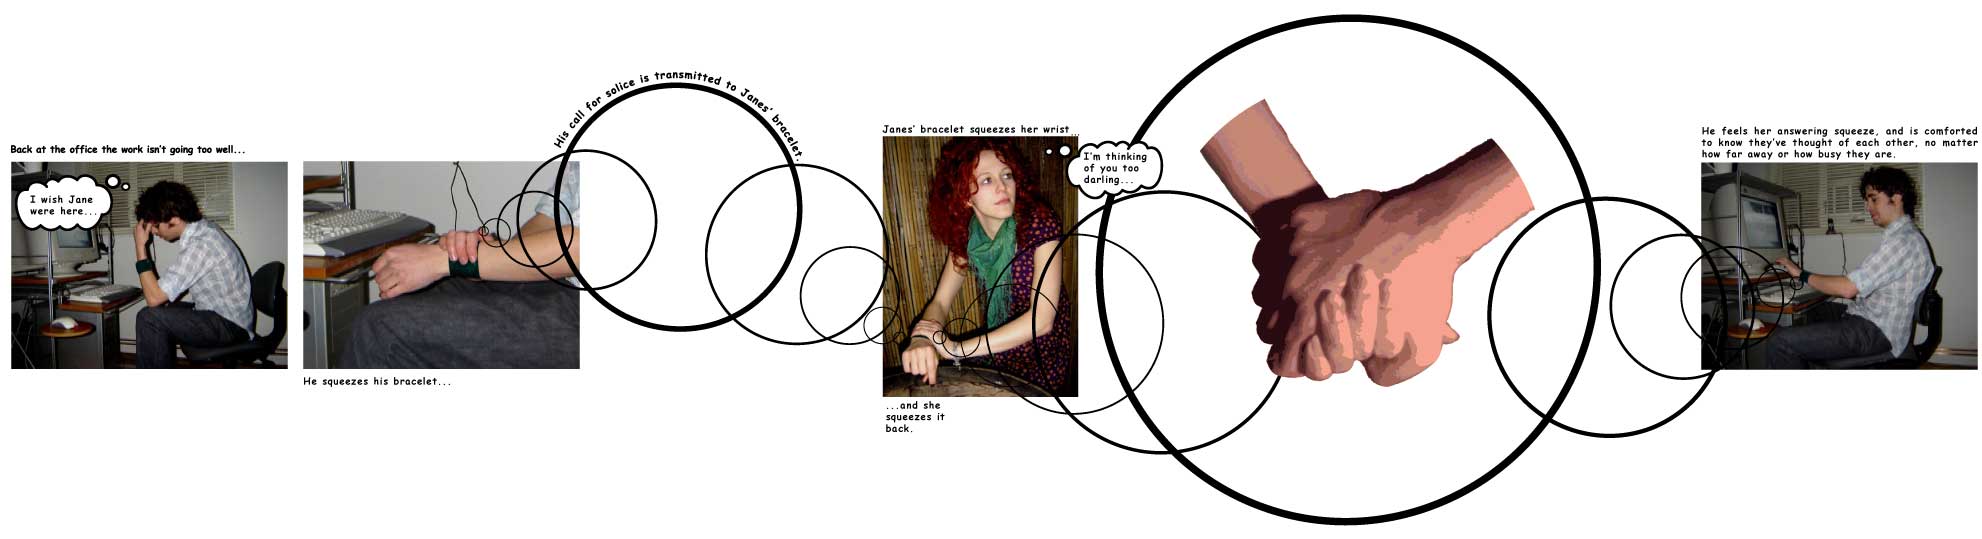
“Chrutsssh”. I put my keys into the door and open it. I just have been out for a walk again. Alone. There is nothing else that one can do outside these times. I close the door and put up my jacket when I see the one segment being flipped at the box hanging in my hallway. I always hang it there to hopefully get a little delight when coming back home, just as I did right now.
With a smile on my face, I grab it and take it to my sofa. ‘Who might this be?’ I think. The small black box lies in my hands. One of the dots is flipped which means I got one message. I press the small button that is located on the case. Immediately the dots start flipping. It is the brief moment of excitement, of anticipation of what is about to come! With a brief sweep, I see the “message” in front of me appearing. It is an abstract symbol — the message is neither text nor an image, it is something that I have to interpret. A shape that somehow makes me remember a vacation I had with my brother. I press the button again and it disappears, again with a gentle sweep.
Usually, I have the device standing on my table. It is a reminder that, even though it sometimes feels like it, I am not alone, that my friends and family are still around. The clicking noise every now and then feels like someone else is in the room, rummaging around. Of course, it annoys me sometimes, but that is the downside of living together. Compromising that we have to listen to each other’s day-to-day behavior. So, in some sort, I even appreciate being annoyed by it as it keeps me in a social space.
A couple of my friends also have such a device at home and often it is not enough to abstractly be connected. We then connect simply via one of the many video communication services that constantly float around these days. As it is not an official meeting we never really have a specific time set, but we started a new habit: Every time one is ready to meet, they double press the button, initiating a ring, like at a doorbell, and from this moment on, every device of everyone who is part of the group starts slowly flipping each dot, once every ten seconds. It slowly fades from all black to completely yellow. Within these ten minutes, everyone is signalized that a meeting is about to begin, not seeing the exact time, but getting a feeling. The soft clicking sound lets one anticipate the get-together, filling myself with excitement and joy to see my friends again.
It is this object that does not directly improve my communication, nor does it help to get a message instantly and directly to someone else, but it gives me the opportunity to slow down a little bit while still staying connected. It gives me the feeling of comfort of not being alone.
Note: I initially thought I wanted to use a LED matrix, as it represents an abstract way of a display. However, I stumbled across this tweet and was mesmerized:
As @andreasgysin mentioned, I asked myself ‘why RGB’? I like the physical, non-digital aspect of a flip dot matrix bringing the device into a more physical realm while also being abstract.
The clicking sounds along with the clear on and off states provide a design constraint while also playing with the object-specific characteristics that the matrix brings into the room. One can automatically hear when the screen is changing, it is not lightning up and thus destroying the lighting of the environment. It does not feel as much as another intrusive digital device while at the same time fostering communication. It represents to me the perfect intersection of digital and physical.
The current pandemic situation restricts our social life massively. In my personal situation, I have not yet met any of my fellow students in person, as I am not able to even go into the same country. We are not able to meet with people physically — social distancing is the overarching theme of the current social life. The only other means of communication are over text, phone, or video calls, leading with the provider Zoom.
We are able to directly communicate with each other, exchanging stories, but the subtle nuances that are so important for communication are missing. We are missing out on the feeling of the presence of others in a room, we are missing out on the feeling of touch, we are missing out on the brief moments of anticipation before and after we meet someone.
In this project, I want to explore a way of communicating with one another but on a more subtle level. I hereby have set myself some guidelines that I would like to keep in mind:
It should be a way of communicating that is not directly happening (e.g. no Zoom, text message, etc)
It should inherit a more emotional message but it should not be dedicated to a romantic relationship
Preferably it should happen asynchronously
Preferably the outcome should be a tool that people are able to reproduce and therefore are able to use in their communities
It might work in a semi-public or even public environment, thinking about the hallway of a shared apartment or office space
It should not be a tool of communication that only works during the ongoing pandemic but that eventually could live even beyond that
Research
Here is a list of projects that I think are interesting, that are touching the same realm:
Knock Knock / 8h Ahead by Takram: Knocking on the screen echoes a knocking sound on the counterpart object as well, imitating the subtle nudging a colleague asking or advice.
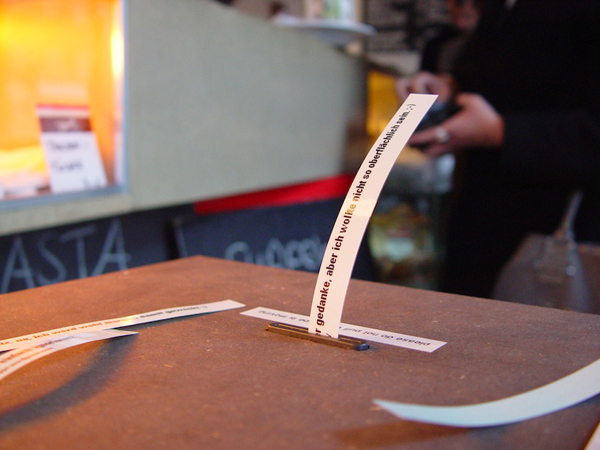
Little Printer by Berg Cloud: A little helper, printing out your personal feed on thermal paper, this could include newspaper articles, tweets, sudokus, etc. Unfortunately, BERG shut down in 2014, and thus the servers for the Little Printer as well. Last year Nord Projects built their own communication service on top of the old hardware.
Complementary Media / Discomfort Zone by IDEO: IDEO did a couple of experiments that could be done with machine learning. One of my favorites of this series is the Complementary Media which includes photos of one’s face to display emotions more deliberately and personally than emojis do.
LittleBigPrinter by Olivier Brückner: A small printer that is focussing on the semi-public space where it is set up. It directly prints out messages sent to it, bringing back communication similar to letters yet still being instant.
Squeeze by Thomas Thwaites: A small bracelet that lets one ‘squeeze’ the counterparts arm, giving the subtle feeling of comfort.
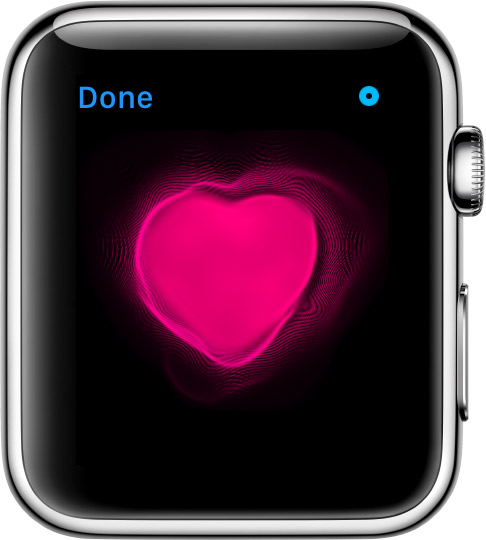
Digital Touch by Apple: The app lets people interchange small sketches and emotions. Most interestingly it is also capable of sharing the heartbeat of a person, bringing a new level of intimacy.
default to public by Jens Wunderling: A project in which tweets within a specific area get printed near that area in a public space. It is a nice way of bringing the digital back to the physical.
Questions & Approach
I wonder, which ways of communication inherit the feelings I want to cover. Is it about facial expressions? Is it about the anticipation of someone who is ringing the doorbell and you wait until this person arrived in your apartment? Is it about the ‘slight discomfort’ that sometimes is created in a room when a specific topic is talked about?
In my project, I want to focus on one of them, creating a device that allows for one more interaction, one more way of communicating between two or more people. It might not necessarily be a useful tool, it might be something that solely raises the question of needing to focus on different ways of communicating than we are used to today.
Ideal Concept
FREKVENS by IKEA is an inspirational form prototype, displaying the abstract box and LED matrix while only being a tool to communicate the emotion.
I am currently thinking about a small box that is portable and can be set up on a table or hung up on a wall (inspired by Teenage Engineering’s Raven). It only has a LED matrix display, a tactile sensor or button, and a small speaker. It is connected to a few other boxes or people, selected by the user, representing only a small friend circle (inspired by Christoph Labacher).
Similar to a
It would involve a couple of interactions:
Tapping → sending a brief “hello” to a friend
Anticipating a call → resembling a doorbell, blocking while displaying the time until a meeting starts
Sending (abstract) messages → recorded through sound then displayed abstractly via the LED matrix and transformed sound, echoing the sub-tone of the message, not the direct message itself
Small LED → display that a message has been received
Long Press → echo received messages so far
MVP
A small prototype, built upon a raspberry pi. Maybe with two devices, but probably with only one that is communicating with a website a.k.a. the virtual counterpart device. The display itself could first be represented by a screen on a website. I would want to explore the elements step-by-step, slowly building upon each other, and see how far I would get in the terms of complexity and features, starting with tactile sending ‘hello’.
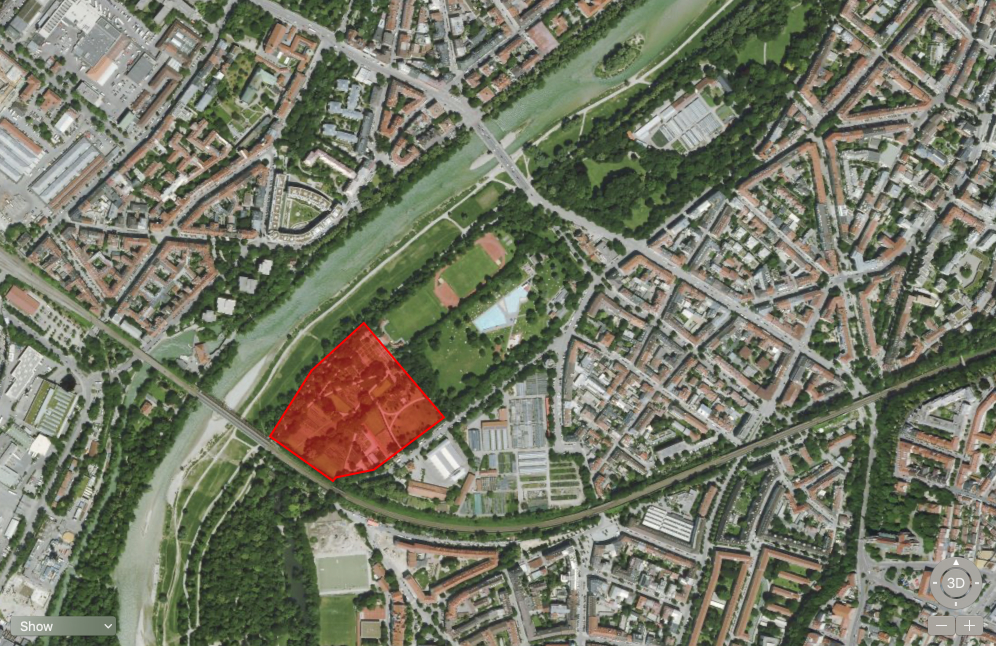
This morning, I went for a walk in my neighborhood. Eventually, I arrived at a park area right around the corner I have never been before, which kind of seems weird, as I grew up in this city, live in this apartment for three years now, and go for walks daily.
It always fascinates me, how I still discover new things, even though I have lived here for so long and I wonder what else I might have missed. It always seems like I know this city inside-out but today had proven otherwise again.
Concept
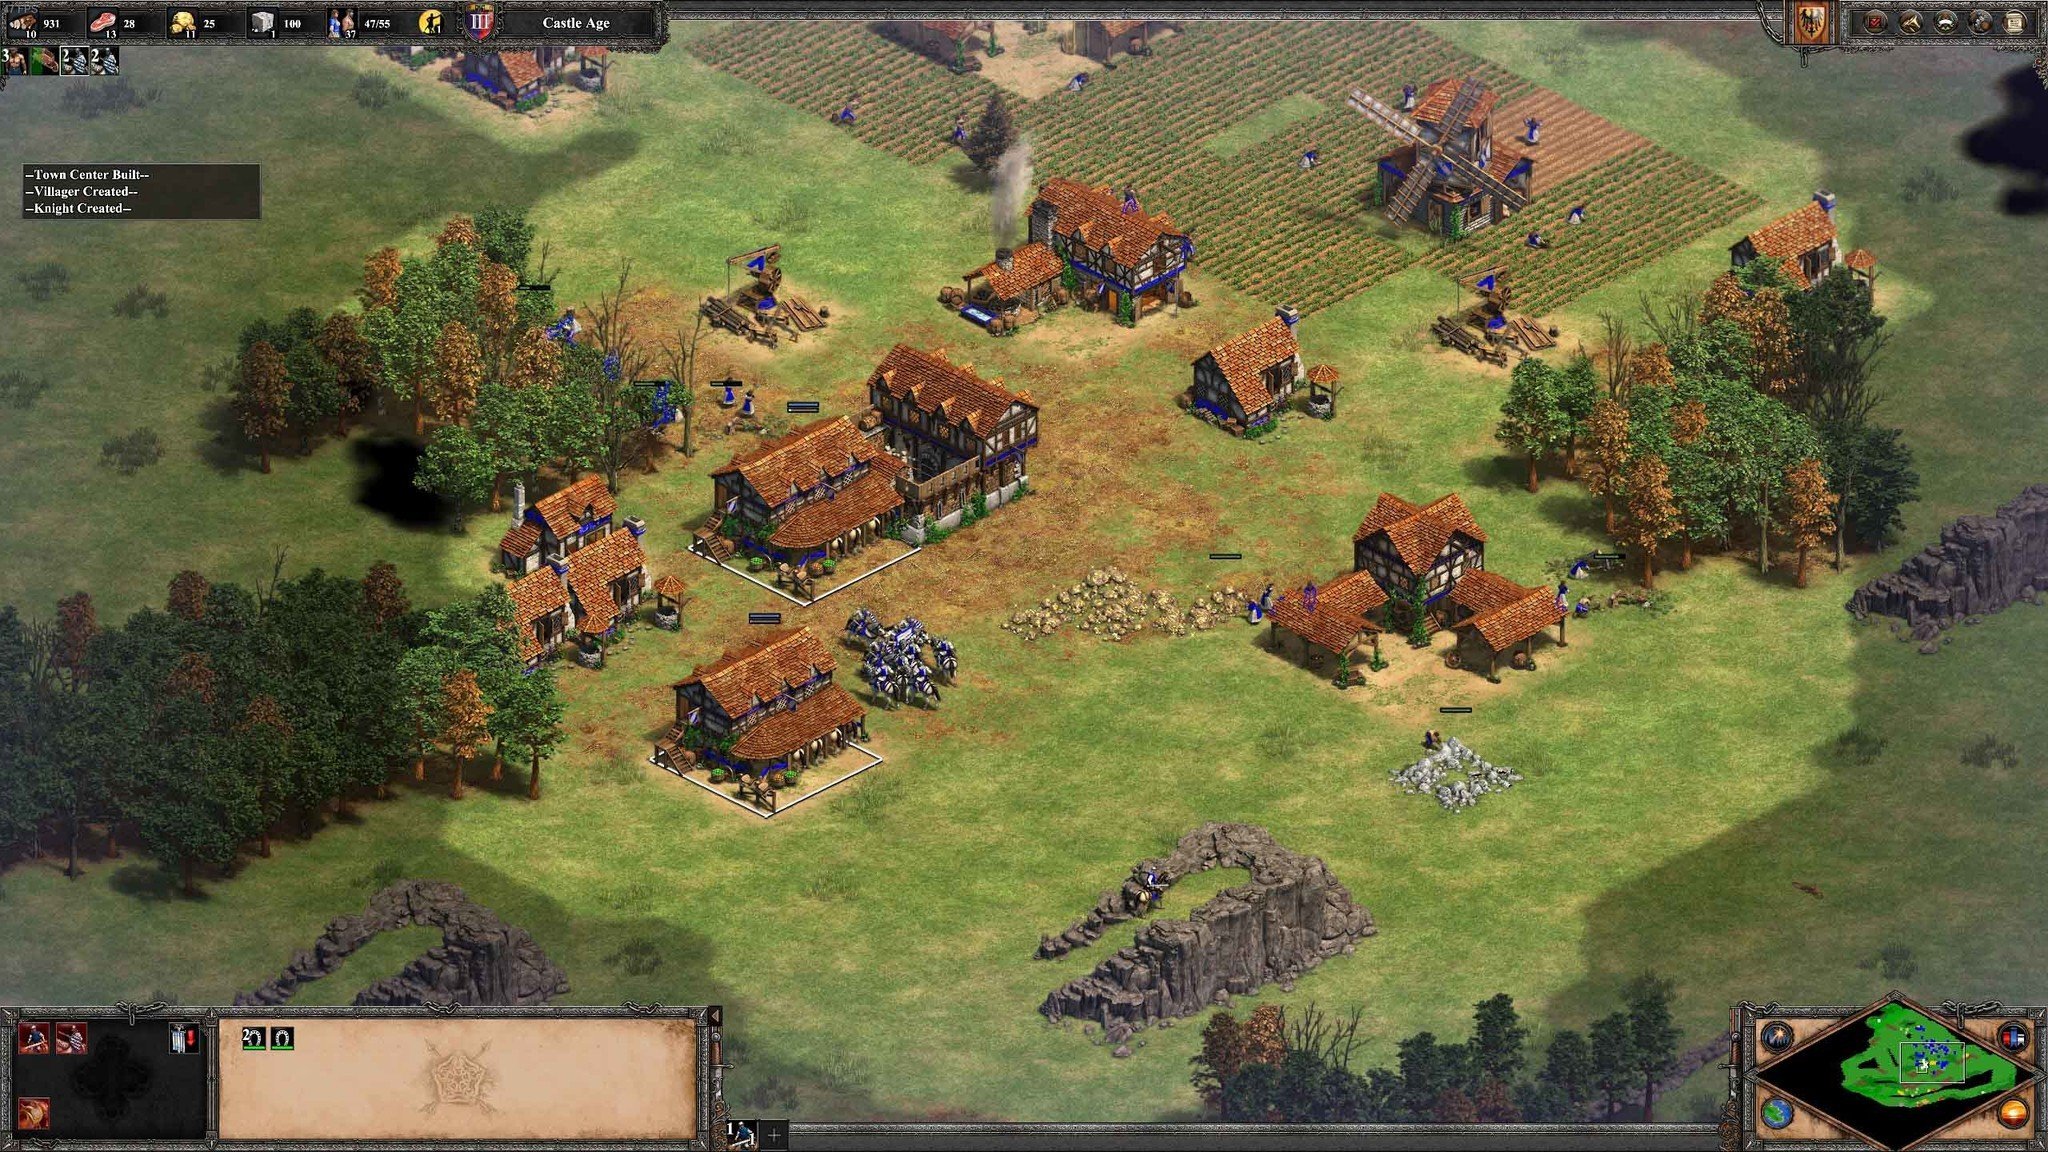
I often have to think about the gaming map from real time strategy games like Age of Empires. One can only see the areas on the maps one has already visited. I would love to have a similar map for my life. A map that only shows the areas I have been indicating where I have not been yet. Maybe also with areas disappearing again that I have not been for a while.
We often have in mind places we visited in a large scale. We know the countries we have visited, maybe the cities, but often we forget the very local areas. So when is the best time to discover your neighborhood if not now?
Process
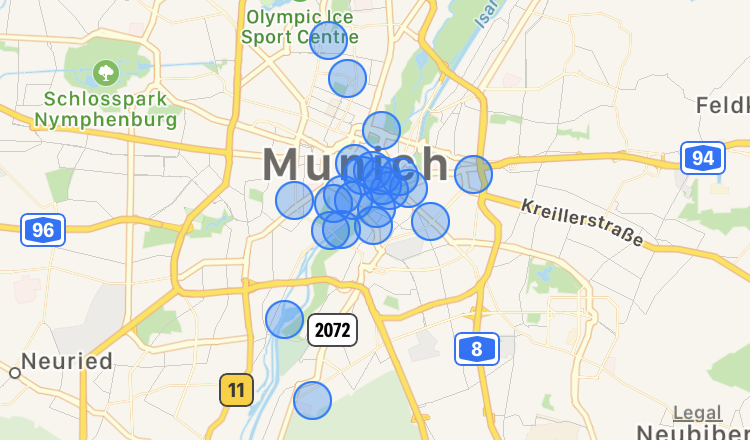
Since Google Maps and my iPhone are anyway tracking my location, I figured I could use this data for my prototype. However, I have disabled tracking for Google Maps and the data from my iPhone is fairly broad and I would need very granular data to fulfill my concept, as it seems to me more important to know which streets I have been to.
This whole data collection raises in me the question, what would be an ethical way of generating this map concept without relying on 3rd parties that would have access to it to take advantage of it? Would that be a tracking service that guarantees privacy? Would that be a manual process one would have to do after every walk, reconstructing the routes one did walk?
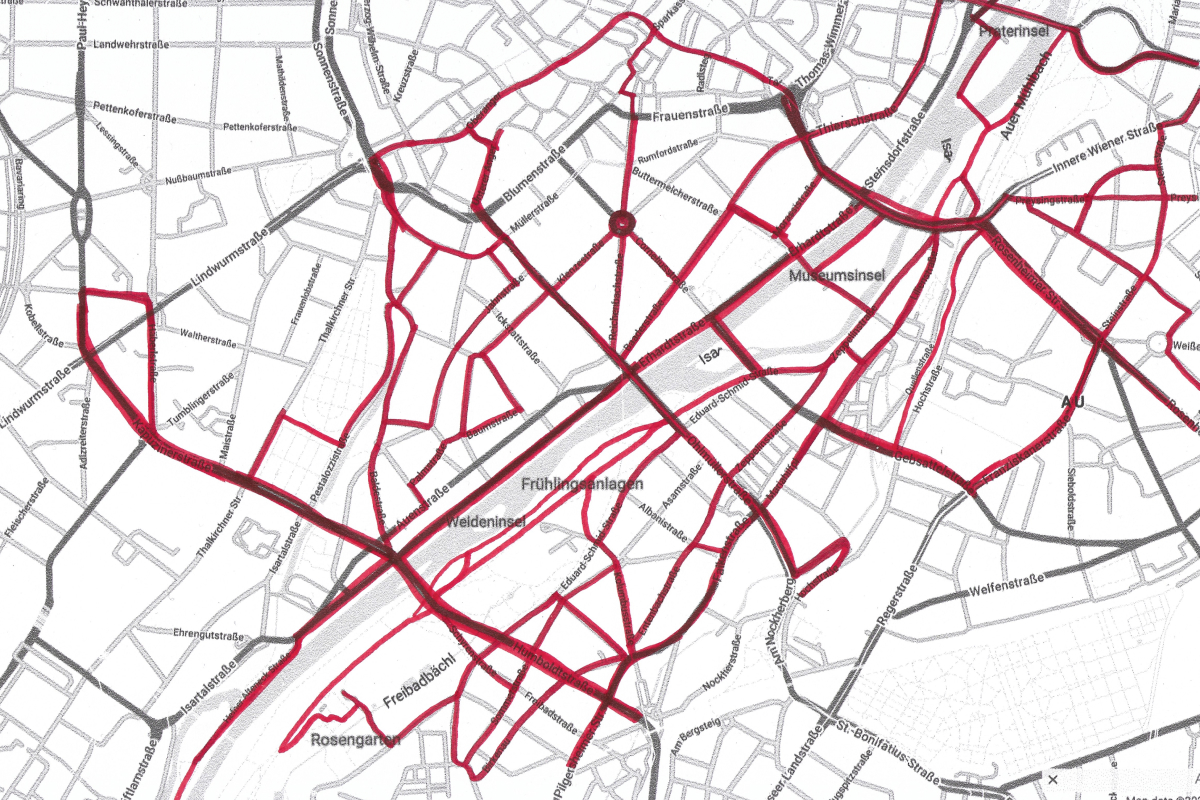
For now, I think the best prototype to test the concept is to simply print a map of my neighborhood and mark the streets I have been to with a pen, making it as local as possible without having tech giants accessing my data.
Printing out the first screenshot, I realized that especially the area I have been discovering today is not visible on the printout. On Snazzymaps — a website that allows styling — I found a black and white style but without labels, but that is hard to navigate so I decided for a black and white version with labels to start of my prototype of the streets I have been to recently (out of my memory).
Prototype
This is the map prototype. Of course, it is just a rough sketch, but even this simple prototype displays the potential of all the places I still have to discover (as a disclaimer, I just marked the streets I have been to recently, within the last one or two weeks). Now I can use this map as prompts where to go next time and updating the map accordingly.
The next step would be to automate this process, lay it upon to a digital map and maybe even set “where I want to go” pins in Google Maps, prompting myself to discover new areas.
Reflection
Finding a process that includes the intention without relying on generated data is hard but necessary. I first thought about a more programmatic way (of course…) to create the map, but this would have meant either to create a database to save the paths to not need to create them to draw over and over again. This would on one hand take a lot of time to create, on the other hand again would save this data in a fairly public spot. A paper prototype in this sense seemed to be the best and quickest way to test the concept.
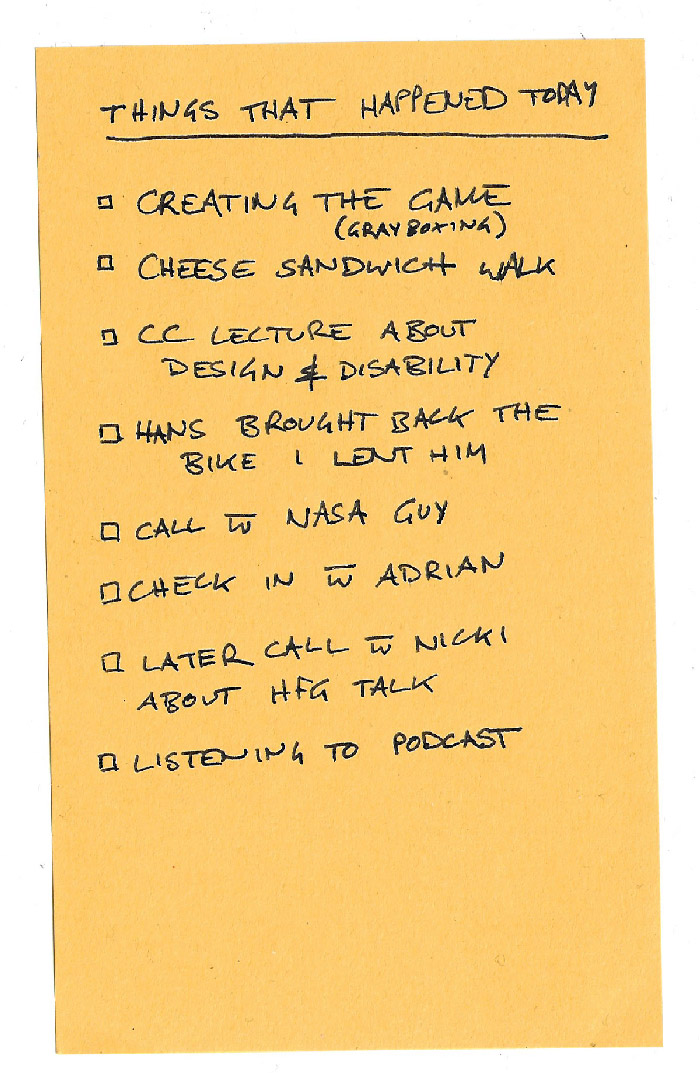
I briefly had a chat today with my friend Hans. He encouraged me to use physical techniques instead of always code. Thinking about today and how much I have been coding due to the CC assignment, doing something physical seemed like a good idea. This is why I am trying to use pen and aquarelle today. To get into the drawing mood, I am listening to his music (which I can totally recommend by the way).
This could be a good method to also loosen up myself a little, hinting to Wesley’s comment from yesterday.
Concept
I wanted to capture my experiences of the day in a sketch. Like a diary entry, I wanted to capture the most relevant aspects of today.
Process
I started with a list of prompts that seemed to be worth capturing:
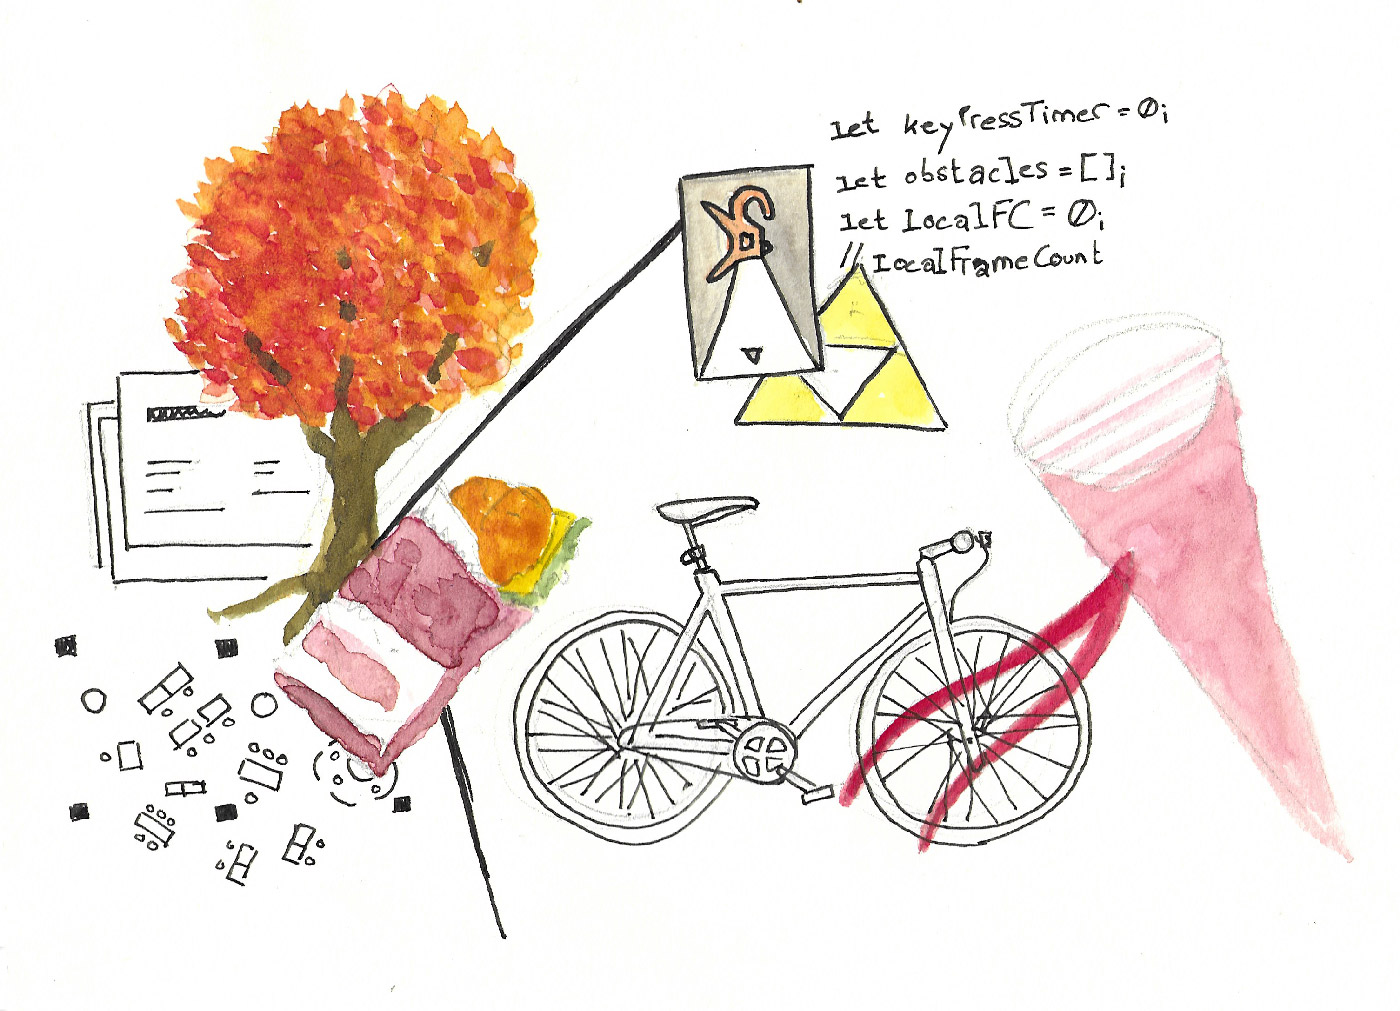
And then started right away drawing. I decided for a mixture between colorful aquarelles (as I enjoy using the technique) and clear iconographic line drawings. A mixture between two worlds.
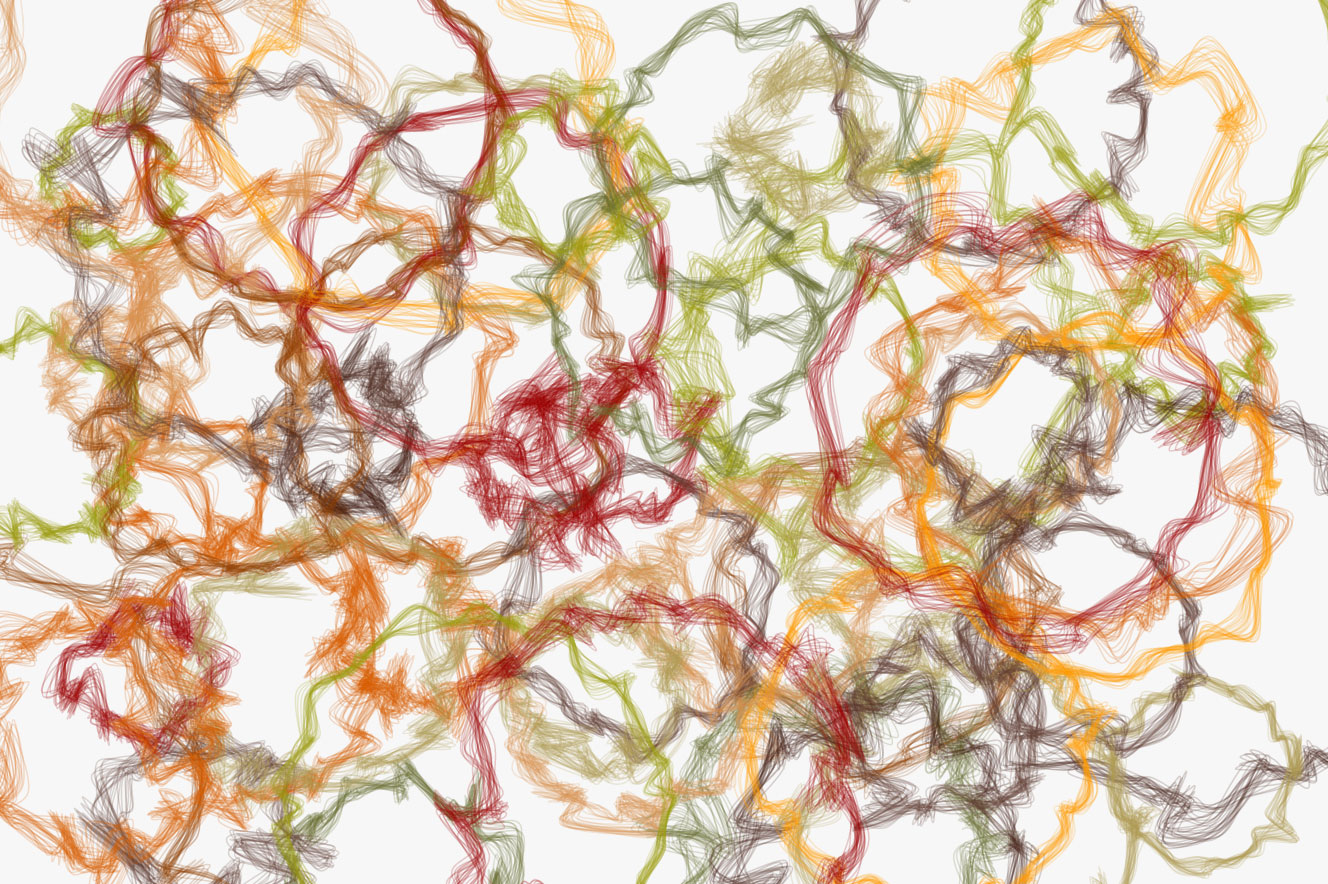
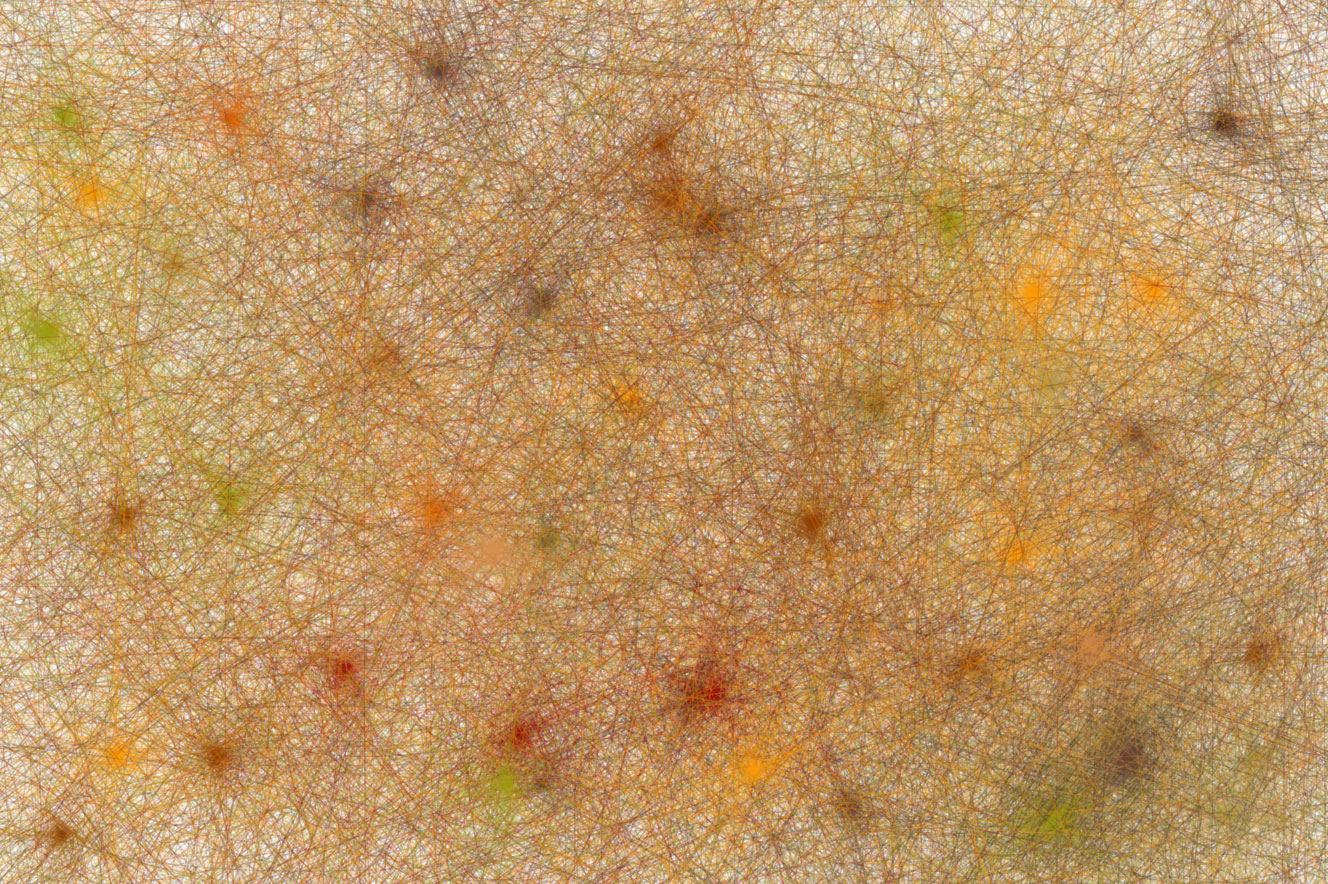
After having done the sketch, I thought of creating a similar effect in a more randomized manner and scribbled the icons again, along with brush strokes, adding them to a P5 sketch (it seems I cannot live without code..).
Outcome
Try clicking to iterate the image. You can edit the sketch here.
Reflection
It felt liberating to use physical tools again. Not being able to adjust the piece again feels uncomfortable for me, but exciting. Also I am not quite sure if I like the quick P5 sketch, but I also do not dislike it. I definitely want to, need to try out more projects that are less constrained by myself.
In a brief chat today, Wesley Chau told me that he would love to see how I would “embrace chaos”. He hit me on a nerve there. Being a designer by training, I am used to work against a problem, finding a solution within the constraints of feasibility. It is hard for me to work without these boundaries, to find something new, to sympathize with the unknown. This is the reason, why today I want to embrace the chaos.
In the past projects, I see code (as my personal interest) as an emerging theme. That’s why I want to have it as the baseline of this project as well.
Concept
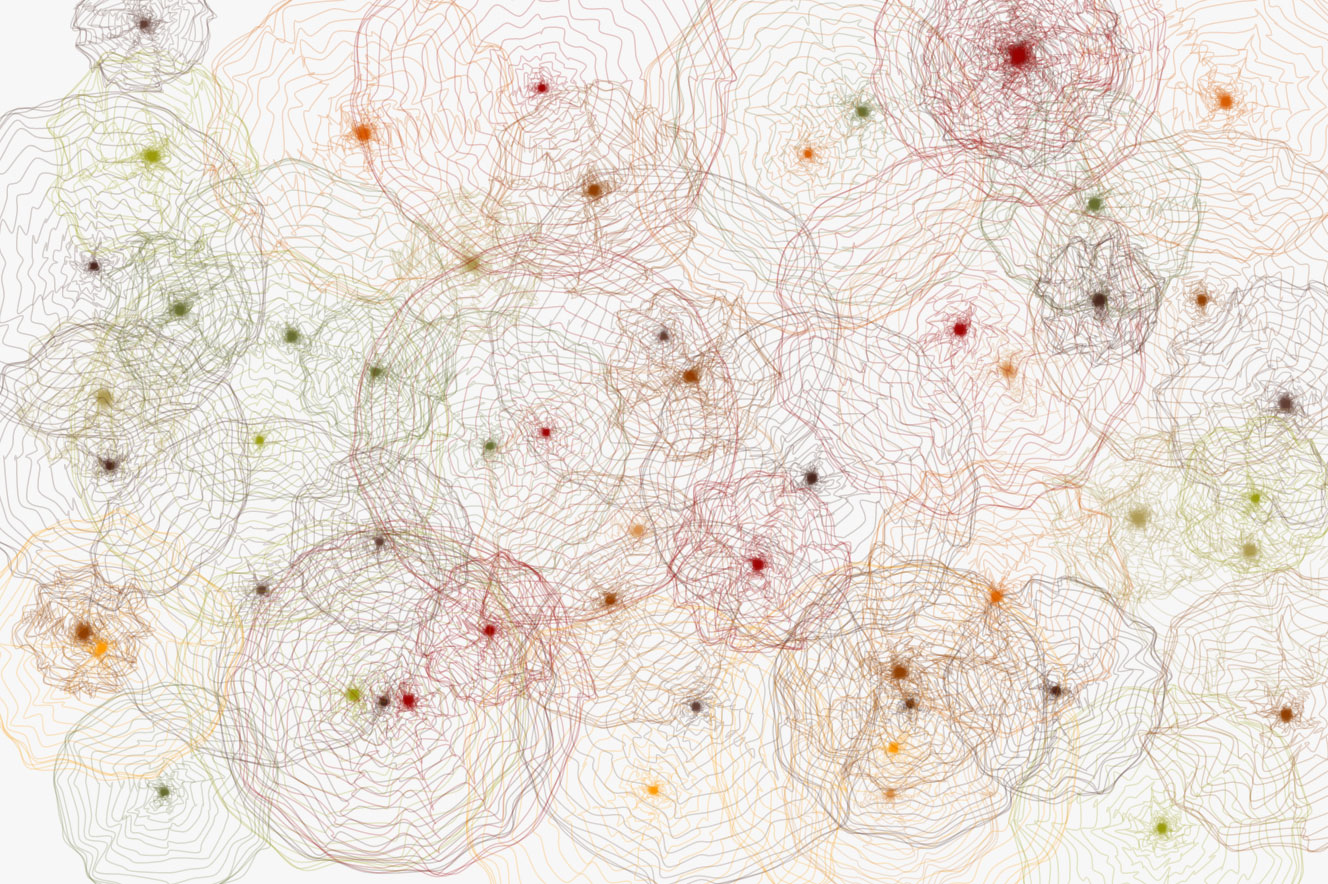
Autumn has arrived in Munich. The leaves have cover the trees in a beautiful red-orange-brown-green spectrum. I want to use generative art as the metaphor for the unknown. A generative art piece, that is inspired by the colors and overall aesthetics of the autumn nature.
Process
I selected a couple of colors which cover the visual scheme of autumn in a way that I think represents it best. Clicking on the canvas should generate an abstract leaf, falling off a tree. Circles in different sizes and speeds should build up this metaphor, however the images generated seemed too sterile to actually represent the same feeling of trees and leaves. Test it out in the canvas below ↓ or here.
It should look more like a sketch, a hand drawing to represent the organic natural irregularity of trees. The book about P5 Generative Design has some interesting sketches, especially something like the shape generators such as this one.
Here is the first sketch of this principle, using a random shape around the mouse click position.
I did not like the circle shape, so I added growth relative to the iteration (shape) count.
As this was too messy, like multiple spider webs, I decided to grow it inwards to be able to control the size better.
This felt kind of like an aesthetic I like, as it looks like a forest, looked at from above. As a final step I decided to increase the lines in between/the circles within a “tree”. In addition, I added automated, random tree generation to enforce a more generic image.
Outcome
Try clicking to add a tree or pressing delete ⌫ to empty the canvas again. You can edit the sketch here.
Today is the change from Summer to Winter time in Europe. The light outside subtly is giving an indicator what time it currently is. This indicator gets shifted and one needs to adapt to the new metrics again. For me it always is a weird feeling of being in between the two times, so I thought I wanted to dedicate today’s project to the shift.
Concept
Instead of having a hard cut off the one hour, I want to experiment with a clock that runs with either 23 hours or 25 hours of a day, to display the change but more subtly. It thereby should not reduce or increase the amount of hours, simply increase or decrease the time slightly.
Process
I decided for the typical Braun Alarm Clock as it is one of my favorites.
Playing around with the different times and understanding again how minutes and hours are calculated, helped to understand the concept of time again better. To indicate the slightly adjusted time, the currently passed seconds are mapped onto the whole amount of seconds if the day would have either 23 or 25 hours, yet still displaying on the clock just 24 hours. This way we are able to read the time as we are used to, it simply seems to pass slightly faster or slower to in the end meet with the correct one again. This helps to (for at least the day of the change) smoothly transition into the right time, while the light is just slightly off to the previous learned behavior.
Outcome
The final clock displays the current time either on the summer time shift, winter time shift, or regularly. A small text on the clock face, indicates what time is currently shown. By clicking space one can toggle between the three modes. You can find the sketch here.
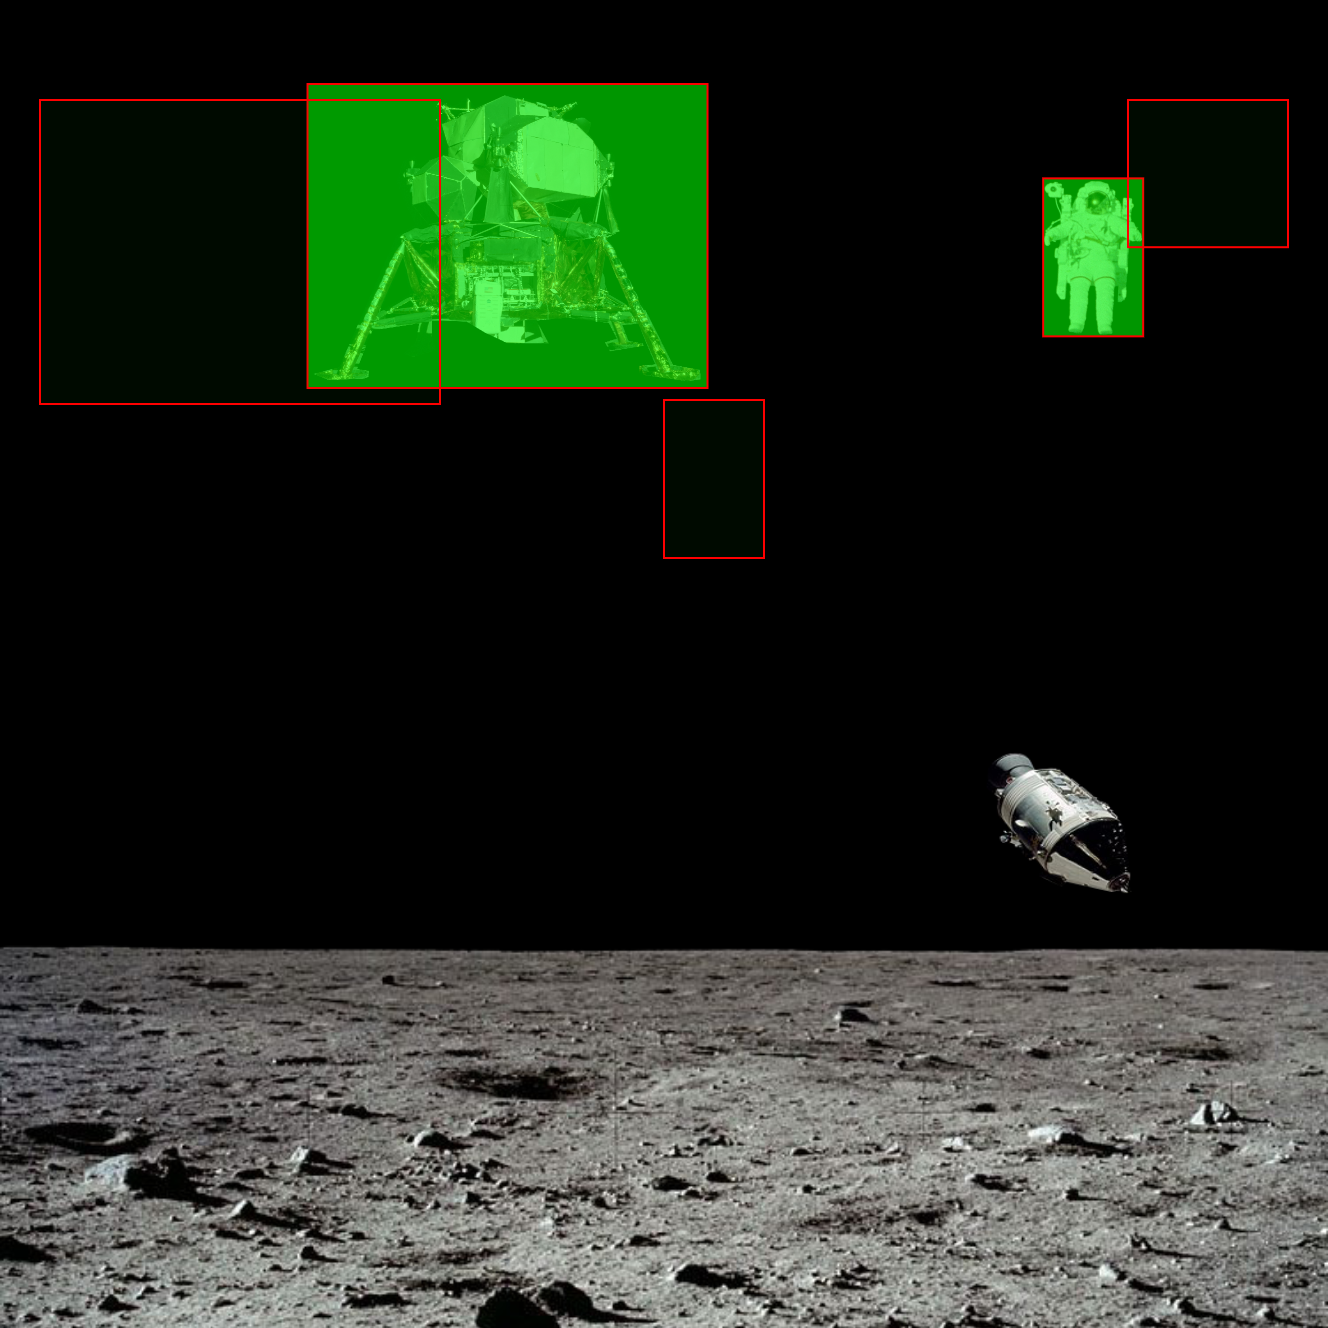
Being fascinated by space and space travel, I decided for today to create a moon landing scene in p5. A simple sketch in which objects are pulled down by the Moon’s gravity.
Process
I am inspired by Wesley Chau’s project and the usage of photographs of something real, put together so oddly with the plain white background. This will be the baseline for my objects.
The intention was to simulate the gravity on the moon with random space objects, that float around and bump into each other. To achieve that, I experimented with a virtual gravity and collision.
Intentionally, I wanted to have the elements also be rotating to simulate the space feeling even more, but this destroyed the boundaries so far (I need to figure out a way to do so). Also sometimes the objects are overlapping, which then destroys the collision concept. I used red boxes as prototypes (see image above ↑) for the images, to know when they hit each other, to have a better visual representation of the hit-box. Also the courser should be able to push the elements around.
My concept for today is about distortion. How do perspectives getting shifted depending on the angle we look at them? Especially in the beginning of the pandemic, a discussion started if the numbers of infections are trustworthy or not. Different possibilities on how to look at the calculations gave different outcomes.
Process
I wanted to use the metaphor of a prism and how it distorts the view of the truth. Being super fascinated by how this website manages to subtly changes the perspective of the truck when scrolling. It adds this natural feeling of a 3D object. Wanting to understand three.js, I took this opportunity to go a little bit deeper into this field, trying to understand how it can be used. I started with a gray cube to get the principle of rotation right. It was a little try-and-error to find the right parameters, so it somehow feels natural.
After that, I focussed on the refraction, the element that displays the distortion of the message. I played around a lot to find the right refraction from a code perspective.
I created a background, initially saying “what is the truth?” to be distorted by the prism, however, the focus then only lied onto the middle, the word “the” which does not seem promoting the purpose. Thus, I decided to only use the word “truth” in the center. The resulting shadows and sometimes visible and sometimes not visible word support, in my opinion, in the ambiguity of what is told to us by the media quite well.
Outcome
I used the font redaction as I think it underlines the message of hiding information but also displaying it, leaving the reader in the unclear if it is actually the truth or not. You can find the code for this prism here.
First of all, it feels like I want to use code as the medium of choice. I could imagine to experiment with the YOLO framework, do a little hardware computing experiments using radar, or finally explore 3D rendering in the web.
Somehow this blog is also a first experiment, as I never used jekyll before to create a website and wanted to see how it works, yet it feels too close to something to use, without an interesting concept.
General ideas I am playing with in my head so far:
Somehow making use of machine learning, probably with ml5js
Maybe the best way is to set myself a set of parameters? Something like “every day I will create one generative art piece that is created through physical sensors”. Or just physical sensors in general.
Concept
As I think, given the current situation with Covid-19, it is interesting how we communicate or how communication would need to change to feel more present.
So, what if a camera would only be rendering a sharp image if someone is close to it, making it visible for conversation partners if one is “present” in the conversation?
Process
My first experiment is to connect an ultrasonic range sensor to an Arduino, which then maps the distance to the blurriness of the camera image. To do so I want to use the Johnny Five API with a node.js server.
After trying out some variants with the physical module, I realized that it is kind of hard to get the values to the browser. Needing a translator for the Arduino anyway seems misleading as then people would need a setup to try out the experiment themselves at home. That’s why I needed to come up with a different method to calculate the distance.
Using a CLM tracker and P5, as in this example, I was able to calculate the distance between two points, getting a relative value that could be mapped onto the filter function. Having this base setup, I tried out different distances to the camera to see what would be a “natural” distance, but still force the user to come closer to the screen to look the other person directly into the eyes.
Outcome
Here is the final camera. You can test it (it only activates when clicking on it). You can find its source code here.
Reflection
For me it helped to understand that even thought at the first glance, the CLM tracker method seemed more elaborate, it was actually quicker to set up, helping me to test it more quickly. The now created prototype is buggy of course, yet still helps to see that the concept in itself works, since I constantly want to be closer as it feels odd to be blurry.
This could be a concept to be more immersed in conversations and also let one feel less surveilled when moving away from the camera during a call.
I worked as an industrial designer, interaction designer, and creative technologist for the last three years. I have learned what it means to be a designer nowadays, that it (luckily) shifted from being the person who only creates appealing forms to the person that creates systems, structures, or strategies. We as designers finally have the privilege to shape our future consistently at a large scale, the way we always envisioned, being able to tackle problems at their core. We should be aware of that power that we got, but more importantly, we should be aware of the responsibility it consequently inherits.
Through my experience, I became aware of my responsibility towards our society and I want to take it on consciously. I want to use this privilege to create a world in which everyone is welcome, in which we take care of each other and also the environment. It is wrong to design solely for profit. It often enforces the scarcity of resources and discrimination of people. We cannot tolerate this and need to adapt respectively.
As I am personally deeply interested in technology, I want to use this excitement to build up my expertise to be able to bring this topic thoroughly into the conversation. Technology is in my opinion a tool, a tool that can be used benevolently but also maliciously. It is not always easy to understand the blurry lines since the consequences are not necessarily visible immediately, especially with constantly emerging developments and inventions. Everything I create should therefore aim to either create the usage of technology with a clear conscience helping to shape it or to enable others to understand technology more thoroughly, through usage or provocation, so that everyone can make informed decisions.
I dedicate my work to designing a world without harm with an emphasis on technology, either by creating it myself or by empowering others to do so.
This is my first entry, trying to figure out jekyll.
As we should document our process in a blog, I thought that this might be a good opportunity to finally learn how to create a basic blog structure using jekyll within GitHub-pages. So please find the repository here if you are interested in seeing how it is set up.
This blog will develop, depending on the projects it will contain. I intend to add features accordingly.